
How to Make Camembert Cheese at Home (Step-by-Step Recipe)
Camembert is one of those cheeses that feels slightly wrong the first time you make it.
Most of us spend our entire lives throwing moldy food away, then suddenly we're intentionally growing mold on a wheel of cheese and hoping for the best. If you're feeling a little nervous about that, you're in good company.
The first time I made Camembert, I was convinced I'd done something wrong. The recipe said white mold would grow, but some of mine looked fuzzy while other spots looked flat and matted. I spent days staring at it every time I opened the fridge.
One evening, after asking approximately 20 times if everyone was sure this was normal, I brought a wheel to the kitchen table where my husband and his fellow biologist friend inspected it. They identified the mold as fluffy white Penicillium candidum, which is exactly what you're trying to grow on Camembert.
We cut into it, everyone survived, and it gave me the confidence to make it again.
Since then, I've made this recipe dozens of times and learned exactly what healthy Camembert should look like at every stage. In this tutorial, I'll walk you through the entire process from fresh milk to finished cheese, including visual cues, troubleshooting tips, and the little things I've learned along the way that make homemade Camembert much less intimidating.
If you've never made a bloomy rind cheese before, don't worry. I'll show you exactly what to look for so you can trust your judgment and enjoy the process.
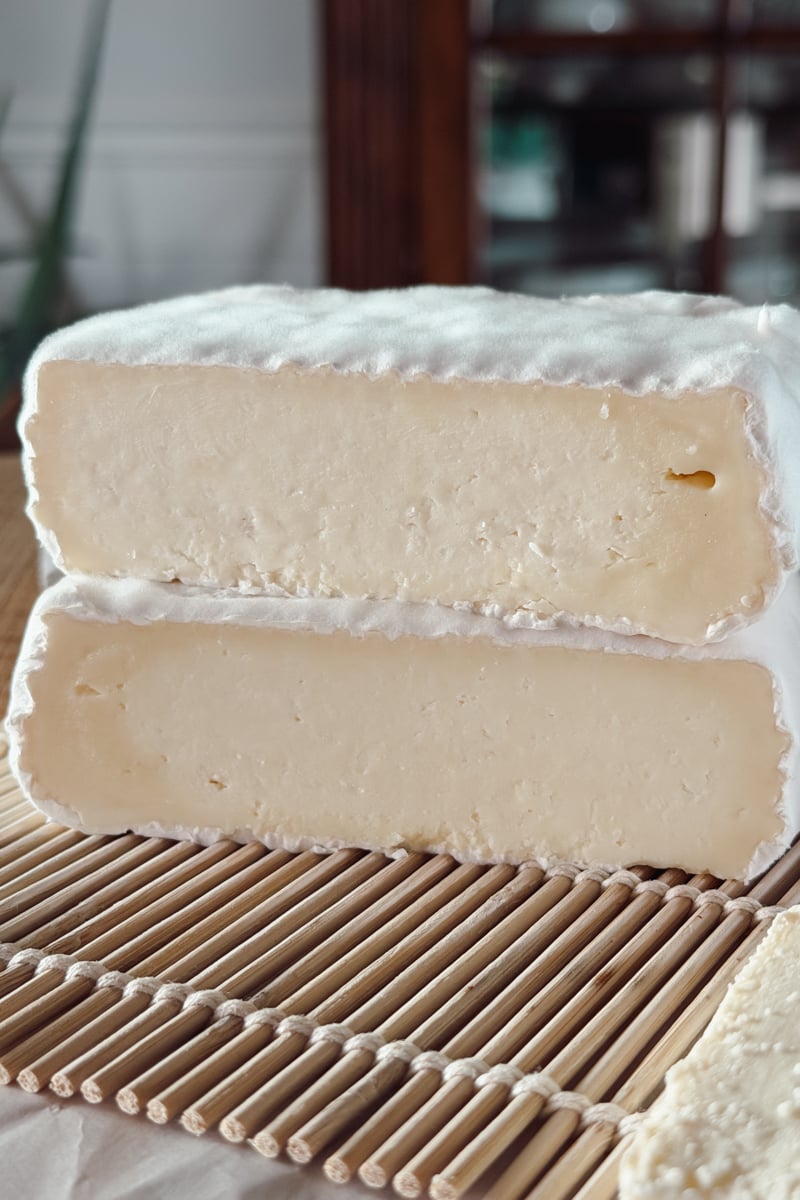
Camembert at a Glance
- Difficulty: Intermediate
- Hands-on time: 3-4 hours
- Aging time: 5-7 weeks
- Yield: 5 small wheels
- Texture: Soft bloomy rind cheese
- Milk: Raw or pasteurized whole milk (not ultra-pasteurized)
Why You'll Love This Camembert Recipe
- Rich, creamy, buttery flavor
- Beginner-friendly introduction to bloomy rind cheeses
- Uses simple cheesemaking equipment
- Includes visual cues for every stage of the process
- Can be made with fresh raw milk or store-bought milk
- No professional cheese cave required
What Is Camembert Cheese?
Camembert is a traditional French soft-ripened cheese made from cow's milk. It is closely related to Brie and is known for its edible white rind, creamy interior, and earthy mushroom-like flavor.
Unlike fresh cheeses that can be eaten immediately, Camembert develops its flavor and texture during the aging process. The white rind is created by Penicillium candidum, a beneficial mold that grows across the surface of the cheese.
As the mold develops, it slowly transforms the texture of the cheese from the outside inward, creating the soft, creamy center that Camembert is famous for.
Making Camembert at home requires a little patience, but the actual cheesemaking process is surprisingly straightforward. Most of the work happens on the first day. After that, time and beneficial molds do the heavy lifting.
Equipment You'll Need
- Large cheese pot
- Thermometer
- Curd cutter or whisk
- Camembert or Brie cheese molds
- Ladle
- Draining mat
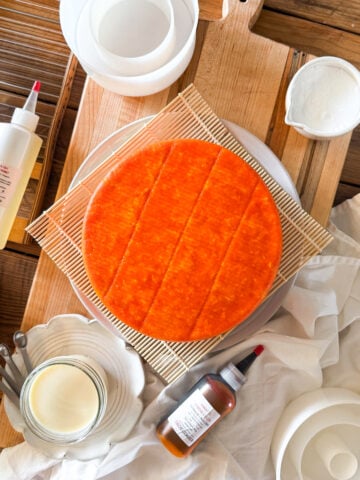
- Bamboo mats or sushi mats
- Aging container - something like this would work great!
- Measuring spoons
- Small bowls for cultures and rennet
- Wine fridge or refrigerator
👉 New to cheesemaking? For a more in-depth look at the equipment you actually need, including where to splurge and where to save your money, read my Cheesemaking Equipment for Beginners (Simple Home Setup That Actually Works).
My Favorite DIY Aging Setup
Over the years, I've settled on a very simple aging setup that works beautifully.
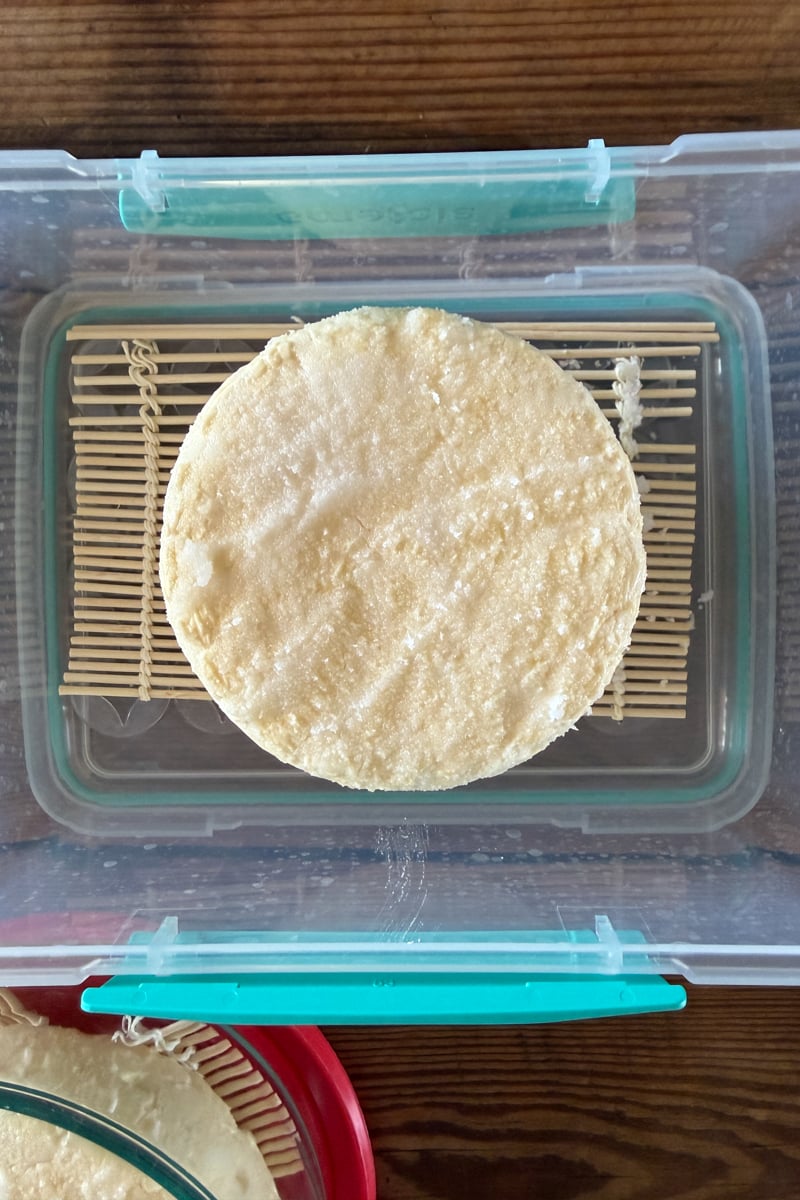
I use a glass food storage container with a plastic draining mat cut to fit the bottom. On top of that, I place a bamboo sushi mat to keep the cheese elevated and allow airflow underneath. The lid helps maintain humidity while still allowing me to monitor the cheese easily.
I age my Camembert in a wine fridge set to 54°F that I bought used on Facebook Marketplace. While many recipes suggest mold growth will fully cover the cheese in 7 to 10 days, mine typically take closer to 14 days in these conditions. If your mold develops more slowly than expected, don't panic. That's completely normal.
As an amazon associate, this post contains affiliate links, which means I make a small commission at no extra cost to you. See my full disclosure here.
Ingredients for Camembert Cheese
- 2 gallons milk (not ultra-pasteurized)
- ¼ teaspoon Camembert culture
- ½ teaspoon liquid calf rennet, diluted in ½ cup cool water
- ¼ teaspoon calcium chloride, if using pasteurized milk (dilute according to the manufacturer's instructions)
- Cheese salt or kosher salt
A Note About Milk
I've made this recipe with fresh Jersey milk straight from our family cow, and it produces the richest, creamiest Camembert I've ever tasted.
If you don't have access to fresh milk, I recommend using whole milk with a pint of heavy cream added. Whole milk alone will work, but the finished cheese won't have quite the same rich, silky texture.
No matter which milk you choose, avoid ultra-pasteurized milk. It generally doesn't form a strong curd and can lead to disappointing results.
Related Reading
👉 If you like to get a little nerdy about cheesemaking (like me!), read Raw Milk vs. Pasteurized Milk for Cheesemaking (Flavor, Yield + Results) to learn more about how your choice of milk affects your finished cheese.
How to Make Camembert, Step-by-Step
Step 1: Warm the Milk
Warm the milk to 86°F.
If you're using fresh milk straight from the cow, it will already be close to your target temperature. Otherwise, slowly warm the milk using a double boiler or water bath to avoid scorching.
Meg's Tip: I like to place my cheese pot in the kitchen sink and create a warm water bath around the pot. As the milk cools during ripening and coagulation, I simply add a little more warm water to the sink to maintain temperature.
Step 2: Add the Culture
Sprinkle the starter culture over the surface of the milk. Allow it to rehydrate for 5 minutes.
Using an up-and-down motion, gently stir for about 2 minutes. Imagine lifting the milk from the bottom of the pot to the top while disturbing the surface as little as possible.
Step 3: Ripen the Milk
Allow the milk to ripen for 90 minutes while maintaining 86°F.
- What to Expect: The milk will still look like milk when this step is finished. Nothing dramatic happens during ripening, and that's completely normal.
Step 4: Add Calcium Chloride and Rennet
If using pasteurized milk, stir in the diluted calcium chloride. Skip it when using fresh raw milk.
Wait 5 minutes, then add the diluted rennet using the same gentle up-and-down stirring motion.
Allow the milk to sit undisturbed for 45-60 minutes.
Step 5: Check for a Clean Break
Begin checking for a clean break after about 45 minutes.
To test, insert a clean finger or knife into the curd at a slight angle and gently lift.
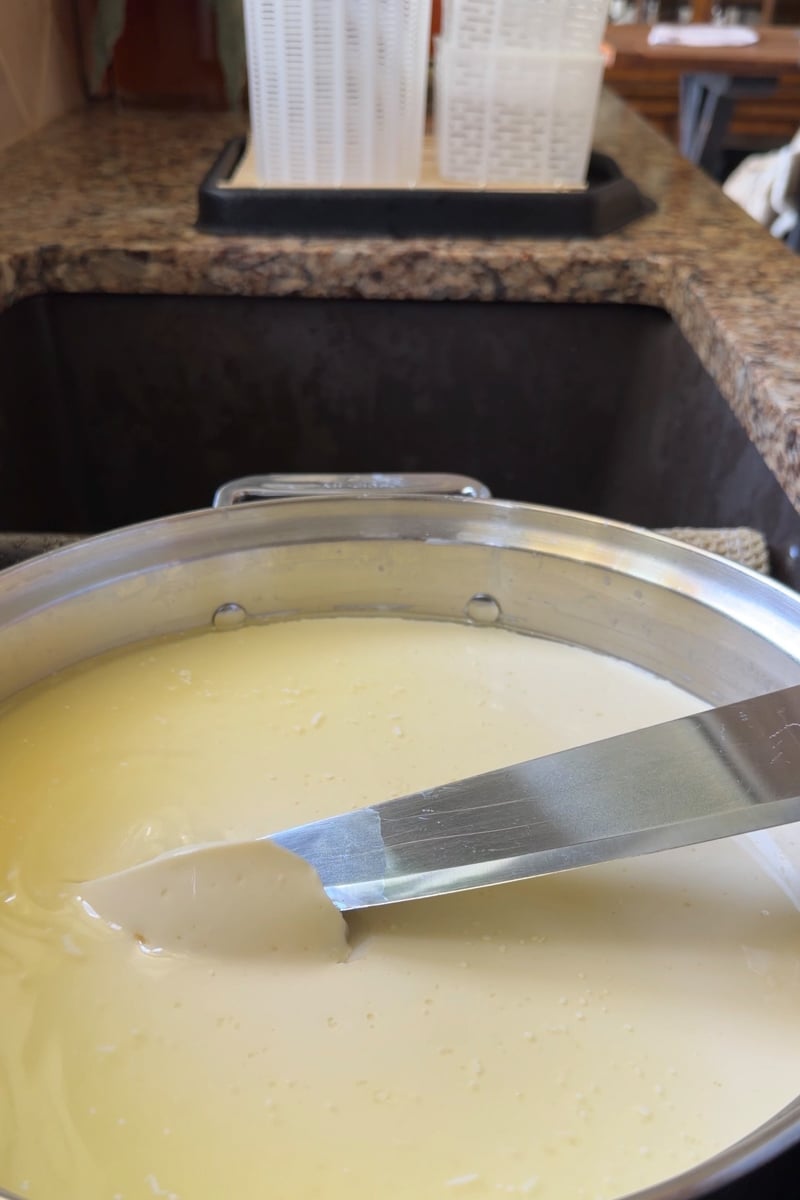
A properly set curd will split cleanly, with clear whey filling the gap.
- What to Expect: The curd should feel similar to soft custard or flan. If the curd tears apart, looks ragged, or remains very soft, allow it to continue setting and check again in 10-15 minutes.
Step 6: Cut and Heal the Curds
Cut the curd into ½-inch cubes. I use a whisk.
Allow the curds to rest undisturbed for 10 minutes to heal.
Maintain the temperature at 86°F during this time.
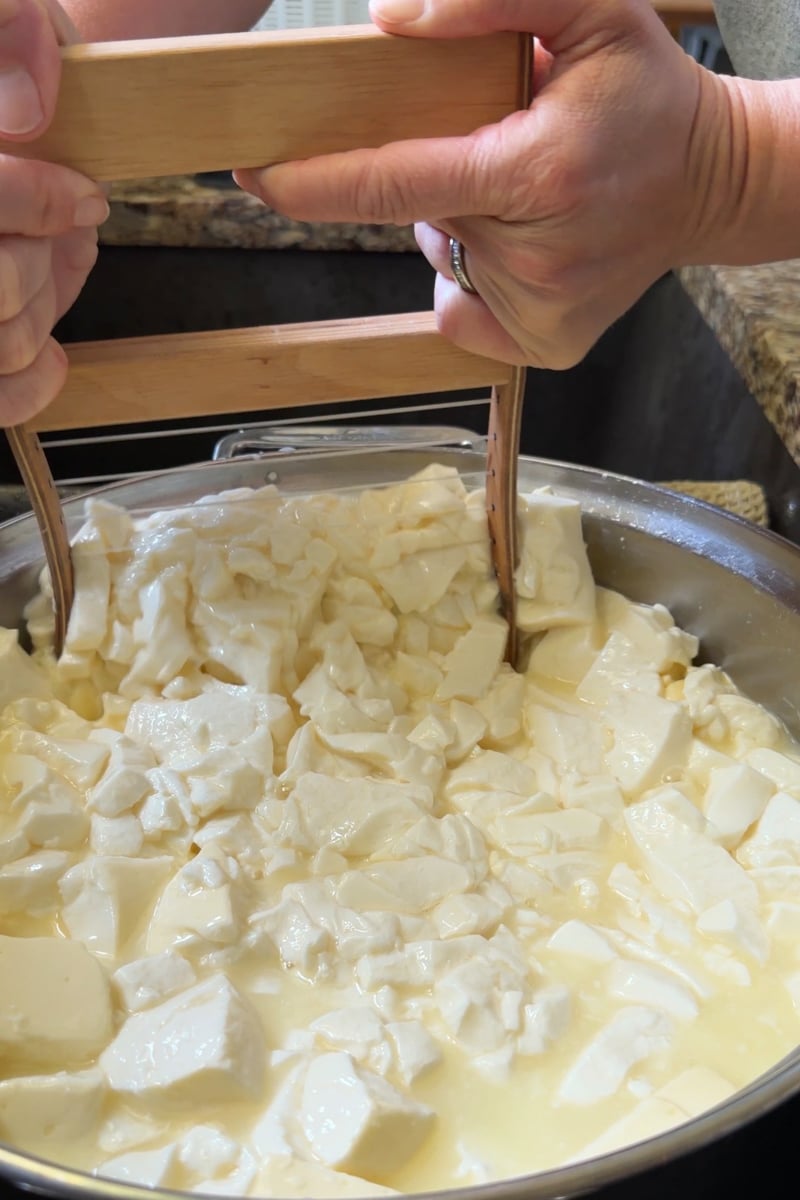
Step 7: Stir the Curds
Gently stir the curds in the whey for 10 minutes.
The goal is simply to keep the curds suspended and prevent them from matting together.
- What to Expect: The curds will gradually shrink as they release whey. They should remain delicate, so stir carefully.
Step 8: Drain and Fill the Molds
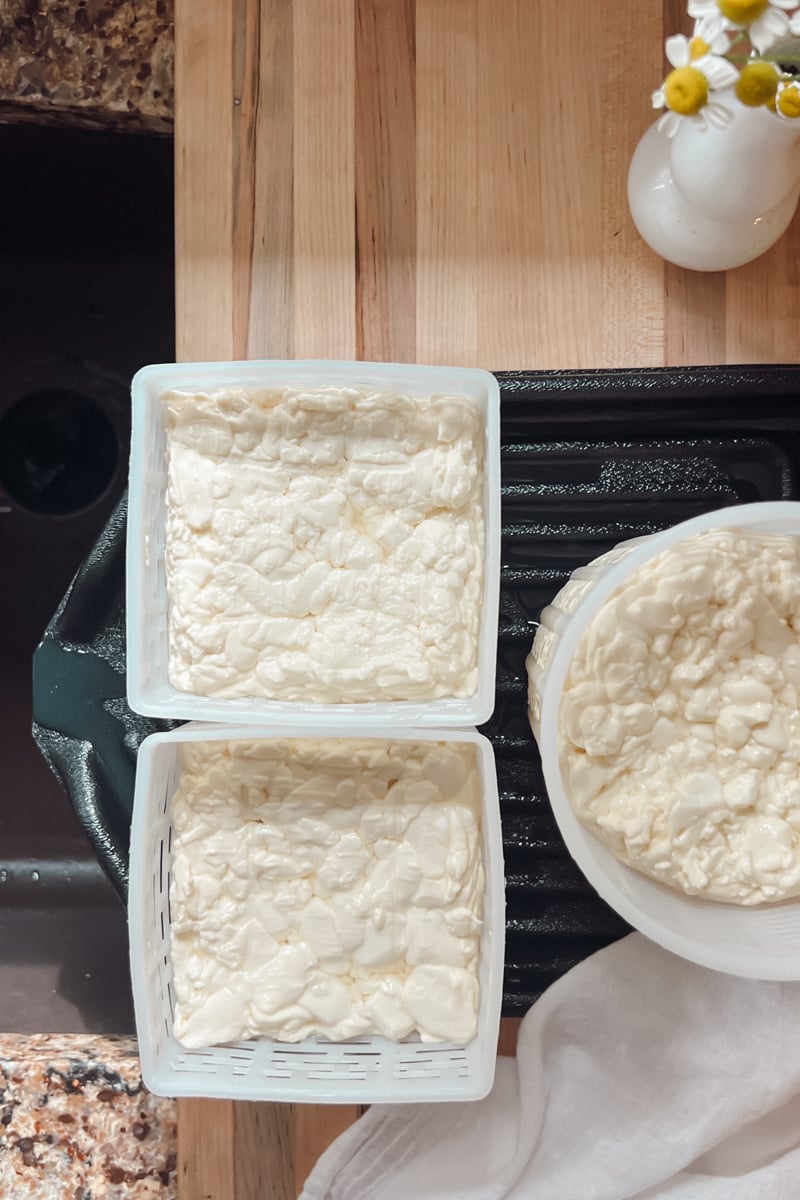
Drain the whey down to the level of the curds. Using a ladle, carefully transfer the curds into the molds.
At first, the molds will look dramatically overfilled. Don't worry. Camembert curds contain a lot of moisture. As whey drains away, the wheels will shrink considerably over the next several hours.
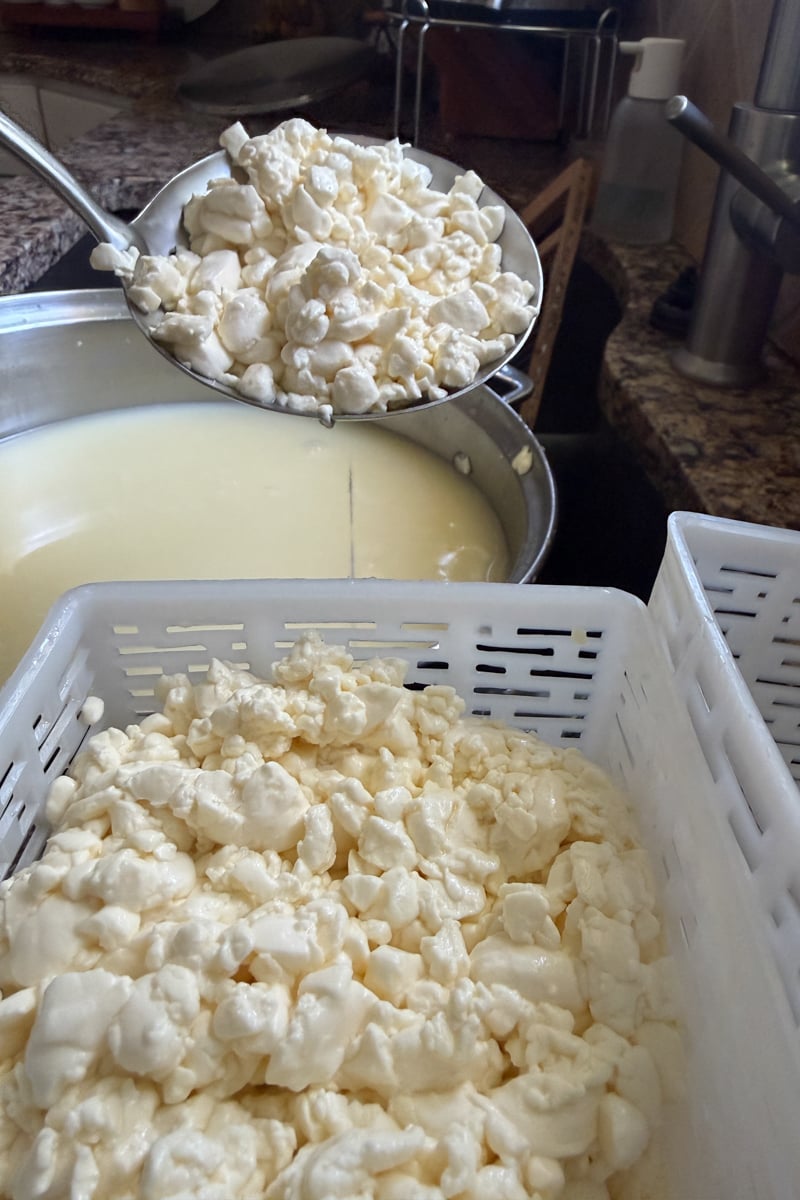
Step 9: Flip and Drain
Flip the cheeses three times over the next 5 hours. Continue draining overnight, or approximately 12 hours total.
This can be tricky at first, but you'll need to invert the cheese mold and gently wiggle it until the cheese block falls out. Then flip it upside down and put it carefully back into the mold.
Step 10: Salt the Cheese
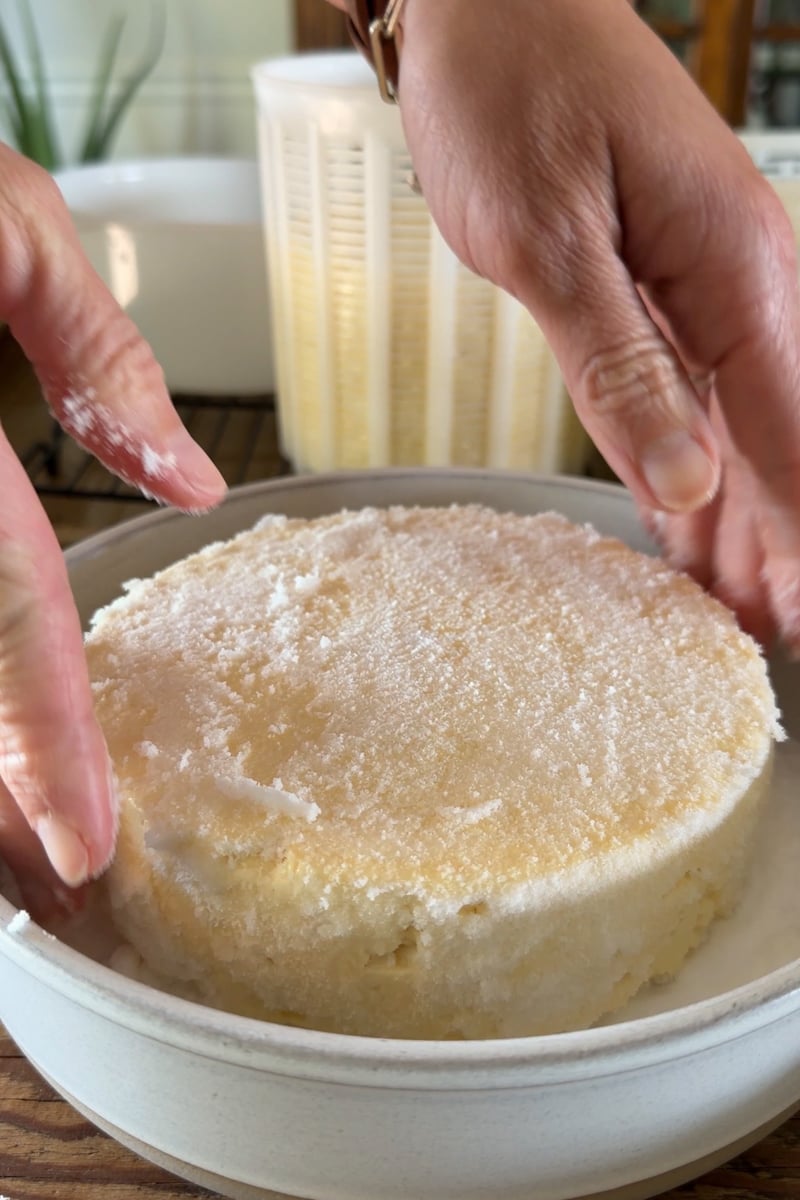
Once draining is complete, gently rub non-iodized cheese salt or kosher salt over the entire surface of each wheel, including the top, bottom, and sides. You don't need to measure an exact amount. Simply use enough to lightly coat the surface of the cheese.
Meg's Tip: I prefer fine cheese salt because it spreads more evenly across the delicate surface of the cheese. Kosher salt works perfectly well, but the finer grains are a little gentler and don't disrupt the pattern left behind by the molds as much. Just a heads up, if you use a rust-colored salt like Redmonds it will make your finished cheese look dirty and I don't recommend it (I've used it before!).
Step 11: Begin Aging
Place the cheeses into your prepared aging containers and move them to a wine fridge, cheese cave, or refrigerator.
I use a wine fridge set to 54°F, which works well for me even though it isn't a true temperature- and humidity-controlled cheese cave. If you're using a regular refrigerator, which is typically closer to 38°F, you can still successfully age Camembert, but expect the colder temperature to slow both mold development and ripening.
Turn the cheeses daily with clean hands. You can also wear cooking gloves if you want to be extra careful. We don't want to accidentally inoculate our rinds with any wild bacteria!
Recipe Card
Recipe
Homemade Camembert Cheese
Equipment
- Large cheese pot
- thermometer
- Curd cutter or whisk
- Camembert or Brie cheese molds
- Ladle
- Draining mat
- Bamboo mats or sushi mats
- Aging container
- measuring spoons
- Small bowls for cultures and rennet
- Wine fridge or refrigerator
Ingredients
- 2 gallons milk not ultra-pasteurized
- ¼ teaspoon Camembert culture (specifically including the mesophilic cultures Penicillium candidum and Geotrichum candidum)
- ½ teaspoon liquid calf rennet diluted in ½ cup cool water
- ¼ teaspoon calcium chloride if using pasteurized milk (dilute according to the manufacturer's instructions)
- Cheese salt or kosher salt
Instructions
- Warm the milk to 86°F. If you're using fresh milk straight from the cow, it will already be close to your target temperature. Otherwise, slowly warm the milk using a double boiler or water bath to avoid scorching.
- Sprinkle the starter culture over the surface of the milk. Allow it to rehydrate for 5 minutes.
- Using an up-and-down motion, gently stir for about 2 minutes. Imagine lifting the milk from the bottom of the pot to the top while disturbing the surface as little as possible.
- Allow the milk to ripen for 90 minutes while maintaining 86°F. The milk will still look like milk when this step is finished. Nothing dramatic happens during ripening, and that's completely normal.
- If using pasteurized milk, stir in the diluted calcium chloride. Skip it when using fresh raw milk.
- Wait 5 minutes, then add the diluted rennet using the same gentle up-and-down stirring motion.
- Allow the milk to sit undisturbed for 45-60 minutes.
- Begin checking for a clean break after about 45 minutes. To test, insert a clean finger or knife into the curd at a slight angle and gently lift. A properly set curd will split cleanly, with clear whey filling the gap.
- Cut the curd into ½-inch cubes. I use a whisk.
- Allow the curds to rest undisturbed for 10 minutes to heal. Maintain the temperature at 86°F during this time.
- Gently stir the curds in the whey for 10 minutes. The goal is simply to keep the curds suspended and prevent them from matting together.
- Drain the whey down to the level of the curds. Using a ladle, carefully transfer the curds into the molds. At first, the molds will look dramatically overfilled. Don't worry. Camembert curds contain a lot of moisture. As whey drains away, the wheels will shrink considerably over the next several hours.
- Flip the cheeses three times over the next 5 hours. Continue draining overnight, or approximately 12 hours total.
- Once draining is complete, gently rub non-iodized cheese salt or kosher salt over the entire surface of each wheel, including the top, bottom, and sides. You don't need to measure an exact amount. Simply use enough to lightly coat the surface of the cheese.
- Place the cheeses into your prepared aging containers and move them to a wine fridge, cheese cave, or refrigerator.
- Turn the cheeses daily with clean hands. You can also wear cooking gloves if you want to be extra careful. We don't want to accidentally inoculate our rinds with any wild bacteria!
- Once the wheels have developed a complete white rind, carefully wrap each one in breathable cheese paper. In my wine fridge, this usually takes about 14 days, although some batches have taken as long as 18 days.
- Transfer the wrapped cheeses to the refrigerator and allow them to continue ripening for another 3–5 weeks. Check them periodically for softness. The cheese is ready when the center has developed your preferred creamy texture and the aroma is pleasantly earthy and mushroom-like.
Notes
- Milk: Raw or pasteurized whole milk will work, but avoid ultra-pasteurized milk. If using store-bought whole milk, I like to add 1 pint of heavy cream for a richer, creamier cheese.
- Calcium chloride: Use calcium chloride only when making this recipe with pasteurized milk. Dilute according to the manufacturer's instructions. I skip it when using fresh raw milk.
- Temperature: Maintain the milk at 86°F during culturing, ripening, and curd formation.
- Salt: There is no exact amount of salt needed. Gently rub enough fine cheese salt or kosher salt over the top, bottom, and sides of each wheel to lightly coat the entire surface.
- Aging: I age my Camembert in a wine fridge set to 54°F. A regular refrigerator can also work, but the colder temperature will slow mold development and ripening.
- White mold: White Penicillium candidum growth is exactly what you want. It may look fluffy and fuzzy or flatter and slightly matted, especially after the cheese has been handled or flipped.
- When to wrap: Wait until the entire surface is covered with a soft white rind before wrapping. Mine usually take about 14 days at 54°F, although I've had batches take as long as 18 days.
- Final ripening: After wrapping, refrigerate the Camembert for another 3–5 weeks. The cheese will gradually soften from the outside toward the center as it ripens.
- Knowing when it's ready: Ripe Camembert should feel soft beneath the rind and smell pleasantly earthy and mushroom-like. For the creamiest texture, judge the cheese by its feel and aroma rather than relying on the calendar alone.
Nutrition
What Your Camembert Should Look Like as It Ages
One of the hardest parts of making Camembert is waiting. Every time you open the aging container, you'll probably wonder if everything looks normal. Here's what you can expect during each stage of the aging process.
Days 1-3
During the first few days, your cheese will continue releasing whey and will look a little flatter than it did on the day you made it. You may notice a small amount of liquid collecting in the bottom of the aging container. Simply pour it off as needed to help maintain the proper environment.
Don't worry if the surface looks a little uneven or you can still see small gaps where the curds knitted together. This is completely normal and will become much less noticeable as the cheese ages.
Days 4-7
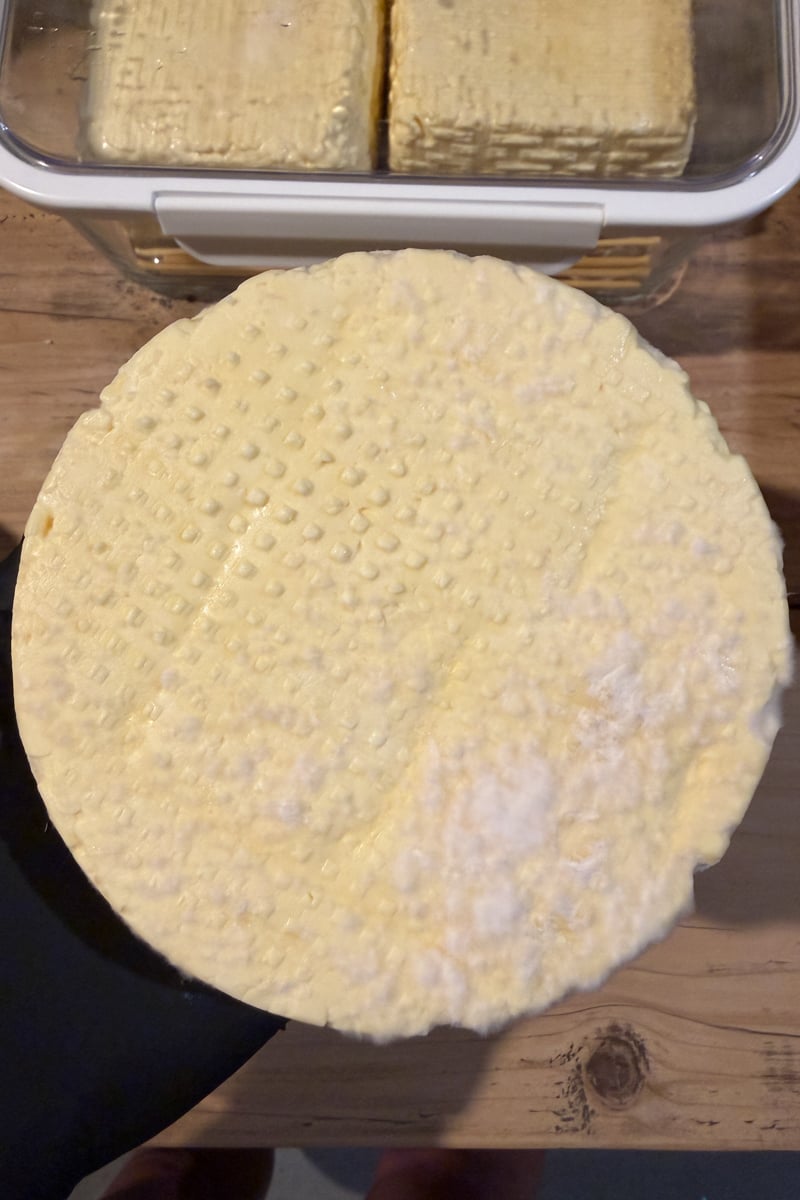
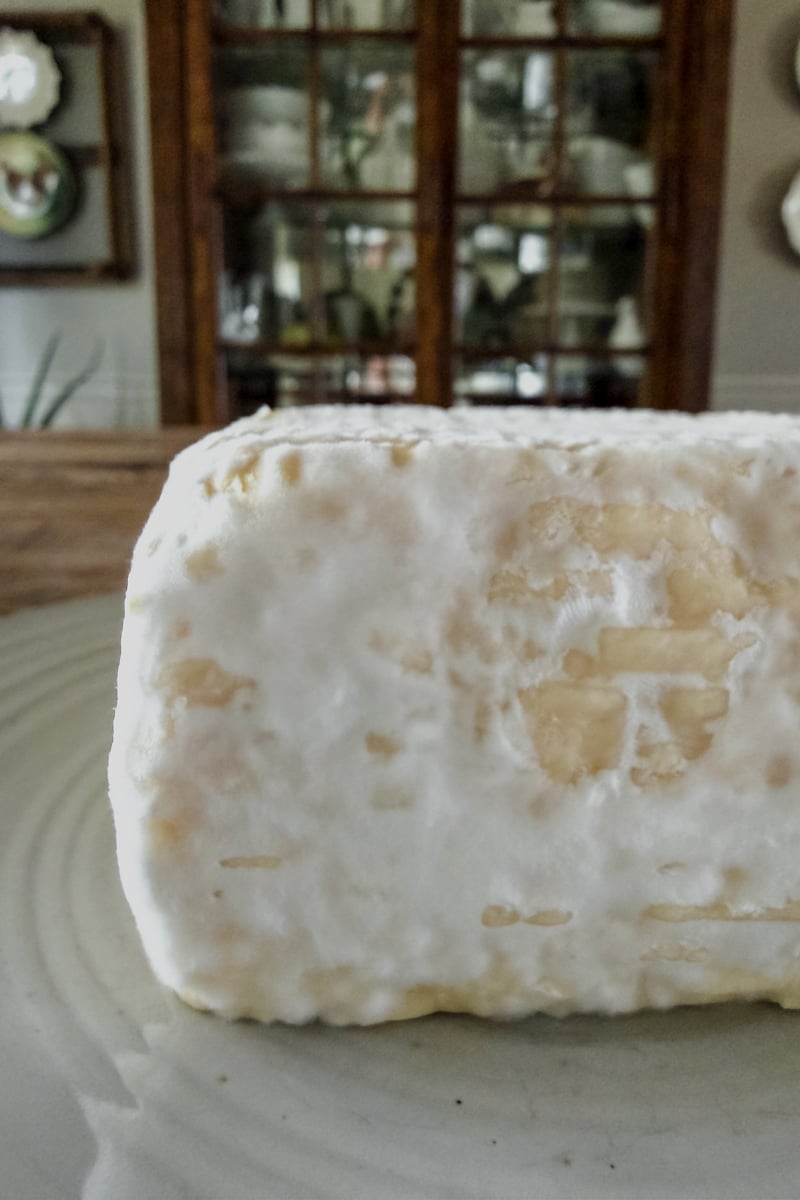
Around the middle of the first week, you should begin seeing tiny patches of white mold developing across the surface of the cheese. At first, the growth may look sparse or appear only in a few spots, but it will gradually spread over the coming days.
The new growth may look fluffy in some areas and smooth or matted in others, especially after handling. Both appearances can be normal.
Under ideal aging conditions, the cheese may become completely covered in a soft, velvety white mold by about Day 7. More commonly, though, it takes another week or even a little longer for the mold to fully cover the surface. Be patient. Slow mold growth is perfectly normal.
Days 7-14: Ready to Wrap
Once the entire surface is covered in a soft, white, fuzzy rind, your Camembert is ready to wrap. I prefer to use sheets of cheese wrap rather than regular parchment paper. I also do not recommend vacuum sealing camembert.
The cheese should feel noticeably softer than it did when you first salted it and have a pleasant earthy, mushroom-like aroma. It should smell fresh and inviting, not fishy or strongly of ammonia.
After wrapping, the appearance of the cheese won't change very much. While the white rind remains largely the same, the magic continues inside. Over the next three to five weeks, the creamy texture slowly develops from the outside toward the center, creating the rich, buttery interior Camembert is known for.
How to Tell When Camembert Is Ready to Eat
One of the most common questions I hear is, "How do I know when it's actually ready?"
Unlike cheddar or Colby, you can't simply count the days and assume it's finished. Camembert continues ripening from the outside toward the center, so the texture changes gradually over time.
Here's what to look for:
The Rind
The white rind should still be intact and dry to the touch. It may have a few wrinkles from wrapping, but it should remain bright white or cream-colored with a pleasant aroma.
The Feel
Gently press the side of the cheese with your thumb.
An underripe Camembert will feel firm with very little give.
As it ripens, the cheese will begin to soften beneath the rind. A ripe Camembert should feel similar to a perfectly ripe peach or avocado. It should yield easily when gently pressed without collapsing or feeling runny.
If the entire cheese feels liquid or the rind begins separating from the cheese, it has likely become overripe.
The Center
The only way to know for certain is to cut into the cheese.
An underripe Camembert will have a firm, chalky center with only a thin ring of creaminess just beneath the rind. It's perfectly edible, but the texture won't yet be what most people expect.
A fully ripe Camembert will be creamy from edge to edge or have only a very small, slightly firmer center. The paste should be smooth, glossy, and spread easily onto crackers or bread without crumbling.
The Aroma
Fresh Camembert should smell pleasantly earthy, buttery, and mushroom-like.
A faint hint of ammonia can develop naturally as bloomy rind cheeses continue aging, especially if they've been wrapped for a while. A slight ammonia smell doesn't necessarily mean the cheese has gone bad, but it's a sign it's at or just past peak ripeness and should be enjoyed soon.
If the ammonia smell is strong enough to sting your nose or overpower the earthy aroma, the cheese has likely become overripe.
My Favorite Stage
Personally, I like to eat Camembert when the center is almost completely creamy but still has just a whisper of firmness in the very middle. At that stage, it slices cleanly for a cheese board, becomes perfectly gooey when warmed, and has a rich, buttery flavor.
Troubleshooting Homemade Camembert
If this is your first bloomy rind cheese, don't be surprised if you spend the first couple of weeks wondering whether everything is going according to plan. Here are the questions I hear most often and what I've learned after making multiple batches over the past couple of years.
Why Isn't White Mold Growing?
The most common answer is... it probably is. It just takes patience.
For the first several days, your cheese may look almost exactly the same as the day you salted it. Eventually you'll notice a few tiny white patches, and from there the mold gradually spreads until the entire cheese is covered.
Many recipes suggest Camembert will be ready to wrap in 7 to 10 days. In my wine fridge, which stays around 54°F, mine almost always take the full 14 days, and sometimes even longer. I've had one batch take 18 days before it was completely covered.
As long as the mold is slowly developing, the cheese smells pleasant, and you don't see signs of unwanted mold, I wouldn't be concerned. Camembert doesn't mind taking its time.
Why Is My Mold Patchy?
Patchy mold is completely normal.
The white mold rarely appears everywhere at once. Some spots may become fuzzy while others remain smooth or bare for several more days. The coverage gradually fills in as the cheese continues aging.
Resist the urge to wrap the cheese too early. Wait until the entire surface is covered with a soft white rind before moving on to the next stage.
Fuzzy vs. Flat Mold: What's Normal?
Camembert mold can look fuzzy, fluffy, smooth, or slightly matted as the rind develops. New Penicillium candidum growth often looks soft and fuzzy, while areas that have been handled or flipped can become pressed down and appear flatter or smoother. I've seen both on my homemade Camembert, especially as the white rind develops.
What If I See Other Colors of Mold?
White mold is what we're intentionally trying to grow on Camembert, so that's the color I want to see covering my cheese. You may occasionally notice other colors developing alongside the white rind, but color alone isn't enough to reliably identify a mold or determine whether a cheese is safe to eat.
A little variation in the white rind, including cream or grayish tones, isn't necessarily cause for concern. However, distinct patches of blue, green, pink, red, orange, black, or yellow growth are not part of the white Penicillium candidum rind I'm trying to cultivate.
If I see unexpected mold growth, especially if it's spreading or accompanied by a rotten, fishy, or otherwise unpleasant odor, I err on the side of caution and discard the cheese. I don't recommend trying to identify an unknown mold by color alone.
Why Is My Camembert Slimy?
A little moisture inside the aging container is normal, but your cheese shouldn't be sitting in it.
As the cheese releases whey, condensation and excess moisture can collect in the bottom of the container. I keep my cheeses elevated on either a bamboo sushi mat or a plastic draining mat cut to fit the container. This allows air to circulate underneath and keeps the bottom of the cheese from sitting in liquid.
Each day when I flip the cheese, I either pour out any collected moisture or soak it up with a paper towel before returning the cheese to the container. This simple routine has done more to prevent slimy rinds than anything else I've tried.
Why Does My Camembert Smell Like Ammonia?
A healthy Camembert should smell pleasantly earthy, buttery, and mushroom-like.
As the cheese continues ripening after it's wrapped, it's normal for a very faint ammonia aroma to develop. That simply means the cheese is reaching peak ripeness and should be enjoyed soon.
If the ammonia smell becomes strong, sharp, or unpleasant enough to overpower the earthy aroma, the cheese has likely become overripe and the flavor and texture are past their best.
Can I Still Eat It?
When in doubt, trust your eyes, your nose, and a little common sense.
Usually safe and expected:
- Soft white fuzzy mold covering the cheese
- Patchy white mold while the rind is still developing
- A pleasant earthy or mushroom-like aroma
- A very faint ammonia smell in a fully ripened cheese
Signs something isn't right:
- Black or bright yellow mold
- Strong, overpowering ammonia odor
- An unpleasant rotten or fishy smell
- Aggressive pink, red, or orange growth accompanied by an off odor
If something smells truly unpleasant or your instincts tell you the cheese isn't right, it's always better to discard it and start over. Fortunately, healthy Camembert has a very distinctive clean, earthy aroma, and once you've made a batch or two, it becomes surprisingly easy to recognize when everything is progressing normally.
How to Warm Camembert
Camembert is best served warm, when the center becomes soft, creamy, and perfect for scooping onto crackers or crusty bread. The trick is warming it gently enough that the inside melts before the outside dries out.
Oven Method (My favorite!)
Remove the Camembert from the refrigerator 60 minutes before baking so it can begin warming to room temperature.
The rind is edible, so we aren't going to remove it. Using a sharp knife, score the top of the rind in a deep crisscross pattern, being careful not to cut all the way through the cheese or into the sides. I like to stop about ½ inch from the edge so the rind stays intact and creates a little bowl to hold the melted cheese. You can also shave a very thin layer off the top of the rind before scoring if you prefer, but leave the sides completely intact.
Drizzle the top with honey, hot honey, or a good herbed olive oil, then add your favorite toppings. Some of my favorites are:
- Fresh figs
- Sliced plums
- Roasted garlic cloves
- Chopped walnuts or pecans
- Fresh rosemary
- Fresh thyme
Place the cheese in a small baking dish or on a parchment-lined baking sheet and bake at 350°F for 12 to 15 minutes, or until the center feels soft when gently pressed. Avoid overbaking, as the cheese can begin to dry out instead of becoming silky and creamy.
Serve immediately with crackers, toasted baguette slices, apple or pear slices, or fresh vegetables.
Air Fryer Method
While I recommend using the oven whenever possible, I've warmed Camembert in an air fryer several times during summer gatherings when nobody wanted to heat up the kitchen. The finished camembert will be dryer and more browned than if you had oven-baked the cheese, just FYI.
Line the air fryer basket with a parchment liner, then prepare the Camembert the same way by scoring the top, adding your drizzle of honey or oil, and topping with fruit, herbs, nuts, or roasted garlic.
Set the air fryer to its lowest temperature, ideally 200°F, and cook for about 20 minutes, checking the cheese every 4 to 5 minutes. Every air fryer cooks a little differently, so watch closely during the last several minutes.
The cheese should feel soft in the center when gently pressed.
Keep in mind that air fryers circulate hot air much more aggressively than an oven, so they're more likely to dry out the rind before the center becomes completely molten. It still tastes delicious, but in my experience, the oven produces a creamier, gooier texture and a golden top.
Frequently Asked Questions
Yes! I make Camembert with fresh raw Jersey milk from our family cow, and it produces an incredibly rich, buttery cheese. If you're using raw milk, be sure it comes from a healthy, clean source that you trust. If you don't have access to raw milk, high-quality store-bought whole milk also works well.
Absolutely. Choose whole milk that is pasteurized but not ultra-pasteurized. Ultra-pasteurized milk doesn't form a strong curd and often leads to disappointing results.
For an even creamier cheese, I like adding one pint of heavy cream to every two gallons of whole milk.
Yes. You can age Camembert in a regular refrigerator, but expect the process to take longer because the colder temperature slows mold growth and ripening.
I use a wine fridge set to about 54°F, where my Camembert usually takes around 14 days to develop a complete white rind, although I've had batches take as long as 18 days. A standard refrigerator is typically closer to 38°F, so yours may take longer.
Watch the cheese rather than the calendar. Once the surface is completely covered in a soft white rind, it's ready to wrap and continue ripening in the refrigerator.
Yes! The white bloomy rind is completely edible and is one of the signature characteristics of Camembert.
It contributes much of the cheese's earthy, mushroom-like flavor, so I recommend enjoying the rind along with the creamy interior.
Camembert is delicious served at room temperature, but my favorite way to enjoy it is warmed in the oven until the center becomes soft and gooey.
Top it with honey or hot honey, fresh figs, sliced plums, roasted garlic, chopped nuts, or fresh herbs like rosemary or thyme. Serve with crackers, toasted baguette slices, or fresh fruit for an easy appetizer everyone loves.
Once your Camembert has developed its white rind and has been wrapped, keep it wrapped and refrigerated until you're ready to eat it.
Keep in mind that Camembert continues to ripen in the refrigerator. The center will gradually become softer and creamier, and the flavor and aroma will become stronger over time.
Rather than relying on an exact expiration date, I pay attention to the cheese itself. A ripe Camembert should feel soft beneath the rind and have a pleasant earthy, mushroom-like aroma. If it becomes extremely soft or develops a strong, sharp ammonia smell, it has likely moved past its peak.
For the best flavor and texture, I recommend enjoying homemade Camembert once it reaches your preferred level of ripeness rather than trying to store it long-term.
You can, but I don't recommend it.
Freezing often changes the creamy texture that makes Camembert so special. If possible, enjoy it fresh. If you do freeze it, thaw it slowly in the refrigerator and expect the texture to be slightly more crumbly than before freezing.
More Homemade Cheese Recipes to Try
Once you start making cheese at home, it's hard to stop at just one! If you have milk, cultures, and rennet on hand, here are a few more of my favorite homemade cheeses to try next.
👉 Homemade Gouda Cheese – If you enjoyed the aging process with Camembert, try Gouda next. This traditional washed-curd cheese develops a smooth, buttery flavor as it ages.
👉 Homemade Colby Cheese – One of my favorite cheeses for beginners who are ready to make a pressed, aged cheese. It's mild, familiar, and a great next step in learning traditional cheesemaking.
👉 Homemade Cheddar Cheese – Learn the traditional cheddaring process and make a classic cheese that's well worth the wait.
👉 Homemade Mozzarella Cheese – Want something you can eat a whole lot sooner? Mozzarella is a great choice when you don't want to wait weeks or months for your next homemade cheese.
Cheesemaking & Dairy Recipes


Comments
No Comments