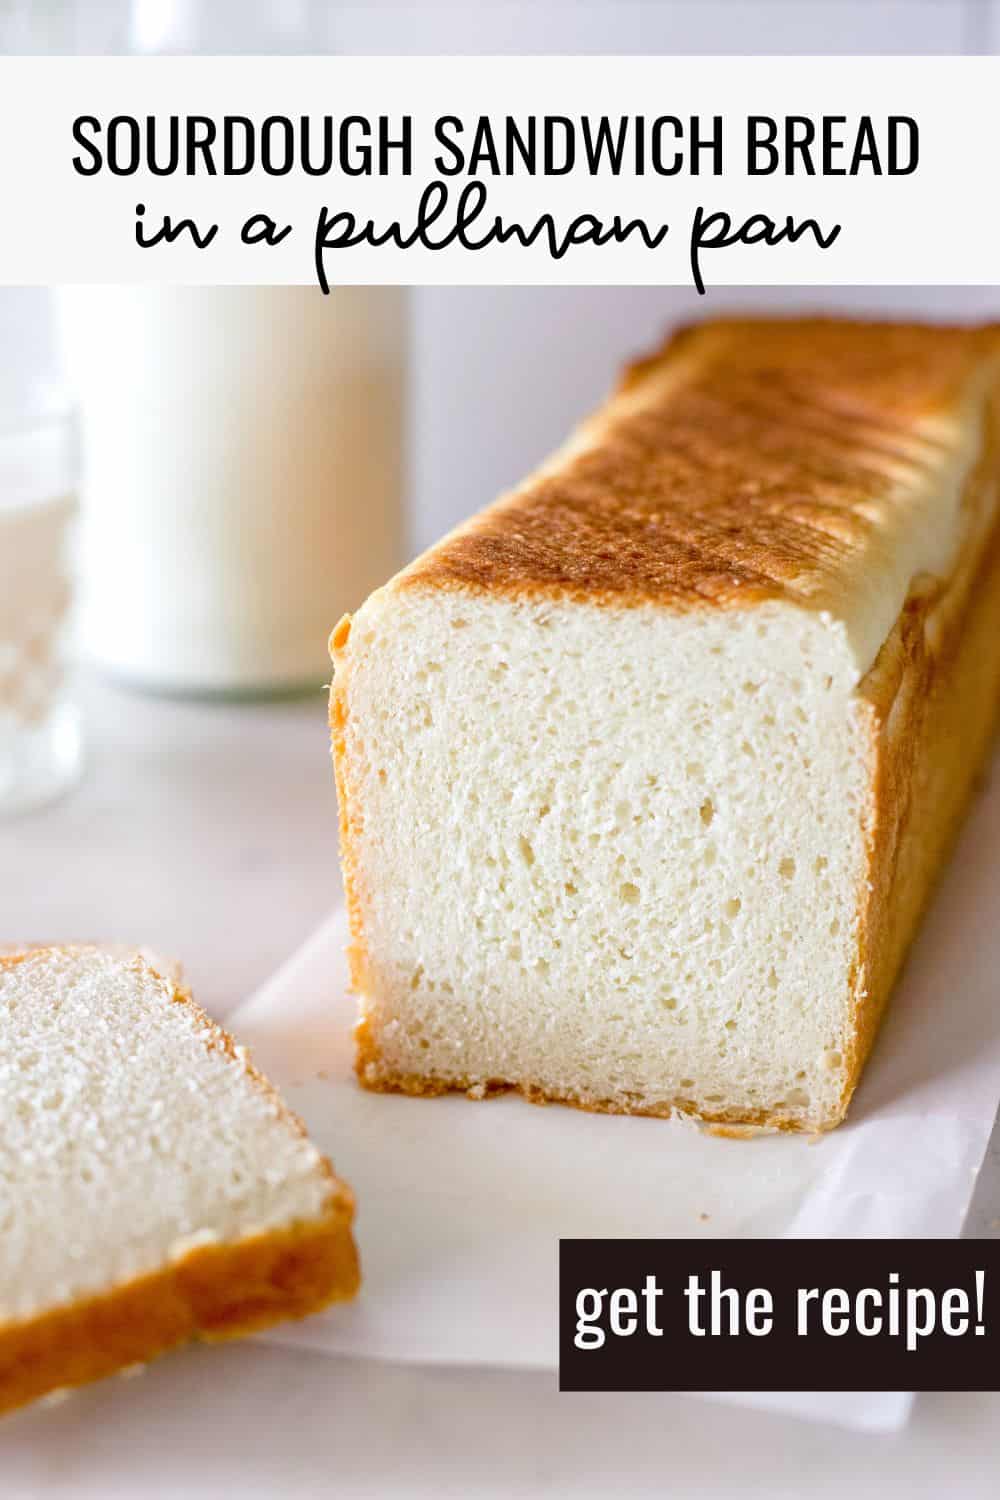
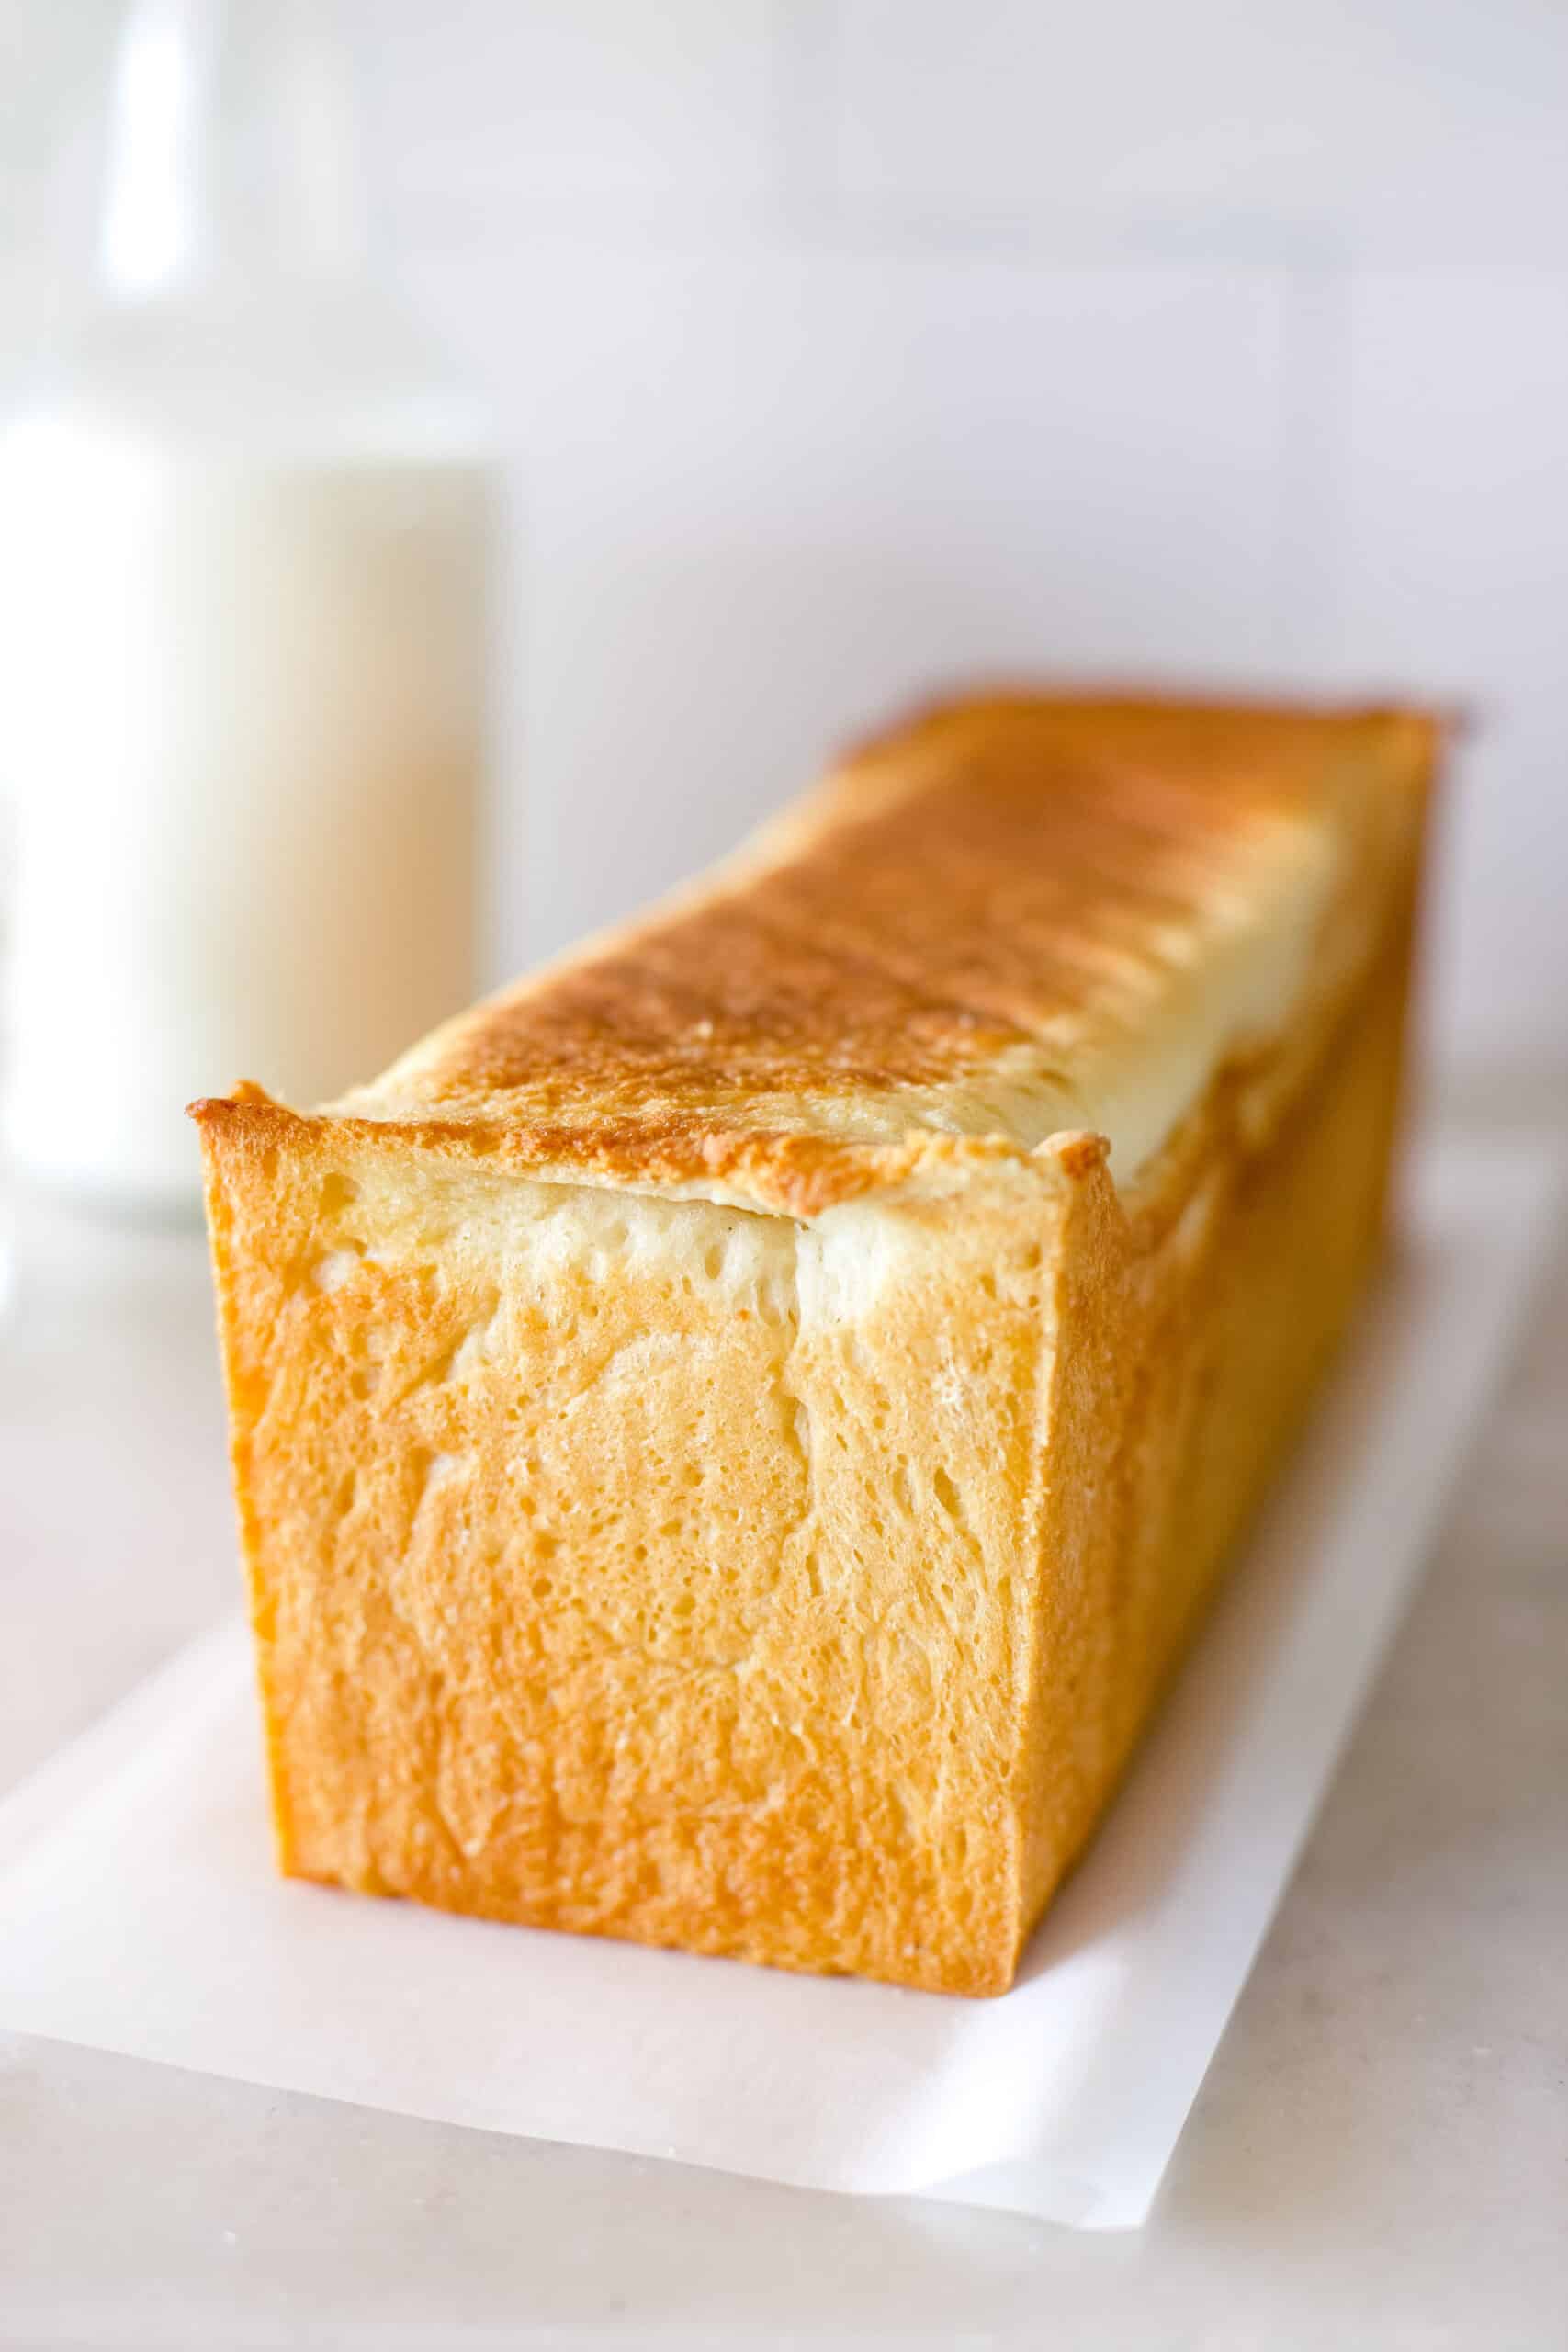
Easy Sourdough Sandwich Bread: a Pullman Loaf Recipe
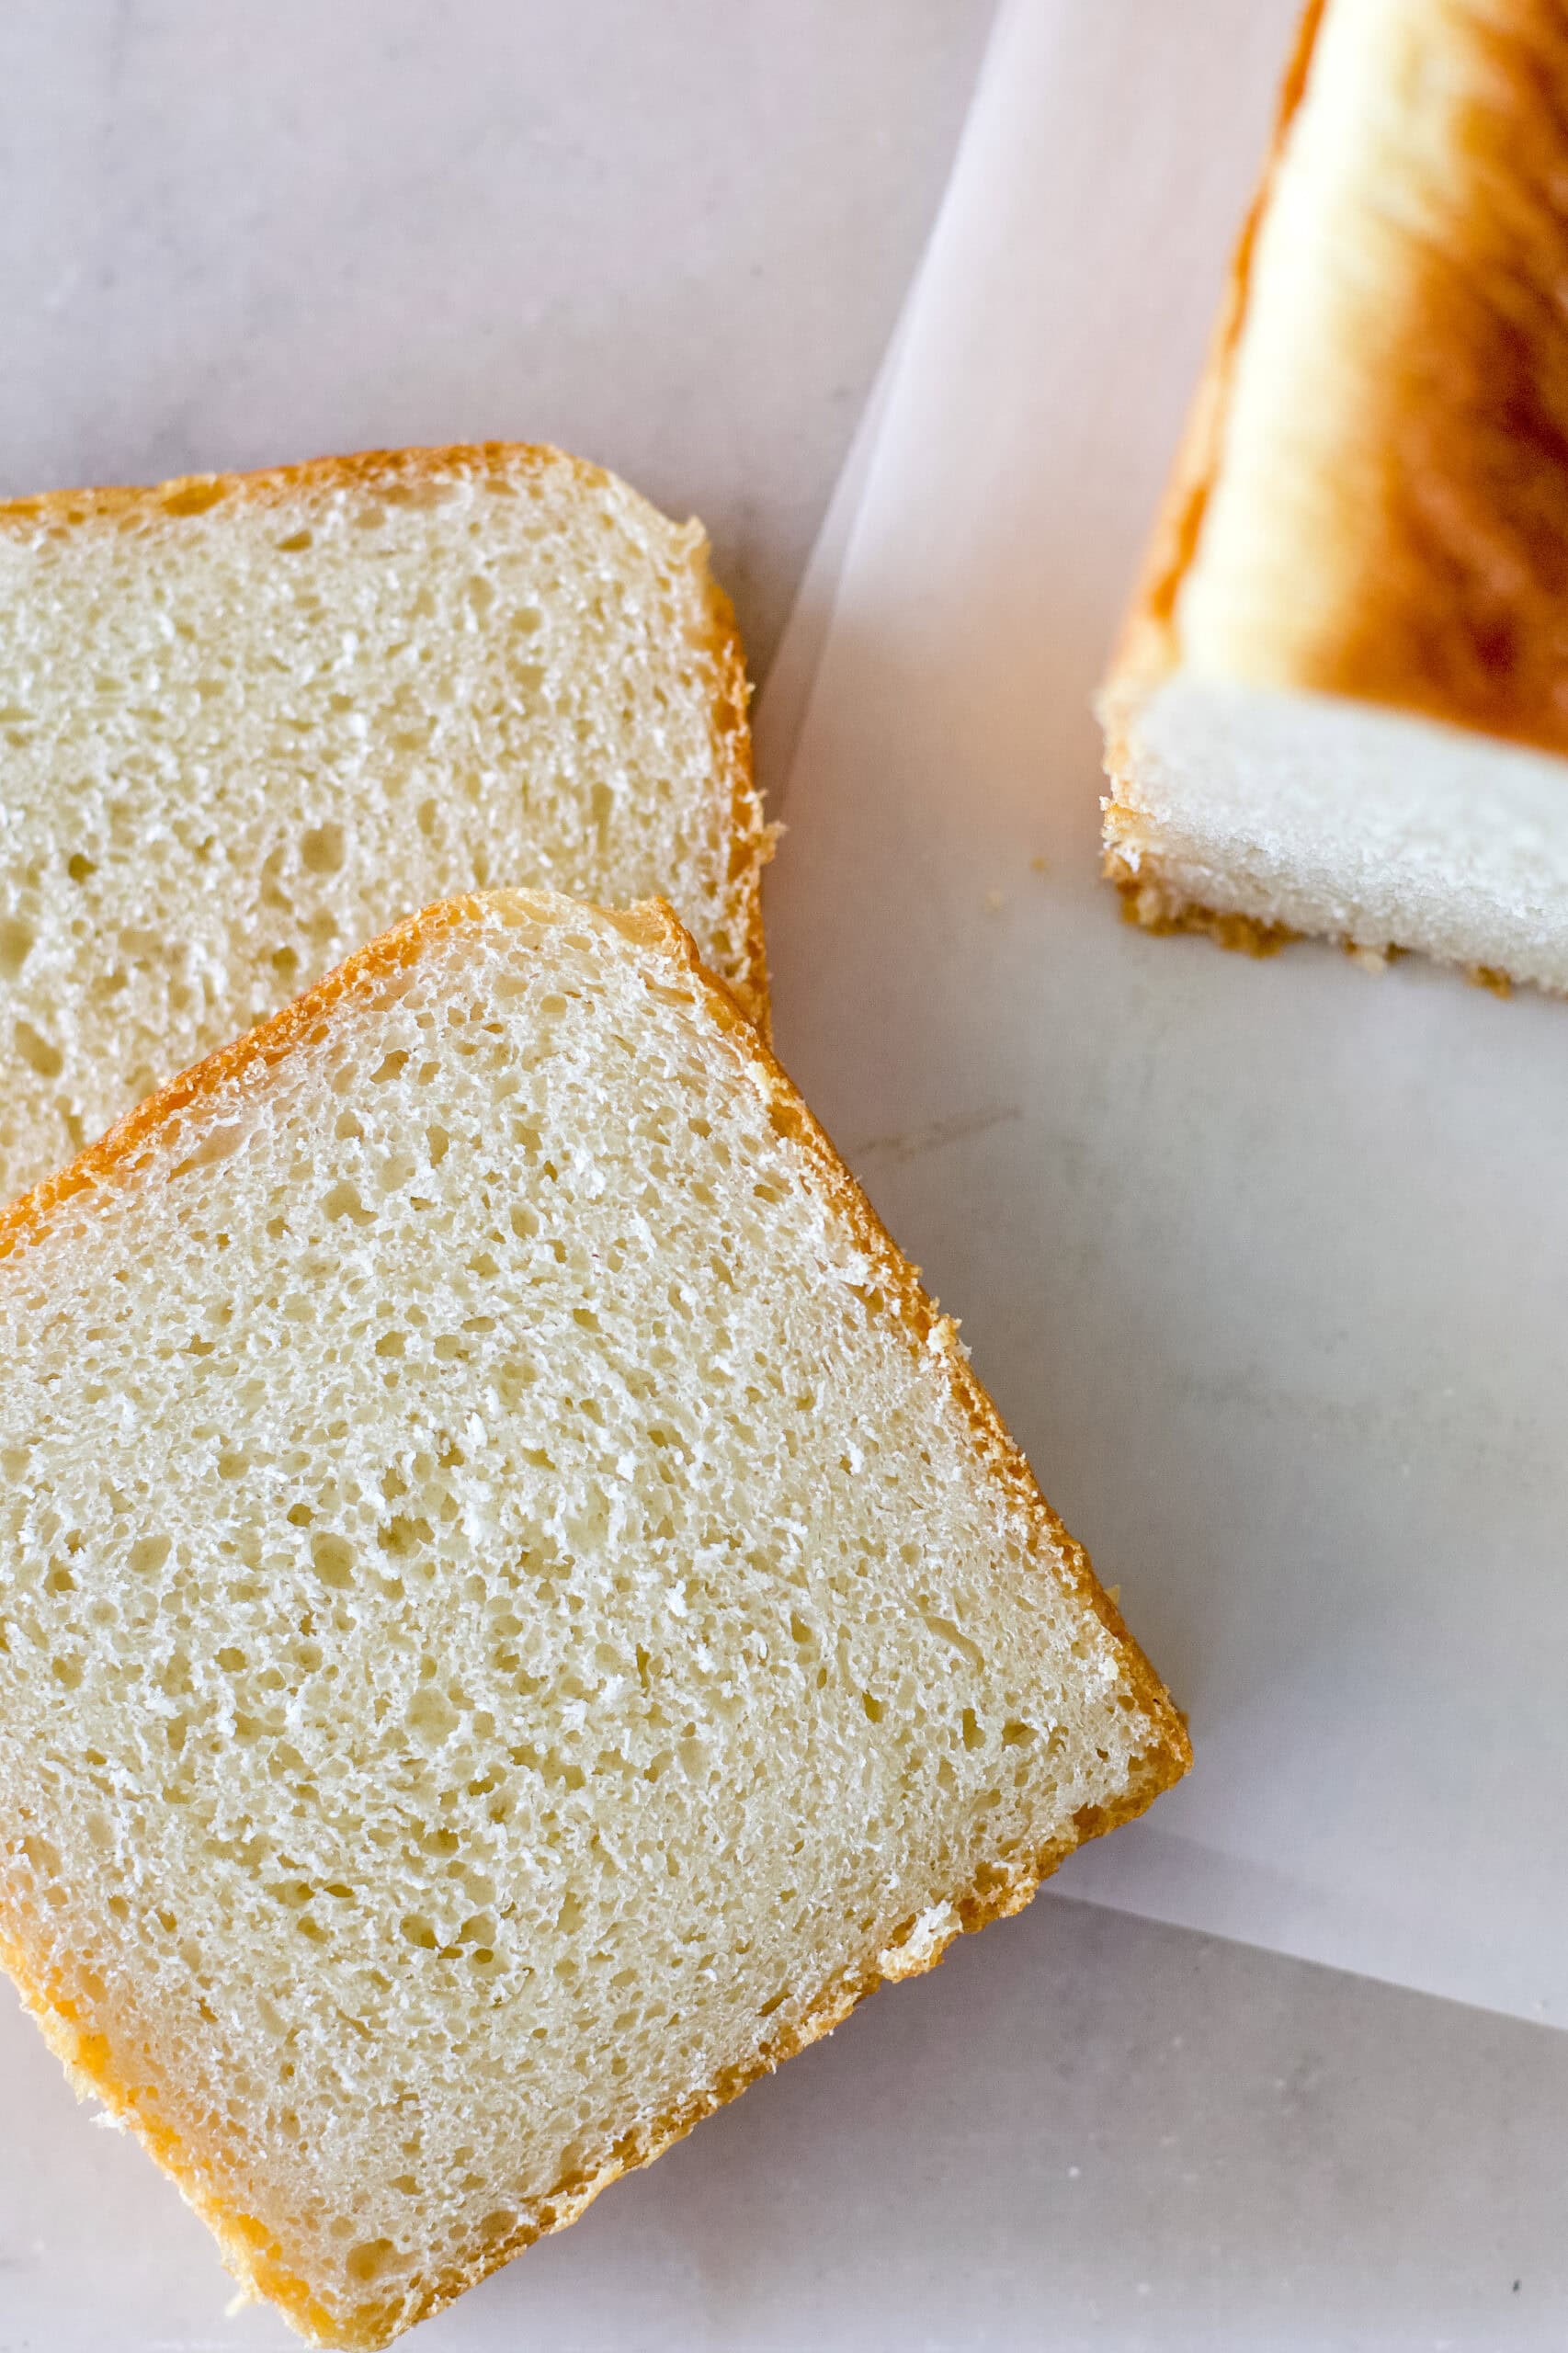
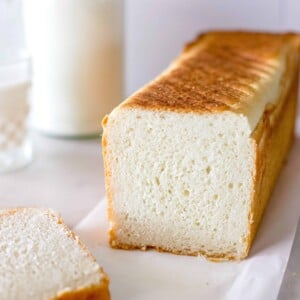
This sourdough sandwich bread, with it's hint of sweetness from honey, is wonderfully moist and tender. Pain de mie has a soft crust, tight crumb and will hold up well to slicing. Baking sandwich loaves in a pullman pan guarantees each slice will have a square shape. Pullman loaves are perfect for packing to-go lunches or making ahead for the next day!
This is one of my most popular—and most reliable—sourdough recipes. It’s gone viral across Instagram multiple times, earned consistent 5-star reviews, and has been recreated by thousands of home bakers. Made in a Pullman pan, it bakes into the softest, most sliceable sandwich loaf—perfect for PBJ lunches, toast, and everything in between. I’m Meg, a fifth-generation farmer and homesteader, and this is the sourdough bread I make every week for my own family. If you're looking for a simple, beginner-friendly loaf with a tight crumb and soft crust, you’re in the right place.
This is the bread I make most often for my own family. I developed this because artisan sourdough was too crusty for sandwiches and the kids needed a something better. We use it for toast before school, grilled cheese on cold nights, peanut butter sandwiches to-go, and quick lunches during busy sports seasons. After years of making sourdough, this is still the loaf I come back to because it's soft, dependable, and slices beautifully every time.
Most sandwich loaves, whether they are sourdough or not, come in a standard shape: long and thin. To achieve this at home, we have to use something other than a standard loaf pan. Enter: the 13" Pullman pan. This pan has tall sides, crisp edges and a lid that can be used to create a soft white bread with a square sandwich slice shape.
NOTE: A Pain de mie simply refers to sandwich loaves baked in a pullman pan.
Jump to:
- Why This Recipe Works
- 3 Reasons to Love Using a Pain de Mie or Pullman Style Loaf Pan
- Lid or No Lid?
- Ingredients for Sourdough Sandwich Bread
- Instructions for Sourdough Sandwich Bread
- Helpful Hint
- Related Posts
- Why I Prefer a Pullman Pan for Sourdough Sandwich Bread
- Pullman Pan Tips & Troubleshooting
- Why is my sourdough sandwich bread dry?
- Variations
- Equipment
- Storage
- More Recipes You'll Love
- How to Use Leftover Bread
- Recipe
- More Simple Sourdough Recipes:
- Comments
Why This Recipe Works
- The Pullman pan creates perfectly square slices that fit sandwich containers and toasters without smashing.
- A touch of honey and powdered milk keeps the crumb soft and tender instead of chewy or dry.
- The tight crumb holds peanut butter, jelly, grilled cheese, and lunch meat without falling apart.
- The optional yeast gives more reliable rise and lighter texture, especially in cooler kitchens.
- This recipe is simple enough for beginner sourdough bakers but reliable enough to become an every-week loaf.
3 Reasons to Love Using a Pain de Mie or Pullman Style Loaf Pan
Sourdough Pain de mie (or 13-inch pullman pan) is extra tall, nearly twice as long, and creates a lofty and airy soft slicing loaf. Aside from the fact that this taller pan can accommodate a wide range of yeast and quick bread recipes, why else will you love it?
- Square slices are perfect for a sandwich loaf. Have you ever tried stuffing a beautiful, tall slice of bread into a ziploc baggie? Or a toaster? I'm just saying, some part of that PBJ is gettin smashed to make it fit. With a loaf baked into a pullman pan, the tall, straight sides and lid prevent your sandwich bread from “doming” into a lofty loaf. Instead your bread will be perfectly square: a loaf ideal for slicing without crumbling. It's the perfect size and shape for bread slices!
- Swirled breads or breads with loose yeast will not separate or lose structure. The supportive and extra tall edges of the pain de mie keep the dough together until it is fully baked. When shaping any of these loaves, feel free to add extra ingredients! I have added cinnamon and sugar, butter and garlic, and olive oil with za-atar spices.
- Quick breads will never overflow (in theory). Have I ever told you about the time I accidentally set my oven on fire? I had made a cinnamon swirl loaf that overflowed (just a little bit) into the bottom of the oven. Since it was a small mess, I ran the self-cleaning cycle to tidy it up. Big mistake! I glanced over at the oven and saw flames dancing in the chamber. Luckily, it ran out of sugar and butter to burn and the flames burned out on their own. Lesson learned! This extra height and length of this pan will USUALLY save you! There are always exceptions, of course.
Pullman Pan vs Standard Loaf Pan
Both pans will make delicious homemade bread, but they create very different results. After years of baking sandwich bread for my family, I reach for my Pullman pan most often because it creates soft, square slices that are perfect for sandwiches, toast, and school lunches.
Here’s the biggest difference between the two:
| Feature | Pullman Pan | Standard Loaf Pan |
|---|---|---|
| Shape | Perfectly square slices with straight sides and flat top | Rounded top with more traditional bakery-style shape |
| Crumb | Tight, even crumb ideal for sandwiches | Slightly more open crumb with larger air pockets |
| Crust | Softer, thinner crust because of the lid | Thicker, chewier crust exposed directly to oven heat |
| Softness | Stays soft and tender longer | Slightly heartier texture |
| Sandwich Quality | Excellent for peanut butter, grilled cheese, toast, and lunch meat sandwiches | Great for rustic sandwiches and toast, but slices can be less uniform |
| Baking Time | Usually slightly longer because the lid traps steam and moisture | Slightly faster baking with more exposed crust |
Lid or No Lid?
I wasn't sure if this was worth mentioning or not, but a pullman pan can be used with or without the lid. In fact, the only recipe I regularly use with the lid on is this Sourdough Pain de Mie. If you don't want to use the lid, just leave it off!
My rule of thumb, and it's a pretty loose rule, is that yeast breads do well with the lid on. As the dough bakes, it swells and pushes against the lid and edges of the pan to create a tight crumb loaf that has a close-grained quality that can be cut into sandwich slices really well! This pan makes great sandwich breads that travel well and are very versatile.
TIP: If you are using a pullman loaf pan with the lid on, check and double check that you remembered to grease and flour the lid! Ask me how I know... Also, once the dough is proofing and the lid is on, do not try to remove the lid to check how tall the dough has risen. As you slide the lid to peak at the dough, it will stick and cause the dough to fall.
As an amazon associate, this post contains affiliate links, which means I make a small commission at no extra cost to you. See my full disclosure here.
Ingredients for Sourdough Sandwich Bread
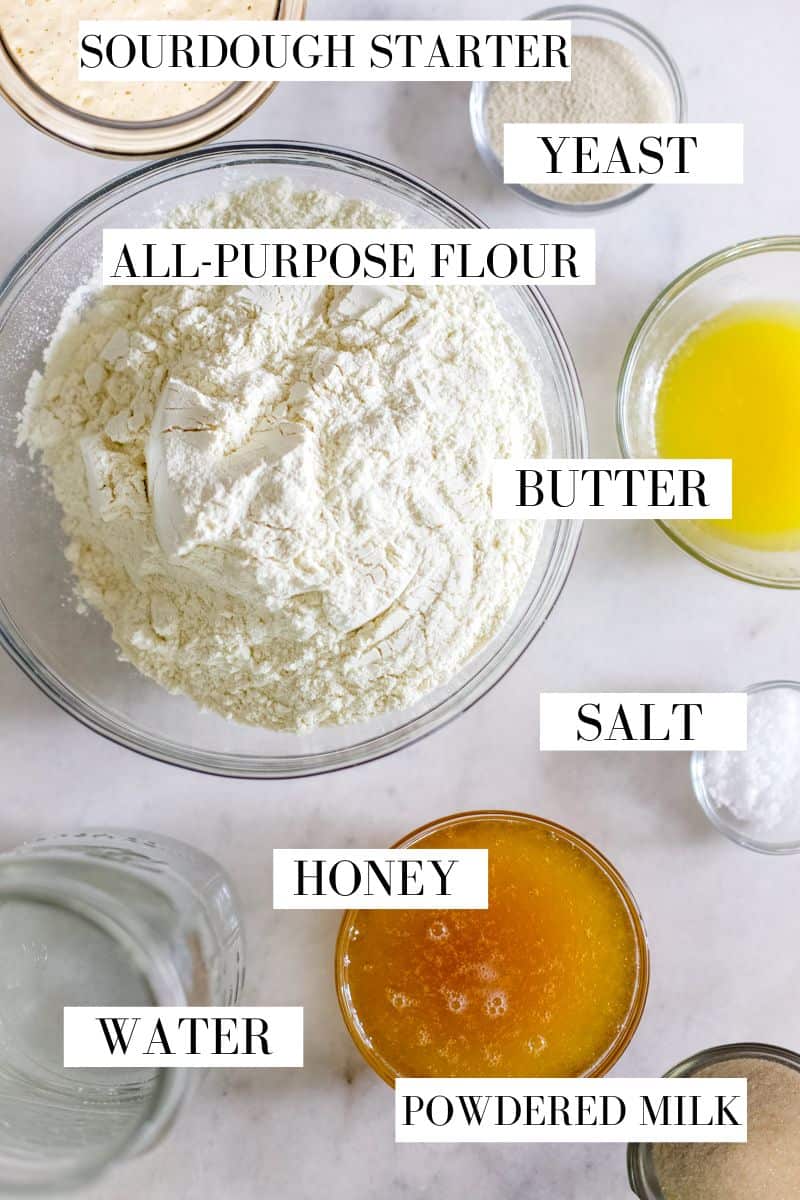
- ACTIVE SOURDOUGH STARTER | A ripe starter is very important. The sourdough starter should be recently fed and at peak activity. If you are unsure how to tell, the bubbles should be large and if you put a spoonful in water it will float at the top of the glass. Measure the amount of starter accurately. I have several recipes for using up your sourdough discard if you need inspiration!
- ALL-PURPOSE FLOUR | I am not loyal to one particular brand, but my favorites are King Arthur All-Purpose, The Food Nanny All-Purpose Kamut, and Jovial All-Purpose Einkorn. If you are using fresh milled grain, I cannot give you a conversion at this time. I will update this recipe when I have had time to experiment and work out the perfect 1:1 fresh milled version. If you are using grams of bread flour, you will need to adjust the amount.
- WATER | Use water that is filtered or from a well. Do not use water that is chlorinated or contains fluoride. Both of these chemicals inhibit bacterial growth, which is literally the opposite of what we want yeast (naturally occurring in sourdough starter or in a packet) to do.
- HONEY | This bread is absolutely DELICIOUS with a hint of honey flavor. If you don't keep honey on hand, swap it for 50 grams of sugar.
- INSTANT YEAST | I buy bulk yeast and store it in my freezer to keep it fresh longer. If you are using yeast from a packet, measure the yeast by weight rather than a measuring spoon. Yes, you can absolutely make this recipe without yeast, but it will need to bulk ferment and proof for 4-6 hours at room temperature and then 8-12 hours in the refrigerator.
- BUTTER | Good quality butter adds fat, which lubricates crumb for easy slicing. It also adds flavor, softness, keeps bread fresh longer.
- SALT | I use Redmond's Real Salt. When I am baking sourdough I tend to stay away from iodized salts and instead try to use Himalayan, Celtic or sea salt.
- POWDERED MILK | The only ingredient that you might not have in your pantry already is the powdered milk. Milk powder adds fat and tenderizes the gluten and gives a soft and rich crumb. Substituting tablespoons of milk will not work for this recipe.
Instructions for Sourdough Sandwich Bread
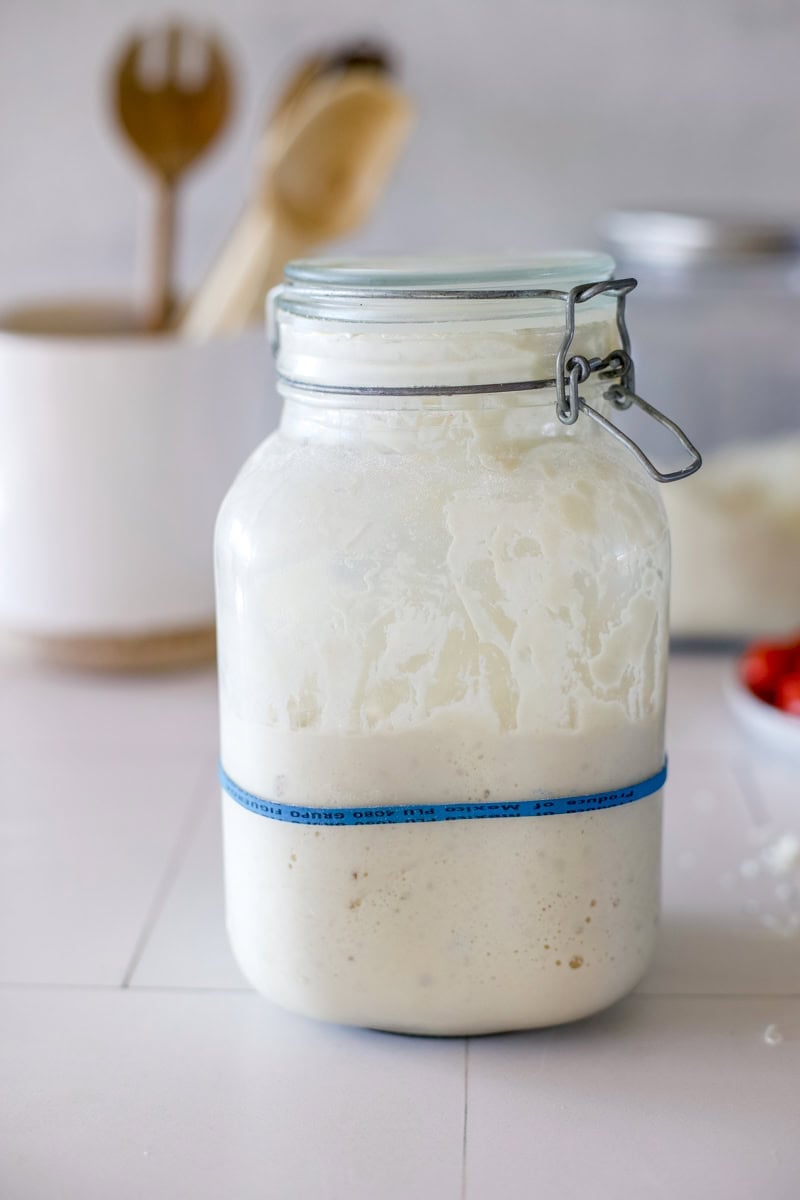
As with all sourdough breads, feed the sourdough starter and place it in a warm place several hours before you are ready to bake. A ripe starter should be doubled and have large air bubbles when it is at peak activity.
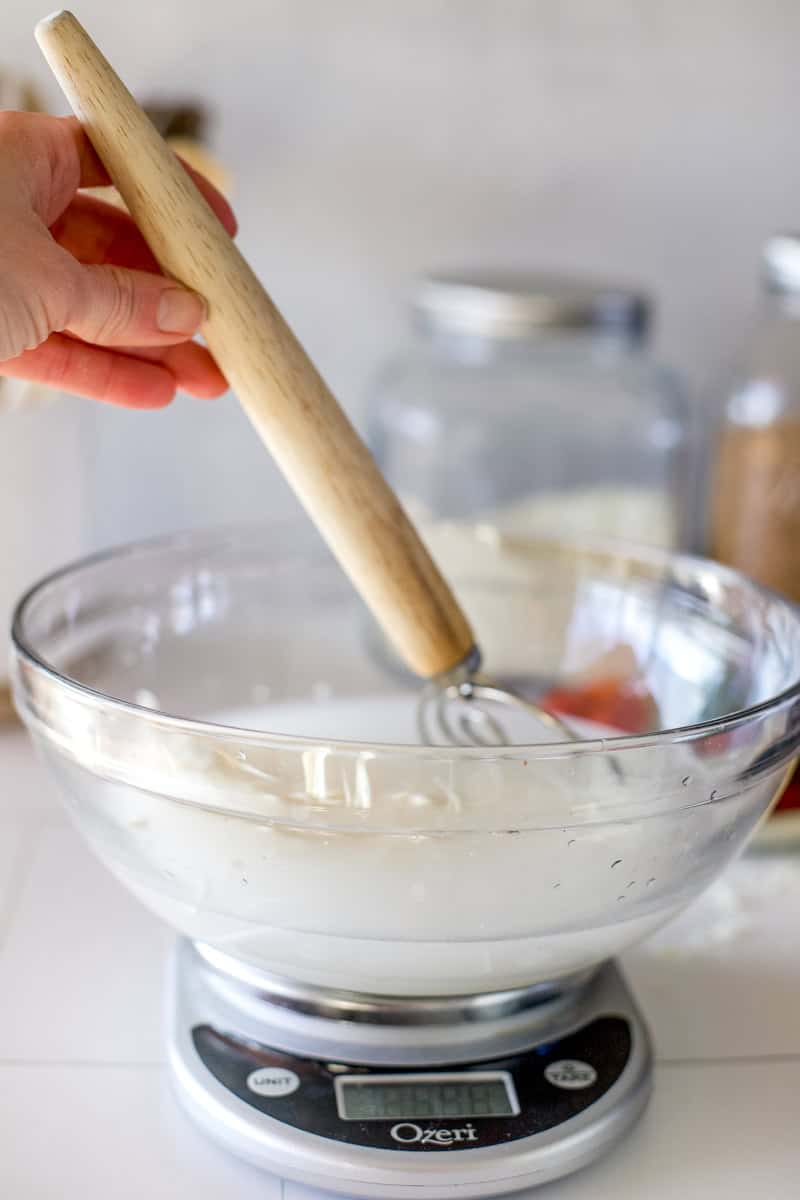
In the bowl of a stand mixer, attach the dough hook and mix together all of the dough ingredients, including the (active) ripe sourdough starter, to make a smooth, supple, and not overly sticky dough.
Start with a low speed, then gradually increase to a kneading speed for two minutes and evaluate the texture. The dough should cling to the hook and be free from sticking to the sides of the bowl. Add a little extra flour one tablespoon at a time, if needed. Kneed an additional 8-10 minutes.
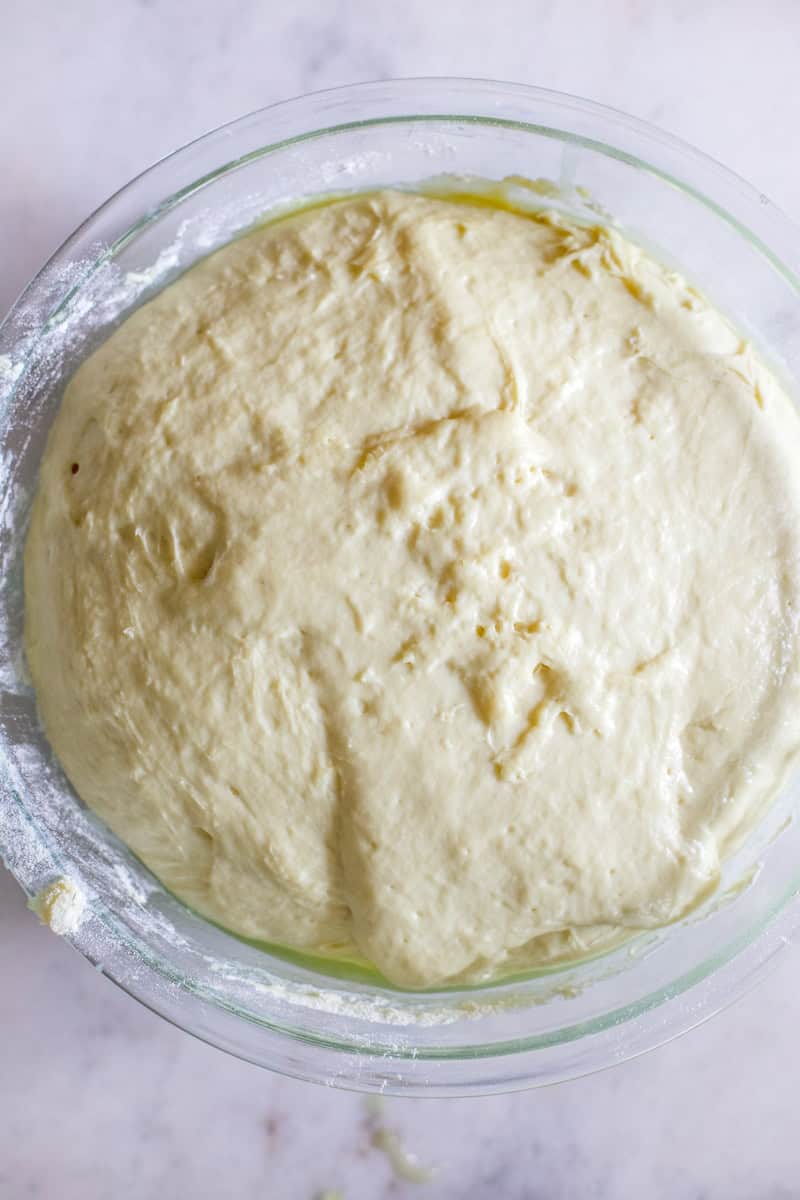
Place the kneaded dough in a lightly greased bowl, cover the bowl, and let the dough rise for 1 to 2 hours, until doubled in size.
** If you are making this recipe without added yeast, it it will need to bulk ferment and proof for 4-6 hours at room temperature. Then you shape the loaf and place it in the pan for 8-12 hours in the refrigerator.
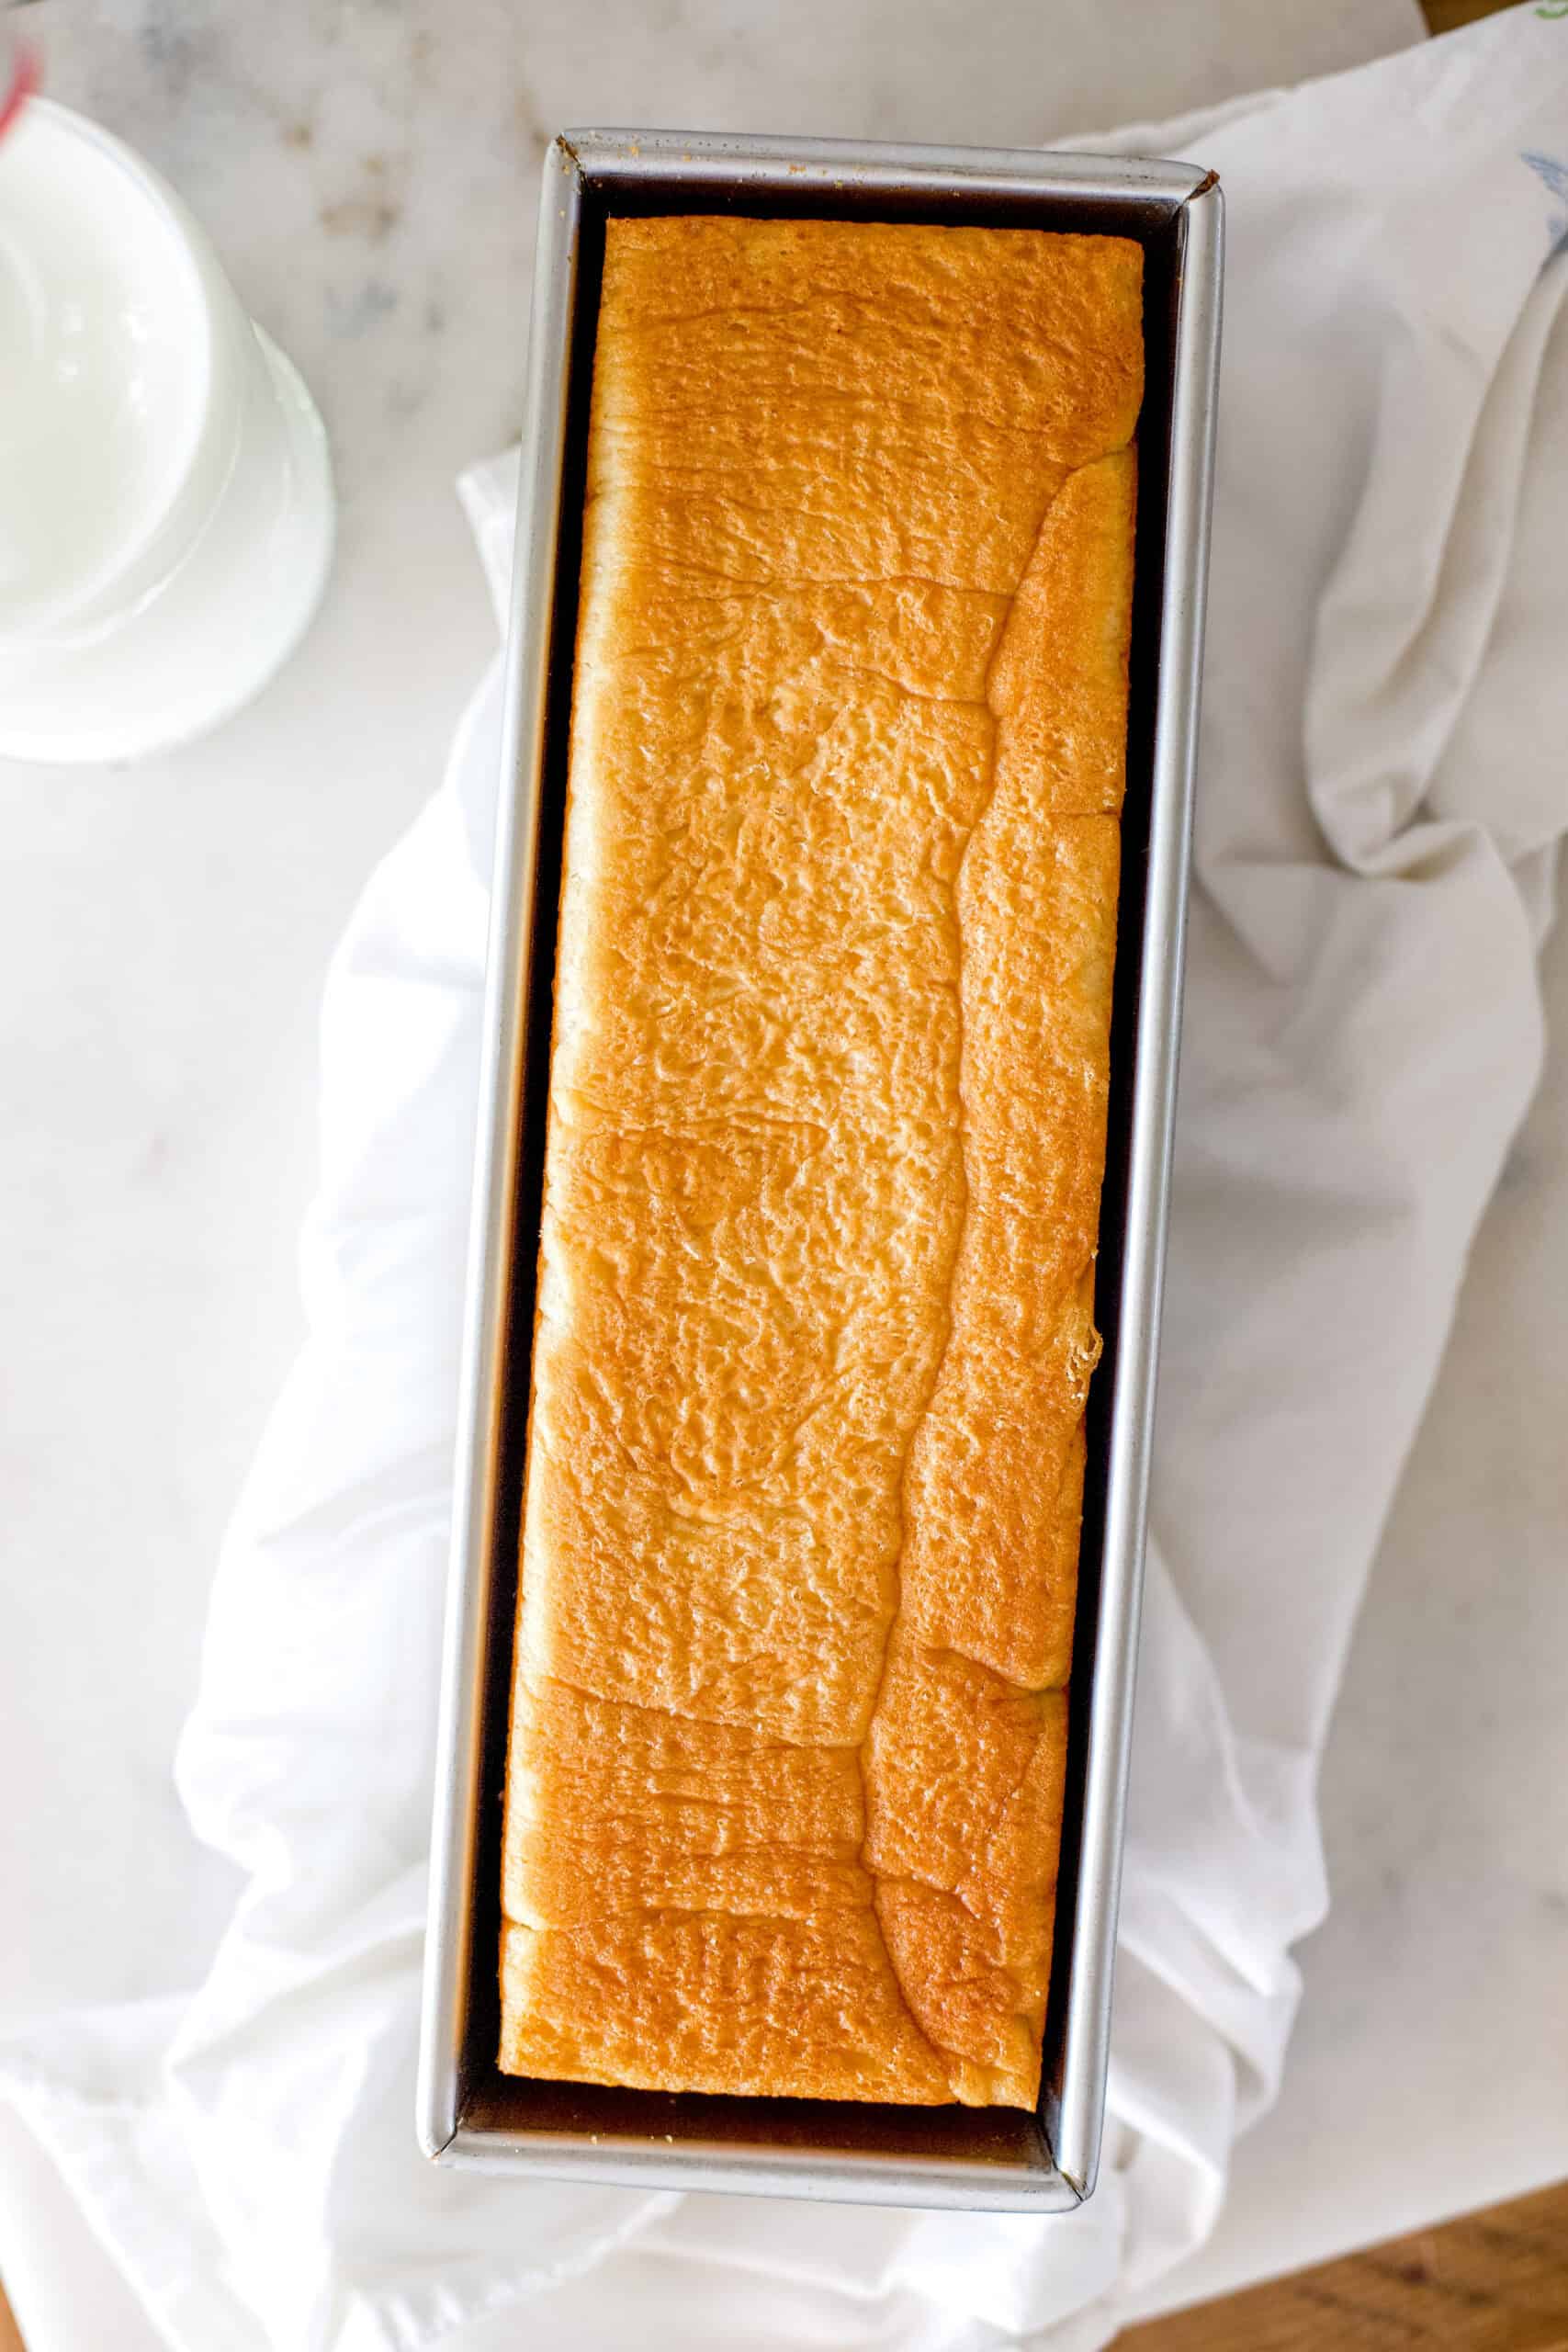
While you let the dough rest, grease and flour one 13" pullman pan or two 8 ½" pullman pans. Once the dough is ready, spread it on a greased surface until it is the same length as the pan. Form a rectangle.
Roll the rectangle like a cinnamon roll to create the traditional sandwich bread log for the final proof. During this step, see the suggested variations below for adding different flavors to this pullman loaf!
If using a 13" X 4 ½" pullman tin, place the single dough log into the pan. If using an 8 ½" pan, divide the dough in half and shape each half into 8" logs. Place the logs in two lightly greased 8 ½" x 4 ½" pullman pans.
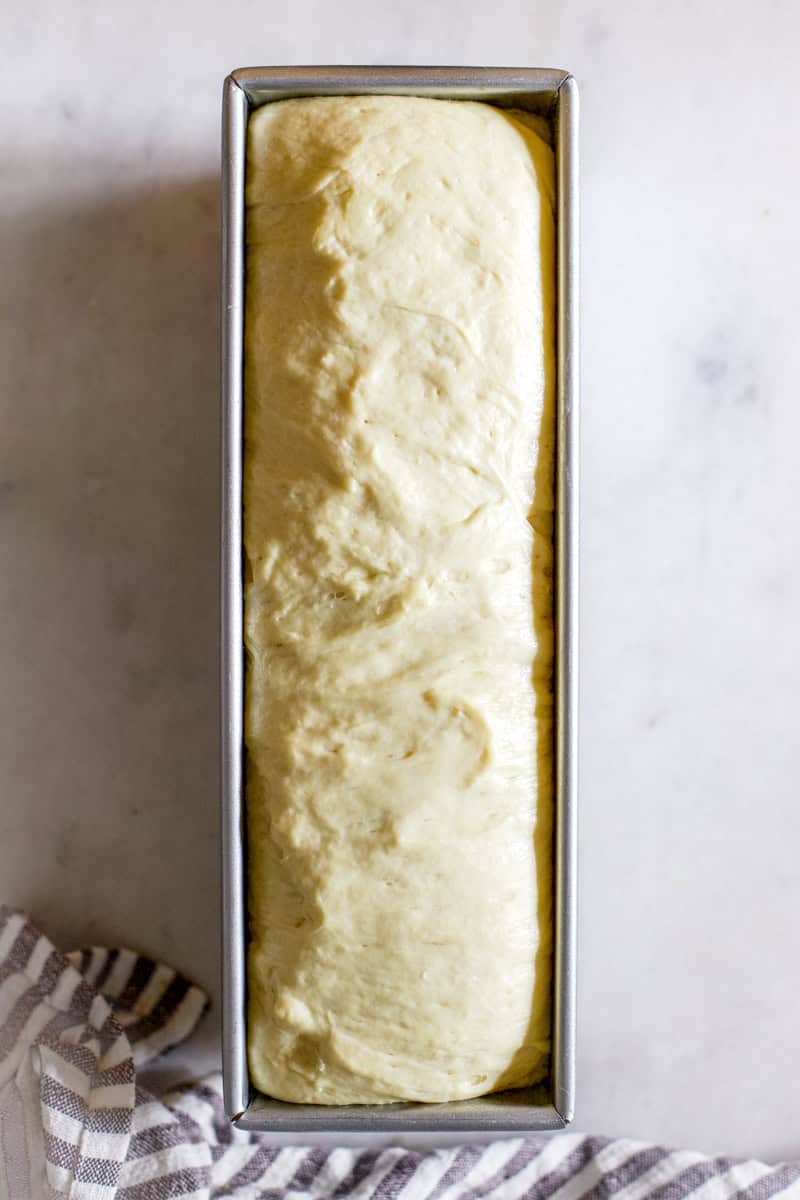
Cover the pans with lightly greased plastic wrap for a mushroom top on the loaf or put the greased lid on the pan for a square loaf.
Let the dough rise until it has crowned about 1" over the rim of the bread pan, or if baking with the lid on, about 1 ½ - 2 hours. Resist the urge to slide the lid to peak inside!
While the dough is proofing, turn on the oven to 375 degrees Fahrenheit. When the dough is ready to bake, place it in the bottom/middle oven rack and bake until the internal temperature of the loaf should reach 195-200 degrees Fahrenheit.
Helpful Hint
I like to create a 'proofing box' for my dough to rise in. This is very easy to do and can be used with any bread dough recipe. Fill a coffee mug with water and microwave it for 5 minutes. Once the dough is ready to proof, put it in the warm microwave with the cup of boiling water. This adds humidity and warmth that will make your dough even lighter!
Related Posts
This was inspired by my Sandwich Bread in a Pullman Pan, and pairs well with this Simple Caprese with Strawberry & Avocado. I like to toast the bread and then add the caprese like an avocado toast topping, only fancier!
Sourdough French Toast will knock your socks off! You've got to try using this sourdough sandwich bread in a pullman pan!
If you are brand new to sourdough or need to learn how to make a sourdough starter, refer to my Simple Sourdough blog post for all of the details. I break down the steps from growing a starter, feeding and maintaining a starter, baking bread and trouble shooting any common issues that can arise. There are so many resources, both here on Ninnescah Homestead as well as other credible sites!
Why I Prefer a Pullman Pan for Sourdough Sandwich Bread
Traditional artisan sourdough is beautiful, but it isn’t always practical for everyday sandwiches. The large holes, thick crust, and uneven slices can make things like peanut butter and jelly or grilled cheese frustrating.
A Pullman pan creates:
- softer slices
- a more even crumb
- square sandwich bread that fits lunch containers and toasters beautifully
- thinner crust that kids often prefer
It gives sourdough a much more practical “everyday sandwich bread” texture while still keeping all the flavor and benefits of long-fermented bread.
Honestly, this is the loaf I make most often for my own family because it works for real life. Toast in the morning, sandwiches at lunch, garlic bread with dinner… it handles all of it beautifully.
Pullman Pan Tips & Troubleshooting
Why is my loaf dense?
Dense sourdough sandwich bread is usually caused by underproofing, weak starter activity, or adding too much flour during shaping. This dough should feel soft and slightly tacky before baking. If the dough feels stiff or dry, the finished loaf will often be heavy and tight.
Cool kitchens can also dramatically slow fermentation. If your dough hasn’t risen enough before baking, it won’t have the strength or gas buildup needed for a light sandwich loaf.
If you’re struggling with dense bread consistently, try:
- giving the dough more time to rise
- proofing in a slightly warmer spot
- making sure your starter is very active before mixing the dough
- resisting the urge to add excess flour during shaping
The optional yeast in this recipe can also help create a softer, more reliable rise.
Why did my Pullman pan lid stick?
The lid usually sticks because steam and baked starches glue it to the pan during baking. This has happened to me before, and I’ve found that generously greasing both the pan and the underside rails of the lid helps tremendously.
If your lid still sticks:
- let the loaf cool for 5–10 minutes before removing the lid
- gently wiggle the lid instead of forcing it
- avoid overfilling the pan, which can push dough into the rails
Why didn’t my loaf reach the lid?
This usually means the dough was underproofed, your starter wasn’t active enough, or the dough didn’t have enough strength to fully rise.
For a full square Pullman loaf, I usually let the dough rise until it’s about ¾ to 1 inch below the top edge of the pan before sliding on the lid.
If your kitchen is cool, this can take much longer than expected. Watch the dough itself instead of relying strictly on the clock.
Why did my loaf collapse?
Collapsed sourdough sandwich bread is usually a sign of overproofing. If the dough rises too high before baking, the gluten structure weakens and can no longer support the loaf in the oven. If your loaf repeatedly collapses, try shortening the final rise slightly or proofing in a cooler area.
Signs of overproofing include:
- dough that feels overly puffy or fragile
- large air bubbles near the surface
- dough collapsing when touched or scored
When Is the Dough Ready for the Lid?
If baking with the lid on, I usually let the dough rise to about ¾–1 inch below the top edge of the Pullman pan before sliding the lid closed. During baking, the loaf will continue rising and fill the corners of the pan.
Can I bake this without the Pullman lid?
Yes! You can absolutely bake this recipe without the lid. In fact, we love doing it this way sometimes for a beautiful domed top that looks like store-bought sandwich bread!
Without the lid, the loaf will rise with a rounded top more like traditional sandwich bread. The crust will also be slightly thicker and darker.
I personally prefer using the lid because it creates soft, perfectly square slices that work beautifully for sandwiches and toast, but both methods work well.
How full should a Pullman pan be?
For a 13x4x4 Pullman pan, I typically fill the pan about halfway to two-thirds full before the final rise.
During proofing, I let the dough rise until it sits about ¾ to 1 inch below the top edge of the pan before adding the lid.
Overfilling the pan can cause the dough to press into the lid rails or bake unevenly, while underfilling may leave you with a shorter loaf that doesn’t fully square out.
Why is my crumb tight?
A tight crumb is actually somewhat normal for sourdough sandwich bread, especially compared to artisan sourdough with large open holes. The dough should feel soft, elastic, and slightly tacky before baking.
This recipe is intentionally designed to create a softer, more even crumb that works well for sandwiches, toast, peanut butter, and grilled cheese.
However, if the crumb feels excessively tight or heavy, it’s often caused by:
- underproofing
- too much flour
- weak starter activity
- insufficient gluten development
Why is my sourdough sandwich bread dry?
Dry sandwich bread is usually caused by too much flour or overbaking.
Fresh-milled flour and whole wheat flour absorb more moisture than white flour, so it’s important not to overcorrect by adding extra flour during kneading or shaping.
To keep sourdough sandwich bread soft:
- measure flour carefully
- avoid overbaking
- store the loaf airtight once cooled
- allow the loaf to fully cool before slicing
Variations
This dough is really fun to play around with! When the loaf is being shaped and is spread out like a rectangle is the perfect time to add ingredients to boost the flavor! The add-ins will look like a subtle swirl in the center of the loaf.
- sweet - add cinnamon, brown sugar, raisins or pecans pieces.
- savory - minced roasted garlic with a little melted butter will be sooo good.
- spicy - for a panini or grilled sandwich with a peppery seasoned dough, try brushing it with hot pepper infused olive oil.
- plain (but elevated!) - sprinkle a few sesame seeds, pumpkin seeds, chia seeds or sunflower seeds into the roll and sprinkle a few on top.
Equipment
Don't overthink sourdough! Here are the basics you'll need: a big mixing bowl, a wide-mouthed jar for your ripe starter, and a kitchen scale.. everything else is just a bonus! Don't stress about buying everything you see people using online. Once you get serious about sourdough you may decide to invest, but in the beginning it isn't necessary.
Alright, so here are a few things that are helpful if you want to dive deeper into sourdough. First, a dutch whisk. This tool makes stirring flour and water together so much easier than just by using a spatula or wooden spoon. I can't explain it, but the way the dough moves through the whisk is so much easier.
Another thing that has been especially helpful to me the past year is a square sided plastic container. The benefit of this container is that it is easy to measure how much the dough has risen during proofing. These are perfect for storing watermelon and cantaloup pieces in the refrigerator when not being used for proofing!
I have more helpful tools in the post Simple Sourdough Loaf if you want more inspiration! I also have an amazon storefront with all of my favorite homesteading, prepping, preserving, gardening, baking and reading materials!
Storage
Fresh homemade bread tends to go stale fairly quickly compared to store-bought, and this sourdough bread is no exception! Trust me, this is a good thing! Professional bakers swear by using a linen bag. I typically slice half of the loaf and store it in a glass container with a lid or in a plastic bread bag. The other half goes in the freezer until we are ready for it, even if it's just a day or two later!
This loaf of bread can be wrapped in plastic and then a freezer bag to be stored in the freezer for up to three months. I recommend slicing it prior to freezing. I've actually written an entire post explaining Best Place to Store Homemade Bread if you want to learn all of my secret tips!
More Recipes You'll Love
- Whole Wheat Sourdough Sandwich Bread
- Soft Sandwich Bread (Makes 2 Standard Loaves)
- How to Store Homemade Bread
- Grain Mill Guide
How to Use Leftover Bread
If you make this recipe, please leave a comment below! This provides helpful feedback to both me and other readers. For more delicious recipes from scratch and homesteading tips, follow me on instagram @NinnescahHomestead
Recipe
Sourdough Sandwich Bread
Equipment
- large mixing bowl
- kitchen aide stand mixer
Ingredients
- 300 grams active sourdough starter
- 630 grams All-Purpose Flour
- 340 grams warm water
- 57 grams unsalted butter room temperature (*see note)
- 50 grams honey
- 42 grams powdered milk
- 15 grams salt
- 6 grams instant yeast (**see note)
Instructions
- Prior to baking this bread, you will need to prepare your sourdough starter. I recommend feeding and discarding at least once before baking so that it is at peak activity. The starter should be freshly risen with large air bubbles and pass the water float test.
- Mix and then knead together all of the dough ingredients, including the sourdough starter, to make a smooth, supple, and slightly sticky dough. You may need to add ½-1 cup extra flour. I use my stand mixer with dough hook and knead for 8-10 minutes.
- Place the kneaded dough in a lightly greased bowl, cover the bowl, and let the dough rise for 1 to 2 hours, until doubled in size. I like to use a square sided plastic container with lid. Prepare the pullman pan by greasing both the pan and the lid (if using).
- Once the dough has doubled, it is ready to be shaped! Lightly grease a surface and spread the dough into a rectangle with the length being the same size as the length of the pan. Roll the dough lengthwise (cinnamon roll style) and place it in the prepared pan. Putting the lid on the pullman pan will create a square loaf. Leaving the lid off will create a mushroom or dome top.
- Let the shaped loaf rest another 1-2 hours. Resist the urge to remove the lid and check the height, this will damage the top of the loaf and cause it to wrinkle or fall.
- Towards the end of the rising time, preheat the oven to 375°F.
- Bake the bread for 45 to 50 minutes, until the crust is golden brown and the sides of the loaf feel firm. The internal temperature of the loaf should be about 195°F. Remove the loaf from the oven, and turn it out of the pan onto a rack to cool. Let it cool completely before slicing.
Video
Notes
Nutrition
More Simple Sourdough Recipes:
- Whole Wheat Sourdough Sandwich Bread (Fresh Milled Flour Recipe)

- Fluffy Blueberry Sourdough Scones with Lemon Glaze
- Sourdough Pumpkin Roll - Discard Recipe
- Sourdough Apple Zucchini Muffins
- Sourdough Banana Zucchini Muffins
- Sourdough Peach Quick Bread
- Sourdough Banana Zucchini Bread
- Ranch Crackers- Sourdough Discard Recipe
- Best Sourdough Blondies (Easy Discard Recipe)


Softest sandwich bread! Hint of sourdough, really good.
Holds up well for PBJ's, doesn't it? Glad you liked it and thanks for leaving a review! I appreciate it!
I am excited to try your recipe. I like that it uses a natural sweetener. Is it possible to leave the yeast out?
Hi! I'm so glad you asked. It is totally possible to make this bread without the added yeast. I've been working on getting a baking schedule nailed down, and I'm not quite there yet. So far it looks like it will add on at least 12-16 hours, and I've kept the amount of active starter the same. I'll post an update once I feel like I've found a way to do it reliably! And if you try it, please let me know your experience!
-Meg
So currently trying this out. Followed the recipe and it over flowed the pullman pan. What did I do wrong
Hi Bobbie,
You are using the 13/4 pullman pan, right? Not the standard size? If so, it sounds like overproofed. When the dough gets too active too fast, for example a warm kitchen during the summertime, it goes in to the oven with so much air that as it continues to expand, it overflows. Do you think that might be what happened?
Meg
This is simply THEE best recipe I’ve ever used with my starter - makes packing lunches for my littles a breeze! It’s just so so good! Thank you! Quick Q, for the nutrition facts, approx what size slice are you using for your data there? Thanks!
Excellent post Meg! Full of useful tips that I will for sure use. Just ordered the pullman loaf pan off your amazon link. It's been on my wishlist forever! Thanks for the inspiration and great recipe!
Ahhhhh! Thank you, Seanna! You will love the pullman pan. I have another recipe on here for non-sourdough sandwich bread in a pullman pan and it's really good, too. I hope you have the BEST day!
Made this a bunch of times using only starter and no yeast, with the extended rise time. I've made it twice now using the 6 grams of yeast and both times it overflowed the pan in the oven. This was with 1 1/2 hours initial proof, placed in pan with lid on for an additional hour
I always use Salted Butter. How much salt should I remove from the recipe to account for Salted Butter??
Hi Donna! Salted butter usually has 1/4 teaspoon of salt per stick of butter, so for this recipe you can reduce the total salt by 0.6 grams. You could also just leave the salt as written because the quantity is very small and shouldn't make your bread too salty.
Hi! Followed the recipe to a T and when I put it in the Pullman pan and covered it and left my husband in charge while it rose. He said the bread squeezed itself out of the pan and lid before he put it in and then again when it was in the oven have you experienced that? Thanks!
With this one, no, but I have had that happen before when I've made my other Pullman sandwich loaf, but when it happened to me it was because I let it rise too long in the oven with the light on (added warmth). My best guess is that the temperature in your house must have been just perfect for the yeasts (both naturally occurring in the sourdough and the added) to rapidly rise. It's tough to know when it's risen too much with the lid on because if you try to peak, it messes up the top. I would cut down on the rise time next time and see if it rises to the top in the pan with the shorter time. Maybe your starter is just super active (which is good, right?!)
I just bought a Pullman loaf pan, but is a 9x4x4 pan. Will this recipe work in my Pan?
Cut the recipe in half possibly. Your size Pullman holds approximately 850g of dough. This size Pullman holds roughly 1200-1300g of dough
You can use this recipe, but shape two loaves and bake half of it at a time. While the other loaf is baking, keep the unbaked portion in the refrigerator to slow down the rising. You'll also decrease the baking time. The loaf is done when the internal temperature reaches 195 degrees Fahrenheit.
One of the BEST homemade bread recipes I've tried so far! Substituted out 15% freshly milled whole wheat. Next time will test out 30%. Thank you for this recipe!
LOVE, LOVE, LOVE
Newbie baker, just got the pan. Bread turned out perfectly! Small request. Could all the amounts be in grams?
How would long would you let it rise if you didn’t want to add additional yeast?
Shared the recipe with both my kids who are fantastic bakers,
Thank you,
Carla
Hi! I just switched the butter and yeast to grams for you! It's in a side note on the ingredient, not the actual measurement, but you should be able to see it easily on the recipe card. If you don't want to add yeast, make sure your starter is just reaching peak activity before you start the loaf. It will need to double, and my favorite way to do this is by starting the recipe at night and letting it rise on the counter for an hour or two and then refrigerating it for 8-10 hours (overnight) and baking it the next morning. It's tricky to give a set schedule without the yeast, but I'd allow at least 10-12 hours from start to finish. Good luck!
Thank you!
I made this last night with my new Pullman pan. I didn’t have any powdered milk so I substituted about 3/4 cup fresh 2% milk and took the water down by the same amount. It would have been helpful to have more information on kneading times. I used my stand mixer and really had to guess. I ended up letting it knead for about 10 minutes (I looked at a few other recipes). I’m pretty new to this and haven’t been really successful with the stand mixer. Also, the proofing time; after shaping it and putting it in the pan, I let it raise until it was about an inch and a half below the top of the pan. Then I put the pan lid on and let it proof for another 15 minutes. Then baked.
It’s really delicious bread. Perfect crumb. Filled the pan perfectly. Looking forward to my sandwich for lunch. Im very glad I tried your recipe. 🙂
Hi Kristy! This is the most helpful comment, THANK YOU! I will add this information to the recipe to help make it easier to follow. I really appreciate this feedback and I'm so happy you liked the recipe!
This is my favorite sandwich bread. There isn't a lot of tang to it. So you can not really tell it has sourdough in it. With my oven it is a 40-45 minute baking time usually. I have an electric oven that runs a little hotter.
This is super helpful, thank you! It's crazy how much ovens can vary. My oven has a convections setting that I like to use towards the end of the cook time to help keep the air flowing evenly. Thanks for the tips!
I was gifted a pullman pan for Christmas this year! The first thing I did was make your sourdough sandwich bread in it! It was so light and fluffy! Made the perfect breakfast sandwiches!
I made this today but had so many technical issues on my part that it probably didn’t turn out. lol I proofed it with the lid on in my proofing oven and it poured out of the pan. Next I asked Siri to set a timer to bake it she repeated it back to me. Later I asked how much longer and she said no timers lol. It’s cooling now so we’ll see. On the other hand everything that poured out I made a small focaccia bread with rosemary, garlic and olive oil and it was amazing.
Update even after all my issues the bread turned out super soft and so delicious. This will be our sandwich bread for on. Thank you
I am new to all of this, so this question may sound off….
In using non-fat dry milk, how can it add flavor with no fat?
Thank you for all of your lovely recipes!
That's a great question! Powdered milk is a dough conditioner, much like potato flakes or other "secret ingredients" found in old-fashioned recipes. It isn't so much that we are adding milk, but rather adding dried the components in the milk. It helps to feed the yeast and makes the dough extra soft and pillowy. But, if you don't have it, you can certainly leave it out!
- Meg
Thank you!
This recipe is easy to make and yummy!!
This is the best bread I have ever had. I made my first loaf 10 months ago and have not purchased a loaf of bread since. This is my daily!!
I’ve made this recipe a bunch of times and every time it has been successful! The last 3 or 4 times I did not add additional yeast ( I also never add sugar or honey) and it turned out great. I start mixing the dough at about 4pm, let it proof in the oven with the light on ( my house is in the chilly side) until 8pm then flatten and roll, the Pullman loaf pans go in the oven with the light on until 6- 7 am then bake. Such a delicious recipe! Soft, subtle sourdough taste and can hold up to sandwiches!
This is exactly what I needed to hear, so thank you! I've been experimenting with this, too, and my results are similar. I'm so glad you tried it out and it worked! Yay!!
I only have Salted Butter! How much should I decrease from the recipe to compensate??
Made this today and it is SO delicious!
This sandwich bread came out SO good!!
I love this recipe!! Two questions
1- we can sub granulated sugar same amount as honey?
2- can I use dry buttermilk powder without issues?
Hi Debra! You can absolutely substitute sugar for honey. The yeast needs a little something sweet to make it active, so as long as you don't skip it completely, you're good to go. Great question!!
- Meg
I have a 16 inch by 4 inch pullman. How do i increase the recipe. Thank you.
I would not increase the recipe. This is written for a 13' pan, and while yours may not get the perfectly pressed rectangular shape, I think it will still provide a very nice loaf.
If you measure in grams multiple the recipe by 1.23 and that should be perfect for your loaf pan.
Katherine - I wish there was a way for me to pin this comment to the top! THANK YOU!!!! We all appreciate it that you took the time to share this. Have a great day!
- Meg
Best sourdough sandwich loaf. I have a smaller pan and did 70% of the recipe. I had the best PB&J. We are a family of two so I sliced it and used half and put half in the freezer.
I'm so glad you shared this!! Thank you!
Katherine - I plan to try what your method for the smaller plan. Can you tell me how long you cooked it? Did you use the same temp?
Easy and delicious. I prefer the yeast version for busy days and the long ferment for my regular routine.
Love this recipe! So easy to make and tastes wonderful! Will definitely be making again
I have been making this bread for mo this now and it never fails me except when my starter is a little too happy and it spills over when proofing. We are out of bread and I need to bake today. I'm out of AP flour and can't go to store today. Can I use bread flour? If so, is the ratio the same?
Hi Michele! I've made this recipe with bread flour before. It is going to be lighter and airier, and I would set it on a cookie sheet the first time you try it, just in case it overflows a little. Gotta keep that oven clean! Happy baking! - Meg
Could I do the kneading and 1st rise in my Breadmachine?? Also, can powdered buttermilk be substituted for regular powdered milk?? Thank you!!
I made my first loaf and it turned out perfectly. The crust is softer and the inside was pillowy goodness. However today I doubled the recipe and it seems to be very wet. I noticed it says 8 Tbl of butter or 57 grams. However, 8 Tbl woud be 114 grams. Is it 4 or 8 Tbl when doubling the recipe?
Hi Vicki! Thanks for pointing that out. Ever since I read your comment, I've been sitting here racking my brain trying to figure out how to solve this problem. Some people like this recipe in grams, while others prefer cups, etc. I appreciate it that you pointed out that the note I wrote to the side of the ingredients failed to double when the 2X button was clicked. I'm going to remove my note and just have the entire recipe in grams to avoid future confusion and errors. Have a great day!
Meg
Could this dough be used for making cinnamon rolls?
Absolutely! In fact, I have the Sourdough Cinnamon Roll recipe right here on the blog! Just remember, this is a sticky dough-- and that's okay! Resist the urge to add extra flour so that your cinnamon rolls stay nice and fluffy. Here's the recipe - https://ninnescahmade.com/sourdough-cinnamon-rolls/
The bread is so soft and yummy however the dough overflowed during baking pushing the pullman lid off. Here is where the mistake happened. I didn't measure the yeast.. I went with 2 teaspoons. I'm making it again today and weighing my yeast. 2 teaspoons of yeast is 91 grams.. A scant 1/4 teaspoon is 6 grams...
Hi! One teaspoon of dried yeast is 3 grams. If you use 91 grams, that will be too much! My husband is sitting here eating lunch while I'm writing this, and he suggested your scale might be set to grains instead of grams. That would be 92 grains. And if you are measuring the other ingredients in grains instead of grams, all of the measurements are probably very off. It might look like a 'g' instead of a 'gr' on your scale. Grains are used for measuring lead, ammo, bullets, etc.
I have a tip for bread that overflows in the pullman pan- reduce the rise time by 15 minutes. Sometimes if a kitchen is warm (like mine during summertime!) or yeast is particularly active, it can cause the dough to become too filled with air before baking, which can cause the over flow.
Happy baking!
Meg
My pullman loaf pan is vintage and missing the lid(my 82 year old dad gave it to me when I started my sourdough journey recently ❤️). I have not used it yet so should I just bake this with no lid or is there something I could use that would act as a lid? Thanks!
Hi Charlotte!
I haven't tried using a substitute lid for my pullman pan. My initial thought was to try setting the pan on a baking sheet (to catch any overflow) and putting another baking sheet on top. But honestly, I think that since bread rises at an uneven rate, it could just tip the sheet off and create a big mess in your oven. I have made this recipe many times without the lid on the pan. My kids like the domed, 'grocery store bread' look. I'd still recommend baking it on a cookie sheet the first few times you make it-- all ovens are different!
Good luck and please let me know how it goes!
Meg
Perfect! I was blown away how well this recipe came out. This is my second try at sourdough, as well as my second with using the Pullman pad. (First one didn’t come out as well, tasted good, but was overdone.)
I did cut the recipe down to 2/3rd’s so I could use it my 9 inch pan.
Other than that, I followed the recipe as written.
I forgot to attach the ingredients being cut down to 2/3rds.
I also forgot to mention that I only used 2 grams of yeast, because I wasn’t sure my starter would be enough.
Recipe reduced to 2/3rds.
I forgot to put this in my previous comment.
200 gr active sourdough starter
420 gr all-purpose flour
227 gr warm water
38 gr unsalted butter room temperature (*see note)
33 gr honey
28 gr powdered milk
10 gr salt
2 grams instant yeast
Thank you for posting converted recipe for smaller Pullman loaf (9 inch) pan. I am a long time artisan sourdough Batard baker but every so often my hubby wants " just plain white bread" for his beloved PB&J ( think half jar of pnut butter & jam per sandwich). This bread really stands up to it. Only tweaks for me personally are omitting instant yeast ( oozed out during 2nd rising - possibly because I live at 6100 ft), tad more salt and removing lid to brown last 10 mins. Now I'm thinking I should have bought larger Pullman loaf!
I’ve made this twice and it’s turned out great both times. I love being able to mix everything at once and then just let it rise. This will be my go-to from here on out.
I made this recipe with a few changes because of what I didn't have on hand. I used 100 GM of bread flour, because I didn't have enough AP flour. I also used milk instead of water because I didn't have any dried milk. The first rise went well, then I put it in my Pullman pan and into the fridge overnight since I was going full Sourdough. The next morning, I pulled it out of the fridge and let it warm up until the surface temp was 60ish deg. I then preheated the oven and baked it with the lid on.
The result was perfect. Perfectly square, perfectly moist, just a delight. Thank you for this recipe.
Hello, Oran! This is such a helpful comment, thank you so much for taking the time to share! It's always super helpful to learn from the personal experience of other bakers. We appreciate you!
Happy baking! Meg
Perfection!!! Love this loaf. I have a smaller Pullman loaf pan so made a Pullman loaf and a regular loaf with it. Very soft and tasty. Definitely you might go to sandwich bread from now on. Thank you!
Is there a reason my questions never got answered?? I asked, back in July 2024 about whether I could knead thru 1st rise in my breadmachine, and also if I could substitute powdered buttermilk for powdered milk? Seems like everyone else got a reply to their questions!
What kind of yeast is used? Regular active dry yeast or rapid rise?
This recipe is perfection! Directions were super easy to follow and my loaf turned out very lovely. I saw the comment where I could split this loaf into two 8x4 pans, do you think it would be fine to do two 9x4 Pullman pans instead?