Ground Beef Jerky Recipe (Easy Hamburger Jerky)
Learn how to make delicious beef jerky with ground beef! This easy, customizable hamburger jerky recipe walks you through mixing the beef and seasoning it to perfection, shaping the pressed jerky using a jerky shooter gun, and dehydrating or smoking it for incredible flavor. This is the best beef jerky recipe!
We've been making homemade jerky, snack sticks, and summer sausage for years using our own beef and venison. This ground beef jerky recipe is one of the easiest ways to turn freezer meat into a high-protein snack that disappears fast around our house.
This recipe is simple, flexible, and perfect for anyone looking to turn their freezer full of ground beef into something truly convenient and simple. It truly is the best beef jerky recipe!
Whether you prefer a classic peppered ground meat jerky or want to experiment with different cheeses and add-ins (like dried cranberries!), this recipe gives you the freedom to make it your own.
If you love making your own meat sticks, sausages and jerky, be sure to check out our Venison Summer Sausage, and Venison Jerky.
Why Make Jerky with Ground Beef?
Making jerky with ground beef is one of my favorite ways to turn a few pounds of hamburger into a protein-packed snack that the whole family will actually eat. While traditional beef jerky is made from sliced cuts of meat, ground beef jerky is easier to season, easier to chew, and often more budget-friendly.
It's also a great way to use home-raised beef, venison, elk, or other wild game. Since the seasonings are mixed directly into the meat, every bite is flavorful from edge to edge. No marinating required!
Another advantage is that you don't need fancy knife skills or expensive cuts of meat. Simply mix the seasonings into the ground meat, load it into a jerky gun, and dehydrate. The result is tender, flavorful jerky that's perfect for lunch boxes, road trips, hunting season, or a quick high-protein snack after chores.
If you're looking for an easy way to preserve ground beef and keep homemade snacks on hand, this ground beef jerky recipe is hard to beat.
Shopping list
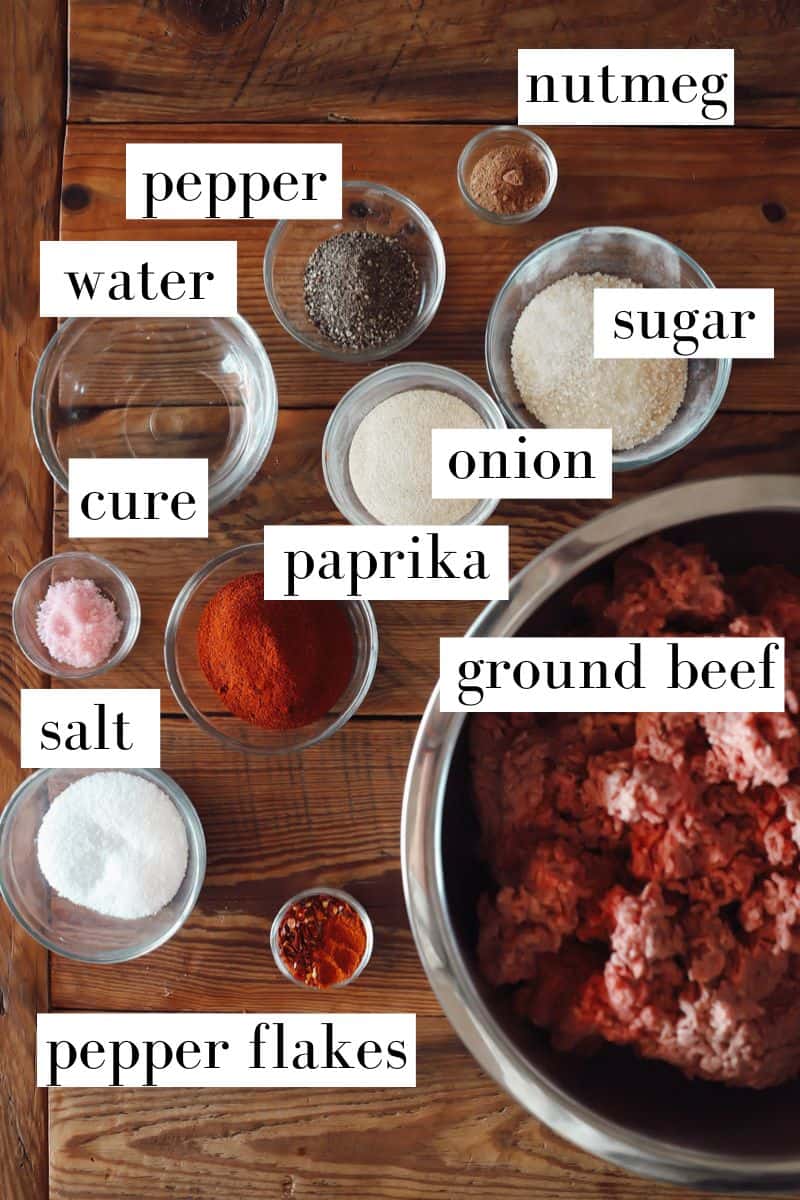
- Ground beef: We are using 80/20 hamburger for this ground beef jerky recipe in our batch today, but leaner 90/10 or even 93/7 would be ideal.
- Kosher salt: Feel free to swap out kosher salt in your venison summer sausage with options like table salt (non-iodized), sea salt, Himalayan pink salt, or pickling salt.
- Insta Cure #1: This goes by other names, such as curing salt, pink salt, Insta Cure, and Prague powder. The curing process from sodium nitrite helps to prevent common food borne illnesses associated with trapped air in a meat mixture.
- Fresh ground black pepper: Prepared black pepper is fine, but we like the flavor of fresh ground peppercorns.
- Smoked paprika: Regular paprika works, too! You can also leave the paprika out if you prefer.
- Onion powder: To convert this recipe to dehydrated minced onions or fresh onions, use 1 tablespoon of dehydrated onions for every teaspoon of onion powder.
- Sugar: Gotta add it!
- Water: Save this for the last bit of the mixing.
- Hot pepper flakes: Optional if you like it hotter!
- Cayenne pepper: We love adding an extra kick-- it's not too spicy!
- Nutmeg: The not-so-secret ingredient! I also use this trick in my Venison Meatballs and Italian Wedding Soup to make the meat even more delicious.
Customizing Your Ground Meat Jerky Recipe
- Dried hot peppers: Self explanatory! It will kick the heat up! We have a special 'garden blend' of dehydrated peppers that we make at the end of the season before it freezes. This mix has everything from habeneros and bell peppers to ghost peppers. It'll set off your internal fire alarm!
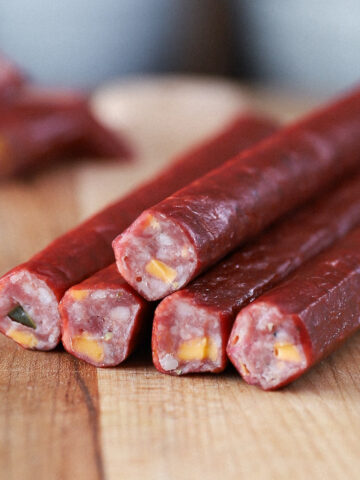
- Dried cranberries: Finely chop dehydrated cranberries and mix them in with the seasonings. It adds a sweet and tart flavor that's unexpected and delicious!
- Flavor ideas: Add teriyaki sauce, Worcestershire, or liquid smoke to your ground jerky seasoning recipe for unique flavors. Remember to decrease the water in equal amounts!
- Texture tips: Want a firmer chew? Dry your jerky slightly longer. Prefer a softer bite? Use a bit of water when mixing to keep it tender.
- Heat levels: Adjust spice with hot pepper flakes or cayenne for those who like a kick. For milder options, skip the heat entirely and stick to smoky seasonings.
How to Make Beef Jerky with a Dehydrator
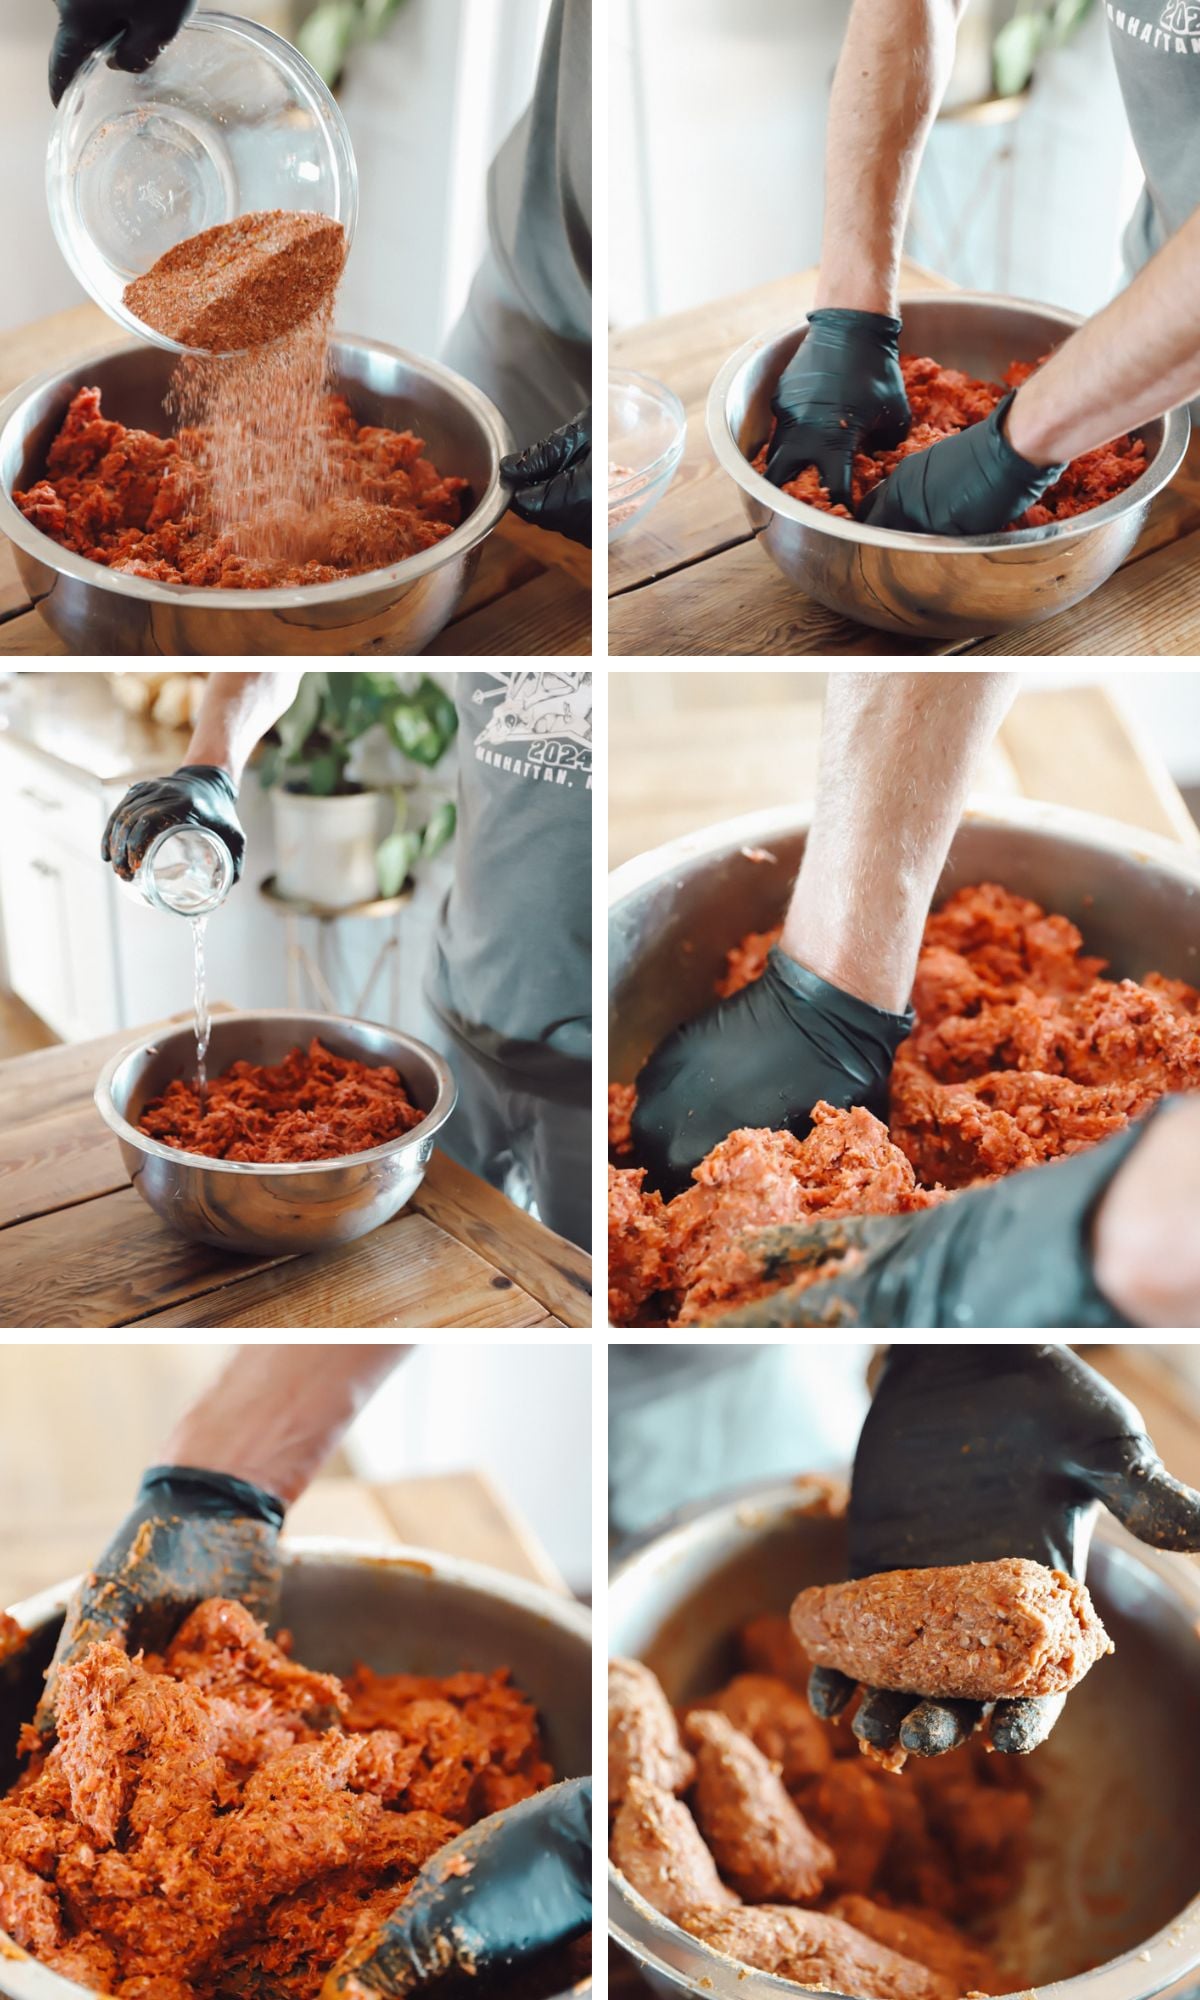
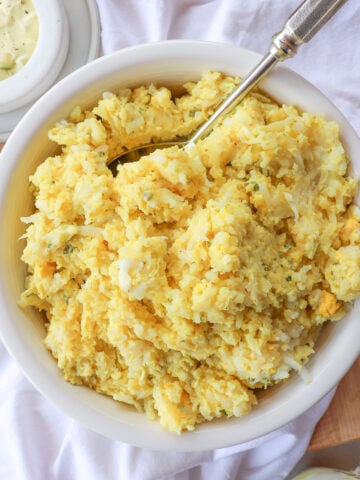
- Mix the Ingredients: In a large bowl, combine the ground beef, salt, Insta Cure #1, seasonings, and any optional add-ins you’d like. Mix thoroughly until all seasonings are evenly distributed.
- Refrigerate the Mixture: Cover the bowl with plastic wrap and refrigerate for at least 12 hours. This step is crucial for the curing process to work properly.
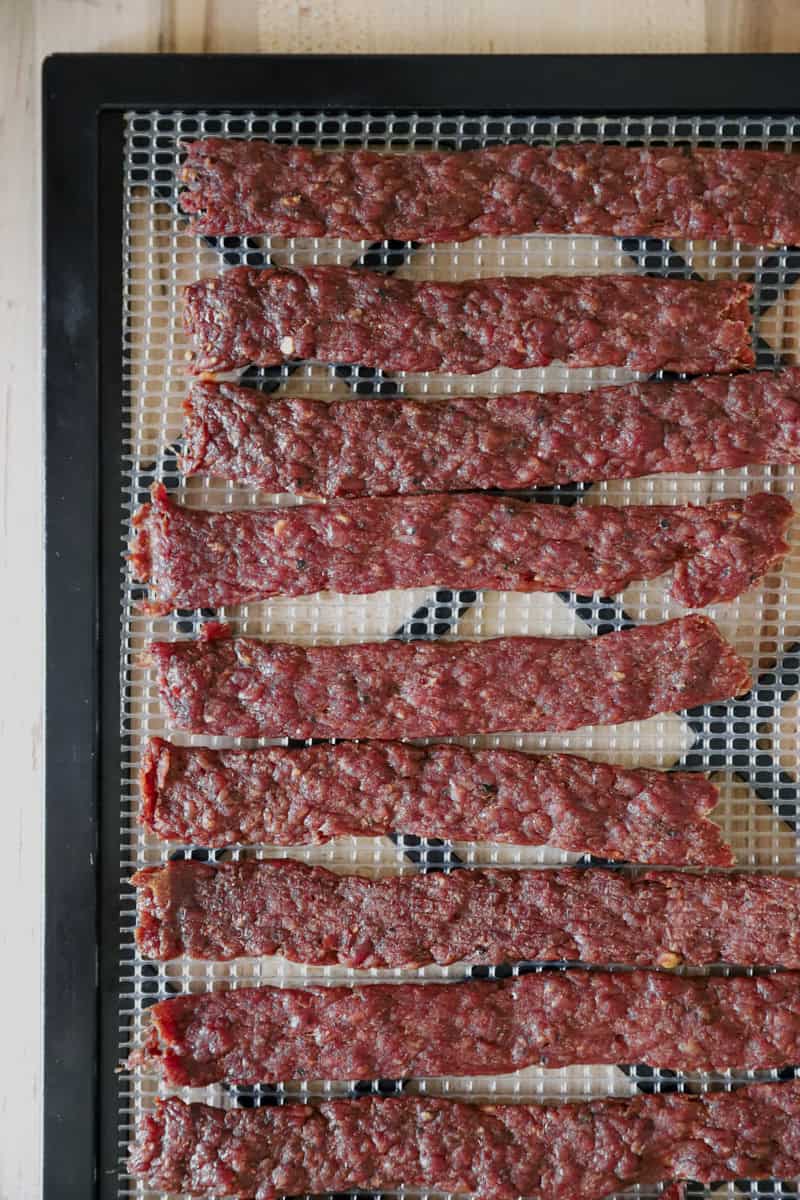
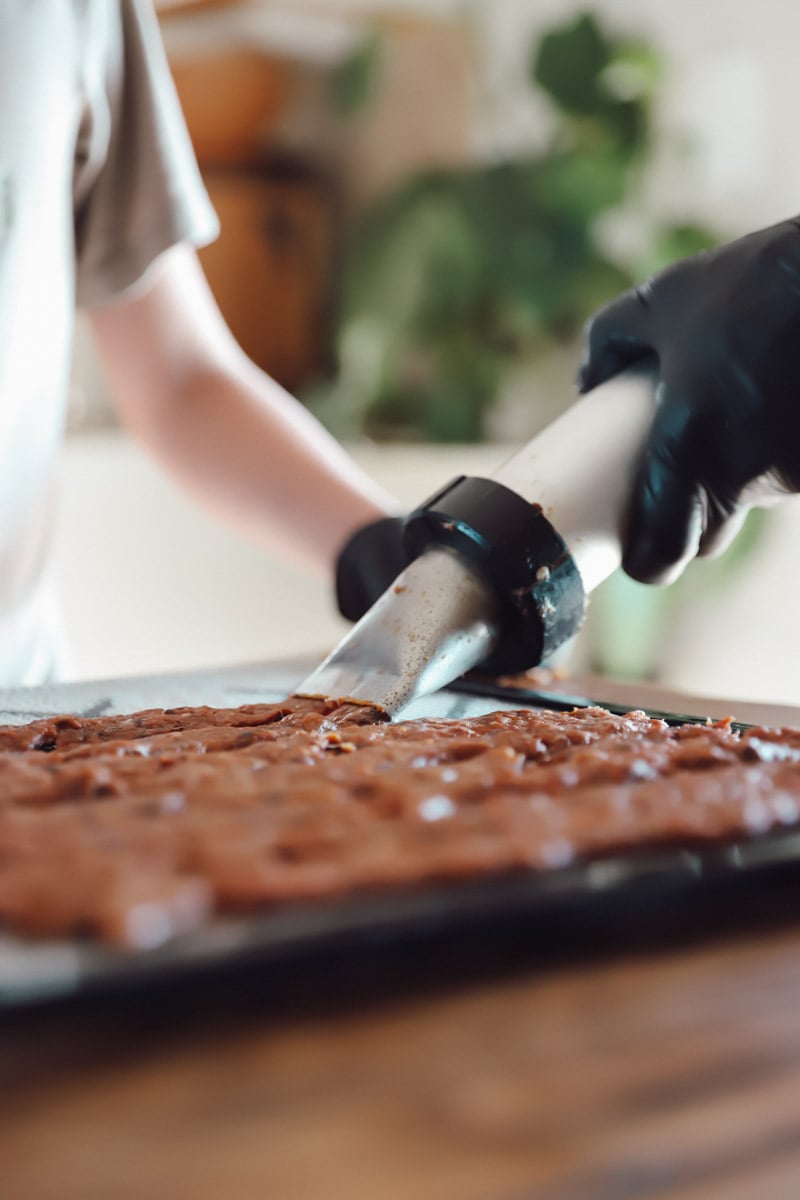
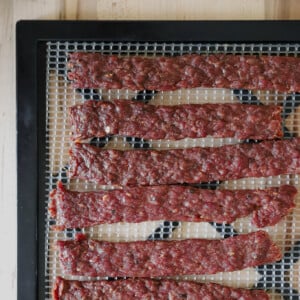
- Prepare for the Dehydrator: Divide the meat mixture into portions and shape them into long ovals that will fit into your jerky gun. Load the jerky gun and press the mixture into strips directly onto your dehydrator trays. Leave a small space between each strip for airflow.
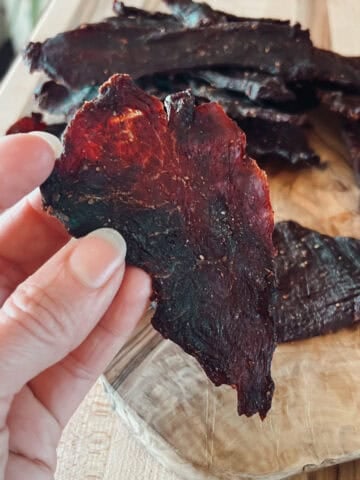
- Dehydrate the Jerky: Set your dehydrator to 150°F. Dry the jerky for 4-5 hours, checking periodically. The jerky is ready when it’s dry but pliable. When bent, it should flex and just barely begin to tear at the fibers.
Recipe
Hamburger Jerky- Beef Jerky Recipe
Equipment
- food dehydrator
- jerky gun
- large mixing bowl or mixer
Ingredients
- 8 pounds beef ground, 80/20 or 90/10
- 100 grams sugar
- 72 grams salt
- 50 grams onion powder
- 50 grams smoked paprika
- 25 grams black pepper
- 12 grams Instacure #1
- 6 grams crushed red pepper
- 6 grams nutmeg
- 4 cups dried cranberries optional (about 650 grams)
- 3 grams cayenne pepper ground
- 1 cup water
Instructions
- Mix the Ingredients: In a large bowl, combine the ground beef, salt, Insta Cure #1, seasonings, and any optional add-ins you’d like. Mix thoroughly until all seasonings are evenly distributed.
- Refrigerate the Mixture: Cover the bowl with plastic wrap and refrigerate for at least 12 hours. This step is crucial for the curing process to work properly.
- Prepare for the Dehydrator: Divide the meat mixture into portions and shape them into long ovals that will fit into your jerky gun. Load the jerky gun and press the mixture into strips directly onto your dehydrator trays. Leave a small space between each strip for airflow.
- Dehydrate the Jerky: Set your dehydrator to 150°F. Dry the jerky for 4-5 hours, checking periodically. The jerky is ready when it’s dry but pliable. When bent, it should flex and just barely begin to tear at the fibers.
Notes
- Heat your smoker to 140°F (no hotter than 180°F). Fruitwood is a great wood choice for this recipe, but feel free to experiment with your favorite. We used hickory for this batch and we all liked it!
- Lay the venison strips on wire racks or directly on the smoker grates or stackable jerky trays, making sure they aren’t touching.
- Smoke until the jerky reaches a leathery texture—firm but not brittle. Start checking at 2 hours and keep an eye on it every 20 minutes after that.
- Store ground meat jerky in an airtight container or vacuum-sealed bag to maintain freshness. For long-term storage, freeze the jerky and thaw as needed.
- When stored in a cool, dry place, homemade jerky from ground beef lasts about 1-2 weeks. Refrigerate or freeze if you don’t plan to eat it within this timeframe. Jerky lasts 6-12 months in the freezer.
Nutrition
How to Make Ground Beef Jerky Without a Dehydrator
No dehydrator? No problem! You can make this ground beef jerky recipe in a standard oven.
Prepare the meat mixture exactly as directed, then shape the jerky strips onto wire cooling racks placed over baking sheets. Bake at your oven's lowest temperature setting, usually around 170°F, and crack the oven door slightly to allow moisture to escape.
Drying times will vary depending on the thickness of the jerky and your oven, but most batches take 3 to 5 hours. Begin checking for doneness around the 3-hour mark. Properly dried jerky should bend and crack slightly without snapping in half.
While I prefer using a dehydrator because it provides more consistent airflow and temperature control, the oven method works well when you're making a small batch or don't have a dehydrator available.
Tip: If your oven has a convection setting, use it. The circulating air helps the jerky dry more evenly and can shorten the drying time.
How to Make Beef Jerky in Smoker
- Heat your smoker to 140°F (no hotter than 180°F). Fruitwood is a great wood choice for this recipe, but feel free to experiment with your favorite. We used hickory for this batch and we all liked it!
- Lay the venison strips on wire racks or directly on the smoker grates or stackable jerky trays, making sure they aren’t touching.
- Smoke until the jerky reaches a leathery texture—firm but not brittle. Start checking at 2 hours and keep an eye on it every 20 minutes after that.
Storing and Shelf Life
- Store ground meat jerky in an airtight container or vacuum-sealed bag to maintain freshness. For long-term storage, freeze the jerky and thaw as needed.
- When stored in a cool, dry place, homemade jerky from ground beef lasts about 1-2 weeks. Refrigerate or freeze if you don’t plan to eat it within this timeframe. Jerky lasts 6-12 months in the freezer.

Safety Note
This recipe is written with some flexibility in the spices, but do not attempt to change the amounts of salt or cure. These ingredients are necessary for preventing food borne illness.
As an amazon associate, this post contains affiliate links, which means I make a small commission at no extra cost to you. See my full disclosure here.
Helpful Tools
Most of these tools are linked in my Amazon Store Front in the Butcher Shop section. If you prefer to shop small, we get most of our butchering equipment and seasonings from Walton's. They gave me a code to share with you for a free Ultimate Steak and Roast Shaker with a $50 purchase! Use MEGAN24 to save!
- Jerky Shooter (also called jerky gun)
- Kitchen scale: I like to use my small kitchen scale for weighing the seasonings and a big scale for weighing the meat.
- Vacuum sealer: Have a vacuum sealer makes packaging and storing the jerky so much easier! You can also freeze the packages. The one we have is linked on Amazon, but it might be a better price at a smaller shop like Walton's.
- Vacuum bags: I use bags either from Walton's (MEGAN24 saves) or Pack Fresh USA (code MEG10 saves!).
- Meat mixer: this is a heavy duty machine that can evenly mix 50 pounds of meat without bogging down. Smaller mixers, such as your Kitchen Aid stand mixer, will work if you work in smaller batches.
- Food Dehydrator: The Excalibur 3900 is the best dehydrator for beef jerky. We can do 9 pounds of jerky in one batch with this machine! It's easy to clean and dries the jerky evenly, without rotating trays.
- Instant-read thermometer
- Fibrous casing: These non-edible, durable casings are large and easy to work with. They allow you to stuff the mixture tightly and smoke or hang sausage or salami without fear of bursting.
Helpful Tips for Ground Meat Jerky Recipes
- Choose the right ground meat: For the best texture and longest shelf life, 90/10 ground beef is ideal, but 80/20 works well if that's what you have available. Leaner meat works too but may result in drier jerky. You can also experiment with other ground meats like turkey, venison, or bison. If using lean meat, you'll need to add 1 pound of ground bacon to this recipe.
- Seasoning balance: If you're experimenting with jerky cannon recipes, start with less seasoning, taste test, and adjust. It’s easier to add spice than to fix over-seasoned meat!
- Even strips for uniform drying: A jerky shooter gun (or jerky cannon) makes it easy to create evenly pressed jerky strips, ensuring consistent dehydration.
- Patience with curing: Let the meat cure in the fridge overnight. This step not only enhances flavor but also ensures food safety, especially when making jerky from ground meat.
Serving Suggestions
- Meat snack trays: Pair your hamburger jerky in the dehydrator with cheese cubes, nuts, and dried fruit for a protein-packed snack tray.
- Hiking or camping: Ground beef jerky in a dehydrator is lightweight and perfect for outdoor adventures. Pack individual portions in airtight bags for convenience.
- Lunchbox add-on: Use pressed jerky as a quick protein boost in school or work lunches. Kids especially love the chewable texture of reconstructed jerky!
Frequently Asked Questions
Yes! Arrange the jerky strips on wire racks over baking sheets and dry them in the oven at the lowest temperature setting. Crack the oven door slightly to allow moisture to escape and begin checking for doneness after about 3 hours.
Yes. Ground beef jerky is made by mixing seasonings directly into the meat before shaping and dehydrating.
90/10 is ideal, but 80/20 works if that's what you have on hand.
No. A jerky gun creates uniform strips, but the meat can also be pressed into strips by hand.
The jerky should bend and begin to crack along the fibers without snapping in half.
Yes. Lean ground venison works beautifully. Link to your venison jerky and summer sausage posts.
And that's a wrap!
And there you have it, folks! Dehydrating your own pressed beef jerky is a homestead journey worth taking. Everything is better when you make it yourself, right?
If you enjoyed this recipe, I have good reason to think you'll also like my easy Venison Hamburger Helper recipe, All Purpose Venison Marinade or my guide to making the Best Deer Meat Burgers (and yes, even if you consider yourself to be a ground beef person, I know you'd love it!).
More easy recipes
Looking for other recipes like this? Try these:

What's New on the Homestead
Here's what's been going on lately here at Ninnescah Made!


I'm definitely going to try this. I just searched curing salt and Walmart nor Meijer sells it in my location. I want to be sure that pink salt or Himalayan salt is the same thing, or no? Should I order the specific stuff as to not mess this up. Thank you.
I'm glad you asked-- pink Himalayan salt is not the same as curing salt. It's really confusing and I wish they didn't call Instacure or Curing salt 'pink salt' because that makes it seem like it's the same as Himalayan salt. If you can't find curing salt locally, we have had great luck ordering from Amazon or Walton's. If you've already made your jerky and didn't include the curing salt, just store your jerky in the freezer and get out small quantities at a time and keep it refrigerated.