easy sourdough pizza crust recipe
If you are looking for a no-fuss sourdough pizza crust recipe, this is it! It comes together with very little hands-on time and is restaurant quality. Keep reading, if you are interested in learning how to make sourdough crust. I have even included a sample schedule to help make the process easier for you!
| This is a true sourdough pizza dough recipe no yeast required! This process takes about a day from start to finish, but the hands-on time is very minimal. Don't be intimidated! |
As an amazon associate, this post contains affiliate links, which means I make a small commission at no extra cost to you. See my full disclosure here.

Jump to:
- ingredients for sourdough pizza crust
- how to make a sourdough pizza crust (with schedule): Day 1
- how to make a sourdough pizza crust (with schedule): Day 2
- Baking the sourdough pizza crust
- helpful tools for making this sourdough pizza crust
- Can a sourdough pizza crust be grilled?
- FAQ about making sourdough pizza crusts
- Recipe
- When is my sourdough starter ready to bake?
- More sourdough recipes you'll love!
- Can a pizza crust be frozen for later?
- Can a homemade sourdough pizza crust be baked in a cast iron skillet?
- Can a sourdough pizza crust be grilled?
- More sourdough recipes you'll love!
- Comments
ingredients for sourdough pizza crust
This sourdough pizza dough recipe is intended to make two large pizzas or four personal pizzas. The size and shape of pizza you want to make is what will determine the pan you need. Baking dish options include two 9X13" pans, two 12" pizza rounds, or four 6" pizza rounds for a hand-tossed style crust. Divide it in half again for a thin and crispy sourdough pizza crust.
- 100 g active sourdough starter
- 500 g slightly warm water
- 720 g bread flour
- 20 g fine sea salt
- 20 g honey
how to make a sourdough pizza crust (with schedule): Day 1
This recipe requires an active starter. Most starters will reach peak activity around 4-6 hours after a feeding. In my kitchen, I will feed my sourdough starter around 3:00 pm. It will peak around 7:30 pm. For step-by-step instructions to make a sourdough starter, refer to my post How to Bake a Perfect Loaf of Sourdough Bread. Instructions are in the beginning of the post.
Prepare for overnight rise
- For these steps, I use a very large bowl. Combine 100 grams of active sourdough starter with 500 grams of water, that is slightly warmed, around 78 degrees. I use a dutch whisk to help incorporate the water and starter faster.
- Add 720 grams of bread flour and 20 grams each of salt and honey. I use the dutch whisk to mix it as much as possible, then finish with my hands using a pinching & kneading motion. This is a slightly dry dough. Cover with plastic wrap and let rest for 30 minutes at room temperature.
- After the dough has finished resting, keep the dough in the bowl and do a series of folds to create a dough ball shape. The dough is now ready to do the first rise overnight!
Bulk Rise
- Transfer the dough to a 2 quart square-sided plastic container that has been well greased with olive oil. Cover and let rise overnight (10-12 hours) at room temperature, around 70 degrees. The dough is ready when it has nearly doubled in size, but it likely will not fully double. In a colder kitchen, the dough will take longer to rise. In a warmer kitchen, the dough could rise too quickly so keep an eye on it! The rest time is going to be different for every baker, every kitchen and change throughout the seasons.


how to make a sourdough pizza crust (with schedule): Day 2
The next morning, I check on my dough to make sure it has risen and almost doubled. If it has not, I will let it continue to rise for a few more hours. When the dough is ready, we will begin a process called stretching the dough. If you have made my sourdough focaccia, this will be a very familiar process!
Stretch the Dough Twice
- Coat the baking dish generously with olive oil. Use your hands to really coat the surface entirely.
- Remove the dough and divide into two equal pieces as evenly as possible to make 2 large pizzas. Divide it again to make four equal portions for personal pizzas.
- The goal now is to stretch the dough to the corners of the pan gently and in a relaxed manner. If the dough feels loose and pliable, keep stretching it towards the edges. Once the dough feels tense, it's time to let it rest for ten minutes until it no longer resists. Do not force the dough!
- Cover the pan with plastic wrap, beeswax wrap, or an inverted baking sheet. The dough is ready to proof in a warm spot, ideally around 78 degrees. I have found that using a seed starting mat or an oven (turned off!) with the light on, or a food dehydrator with a proofing setting usually creates the perfect environment. Let it rest for thirty minutes.
- After thirty minutes, it is time to dimple the dough again! Just like the first time, gently lift and stretch the dough. Cover and rest for another thirty minutes. Now it is time to preheat the home oven to 450 degrees, so do not let the dough rest in the oven now!


Baking the sourdough pizza crust
After the dough has rested for thirty minutes, you are ready to par-bake the pizza crust! Par-bake simply means pre-bake the crust so that it will completely bake once the toppings are added later. After the par-bake, the crust can be frozen for later or used immediately.
- Place the baking pan on the bottom rack of the oven. Bake the dough at 450 degrees for 15-18 minutes, or until the surface is firm and the bottom crust is lightly browned. I use a spatula to gently lift a corner to peak underneath.
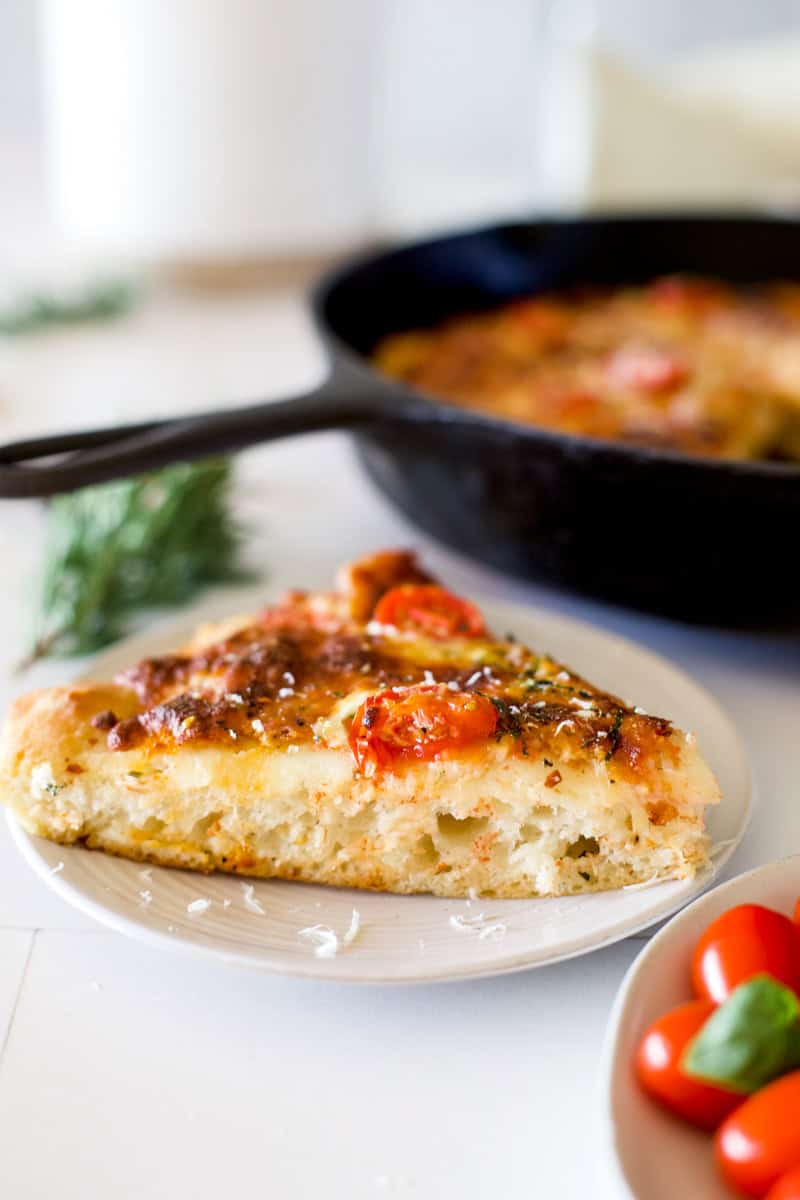
- Remove the par baked crust from the oven, assemble and make the pizza. Add room temperature tomato sauce, fresh mozzarella cheese, fresh basil, and your favorite toppings!
- Bake at 450 degrees in the middle or top rack position, until the cheese is melted and broiled in some spots. The pizza is generally done at 12-15 minutes, and can even be placed under the broil to brown it up a bit more and make the edges of the pizza have a crispy crust. Just keep an eye on it!
- Lastly, take the time to enjoy your own pizza with your family for pizza night!
helpful tools for making this sourdough pizza crust
Sourdough isn't meant to be over complicated and doesn't require any fancy equipment to create beautiful and robust breads. I strongly recommend purchasing a kitchen scale to weigh the ingredients for making sourdough. You will also need a large mixing bowl. It isn't necessary to have a square sided plastic container for the bulk fermentation dough rise, but ever since I started using one I've had such better luck determining if my dough has doubled.
Can a sourdough pizza crust be grilled?
A sourdough pizza crust that has been par-baked can absolutely be finished off on the grill. In the past, we have had varying levels of success getting the perfect bubbly cheese while the crust doesn't blacken too much. I recommend starting the pizza on a cast-iron grill griddle if you have one available, and then moving it to the grill area to crisp up during the last few minutes. Timing will vary, but it is generally going to take about the same time. Grills can be temperamental, so I'm not going to give you an exact time to follow.
FAQ about making sourdough pizza crusts
You can use a pizza stone to make a the pizza. It can, also be used on the grill. Win-win!!
YES! This would be sooo good. Skip the par-bake and bake the crust directly on the stone in the wood fired oven until done.
To save the crust for later, par bake the crust in a pizza pan and let it fully cool. Vacuum seal the sourdough pizza crust or put it in a freezer bag and store it for up to three months.
Yes! The cast-iron skillet will cause the edges to become brown and crispy. In fact, dark pans in general are best for heat conduction and crust color.
Yes! It will need more time to rise and proof. Discard is really just an active starter that needs fed, and that takes extra time. You will likely need to add 4+ hours to this recipe.
Short answer, yes! The fermentation process will be the exact same, you might just notice the dough hydration is a little different. Start slowly when adding the flour and possibly use a little less.

If you make this recipe, please leave a comment below! This provides helpful feedback to both me and other readers. For more delicious recipes from scratch and homesteading tips, follow me on instagram @NinnescahHomestead
Recipe

Sourdough Pizza Crust
Equipment
- large mixing bowl
- proofing container
- baking dish or cast iron skillet
Ingredients
- 100 grams sourdough starter at peak activity
- 720 grams bread flour
- 500 grams water
- 20 grams salt
- 20 grams honey
Instructions
how to make a sourdough pizza crust (with schedule): Day 1
 For these steps I use a very large glass mixing bowl. Combine 100 grams of active sourdough starter with 500 grams of slightly warm water, around 78°. I use a dutch whisk to help incorporate the water and starter faster.
- Add 720 grams of bread flour and 20 grams each of salt and honey. I use the dutch whisk to mix it as much as possible, then finish with my hands using a pinching & kneading motion. This is a slightly dry dough. Cover with plastic wrap and let rest for 30 minutes at room temperature.
- After the dough has finished resting, keep the dough in the bowl and do a series of folds to create a dough ball shape. The dough is now ready to rise overnight!
- Transfer the dough to a 2 quart square-sided plastic container that has been well greased with olive oil. Cover and let rise overnight (10-12 hours) at room temperature, around 70°. The dough is ready when it has nearly doubled in size, but it likely will not fully double. In a colder kitchen, the dough will take longer to rise. In a warmer kitchen, the dough could rise too quickly so keep an eye on it! The rest time is going to be different for every baker, every kitchen and change throughout the seasons.


how to make a sourdough pizza crust (with schedule): Day 2
- The next morning I check on my dough to make sure it has risen and almost doubled. If it has not, I will let it continue to rise for a few more hours. When the dough is ready, we will begin a process called stretching the dough. If you have made my sourdough focaccia, this will be a very familiar process! Coat the baking dish generously with olive oil. Use your hands to really coat the surface entirely.
- Remove the dough and divide it in half as evenly as possible to make 2 large pizzas. Divide it again to make four personal pizzas. The goal now is to stretch the dough to the corners of the pan gently and in a relaxed manner. If the dough feels loose and pliable, keep stretching it towards the edges. Once the dough feels tense, it's time to let it rest for ten minutes until it no longer resists. Do not force the dough!
- Cover the pan with plastic wrap, beeswax wrap, or an inverted baking sheet. The dough is ready to proof in a warm spot, ideally around 78 degrees. I have found that using a seed starting mat or an oven (turned off!) with the light on, or a food dehydrator with a proofing setting usually creates the perfect environment. Let it rest for thirty minutes. After thirty minutes, it is time to dimple the dough again! Just like the first time, gently lift and stretch the dough. Cover and rest for another thirty minutes. Now it is time to preheat the oven to 450°, so do not let the dough rest in the oven now!


Baking the sourdough pizza crust
- Place the baking pan on the bottom rack of the oven. Bake the dough at 450° for 15-18 minutes, or until the surface is firm and the bottom crust is lightly browned. I use a spatula to gently lift a corner to peak underneath.
- Remove the par baked crust from the oven and assemble and make the pizza. Add room temperature sauce, crumbled mozzarella cheese and your favorite toppings! Bake at 450° in the middle or top rack position, until the cheese is melted and broiled in some spots. The pizza is generally done at 12-15 minutes, and can even be placed under the broil to brown it up a bit more. Just keep an eye on it!


Notes
When is my sourdough starter ready to bake?
Nutrition
More sourdough recipes you'll love!
One of my favorite things about sourdough is all of the different ways you can use it! No stand mixer or fancy tools required. If you are brand new and need to learn How to Make a Sourdough Starter, check out my tutorial! I also have sourdough starter discard recipes such as my semi-famous (ha!) Sourdough Discard Coffee Cake and Sourdough Bagels.


Comments
No Comments