How to Safely Water Bath Can Tomatoes (Beginner-Friendly Guide)
Learn how to safely water-bath can tomatoes with modern USDA guidelines. Foolproof, beginner-friendly instructions for perfect jars every time!
There’s nothing better than opening a jar of home-canned tomatoes on a cold winter night. The smell alone takes me right back to summer evenings spent in my grandma’s farmhouse kitchen. I used to watch her standing over a large stockpot, steam fogging up the windows, while rows of garden-fresh tomatoes waited their turn to become next year’s chili, homemade salsa, tomato soup, and spaghetti sauce.
Her method worked beautifully for decades, and those jars were a staple in our pantry growing up. But over the years, I’ve learned a lot about modern food safety, and some of the ways Grandma canned—while tried and true back then—need a little tweaking today.
Here’s the thing: tomatoes are tricky. They fall right on the borderline between high- and low-acid foods. Without one simple extra step, the water-bath method Grandma relied on can’t always guarantee safety.
That’s where this guide comes in. I’m sharing the best of both worlds: Grandma’s tradition paired with current USDA and National Center for Home Food Preservation (NCHFP) guidelines. You’ll find step-by-step instructions, acidification tips, altitude adjustments, and troubleshooting so you can preserve your harvest with confidence—and enjoy those jars all year long.
I’m Meg, a fifth-generation farmer and homesteader. I’ve been canning for years using methods passed down through my family, but always updated to meet today’s tested safety standards. My goal is to help you skip the guesswork and go straight to safe, delicious, reliable results.
Jump to:
Choosing and Prepping Tomatoes
The best canned tomatoes start long before we start heating our canner. Whether you've mastered how to grow your own tomatoes, buy fresh tomatoes from a local farm, or stock up at the farmers market, choosing the right fruit and prepping it properly makes a big difference in flavor. Here's my advice to you.
How to Choose the Best Tomatoes for Canning:
- Firm, ripe tomatoes with no cracks or bruises or pest damage
- Bright color and smooth skin
- Fully ripe but not overripe fruit (no mushy spots)
You can use Roma tomatoes, San Marzano, slicers, cherry tomatoes, or a mix. Romas and paste varieties make a thicker, meatier sauce, while slicers or cherry tomatoes give you a juicier, more liquid result.
I'm using a combination of the tomatoes listed above, plus our favorite garden tomatoes: Gin Fizz (Aaron's favorite sunset-hued slicer!), Cherokee purple, Black Krim, Pink Wonder, plus a bowl full of random cherry and grape tomatoes.
If you froze tomatoes earlier in the growing season, they are perfectly fine to use for canning! I do this often because my tomatoes always ripen at different times. Once thawed, the skins practically fall off, making them easy to prep for canning.
Wash Tomatoes
- Rinse under cool running water
- Rinse thoroughly and let them dry on a clean towel.
- It is no longer recommended to use dish soap to wash tomatoes for canning.
Peeling & Coring Tomatoes
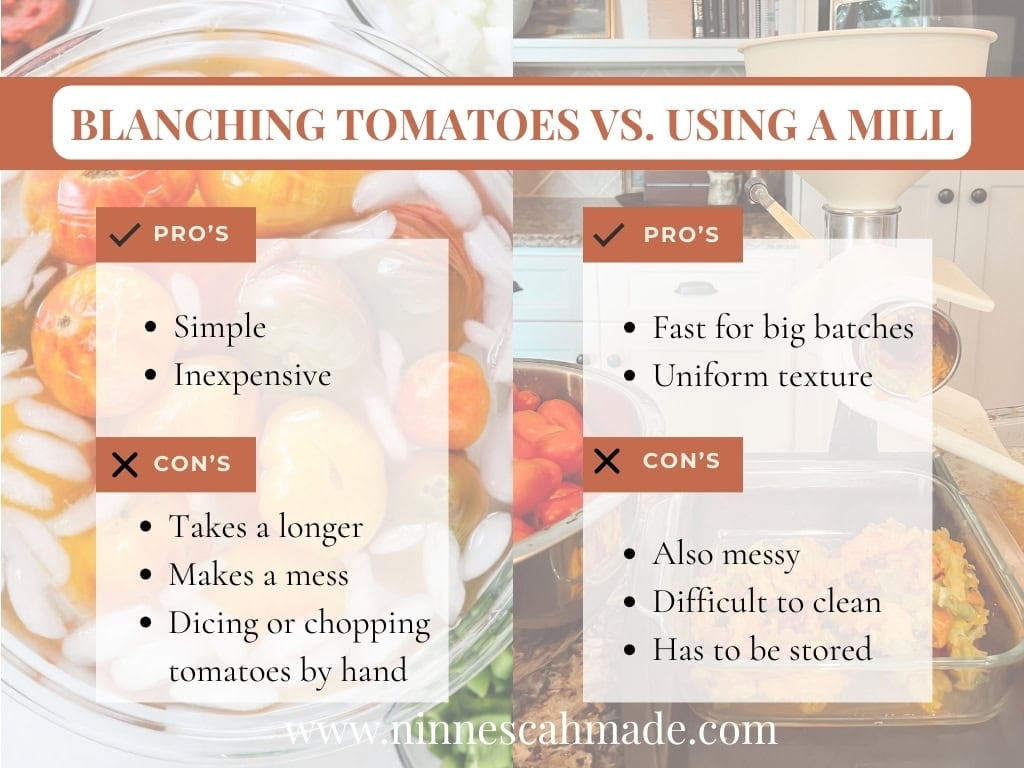
Option 1: Blanch & Ice Bath
- Bring a large stockpot or boiling-water canner to a boil.
- Score a small “X” on the bottom of each tomato.
- Working in small batches, boil the tomatoes for 60 seconds, then transfer the blanched tomatoes to cold water using a slotted spoon.
- Peel and core. The tomatoes can be left whole, halved, quartered or diced.
Pros: Simple and inexpensive.
Cons: Messy and requires multiple bowls. Even so, this is the method I use the most.
Option 2: Food Mill Method
- Cut tomatoes into quarters. They can still be semi-frozen, too!
- Run through a food mill to separate skins and seeds (see photo below).
- Collect the pulp and juice in a large pot. You can see my setup in the picture below: mill, baking sheet to catch drips, 9X13 pan for the pulp and juice, and a smaller dish for catching the seeds and peels.
Pros: Fast for big batches, uniform texture.
Cons: Bulkier, messier, requires cleanup, and your arms will get tired if you are using a manual mill! I also have trouble with my mill not attaching securely because of the decorative edges of the countertop.

Simmer Before Canning
Use a big dutch oven or stock pot to cook the tomatoes. Simmer peeled and diced, halved or milled tomatoes for 30 minutes to:
- Reduce excess liquid.
- Deepen flavor.
- Keep tomatoes hot for the hot pack method.
- Stir frequently to prevent scorching.
Adding Acid & Salt
Tomatoes seem like they should be naturally acidic enough for water bath canning, right? After all, I've always thought of them as being an acidic food. But it's trickier than that - tomatoes sit right on the edge of safe pH levels for canning. The magic number is 4.6 pH. Anything above that is considered a low-acid food, which creates the perfect environment for dangerous bacteria like botulism to grow.
Here’s the kicker: different tomato varieties have different acidity levels.
- Roma tomatoes and San Marzano types are meatier and tend to be less acidic than slicer or cherry tomatoes.
- Growing conditions, ripeness, and even your soil can also affect acidity.
- A batch of tomatoes picked on the same day—even from the same plant—can vary enough to make one jar safe and another risky.
Place clean jars on a towel-lined counter, then add acid to each jar before filling. Optional: add salt for flavor (½ teaspoon per pint, 1 teaspoon per quart).

As an amazon associate, this post contains affiliate links, which means I make a small commission at no extra cost to you. See my full disclosure here.
Essential Canning Equipment
- Water bath canner or a large stockpot with a canning rack. A weighted-gauge pressure canner is not necessary for this recipe.
- New lids and screw bands (don’t reuse old lids) - save with code MEG10
- Jar lifter – for safely moving hot jars in and out of the water
- Canning funnel – keeps rims clean and helps with accurate filling - save with code MEG10
- Slotted spoon or ladle– for scooping tomatoes into jars
- Damp cloth or damp paper towel – for wiping rims before sealing
- White vinegar – to wipe rims or prevent cloudy water in the canner
- Towels or a cooling rack – where jars will rest after processing so that your countertop doesn't get damaged (seriously!)
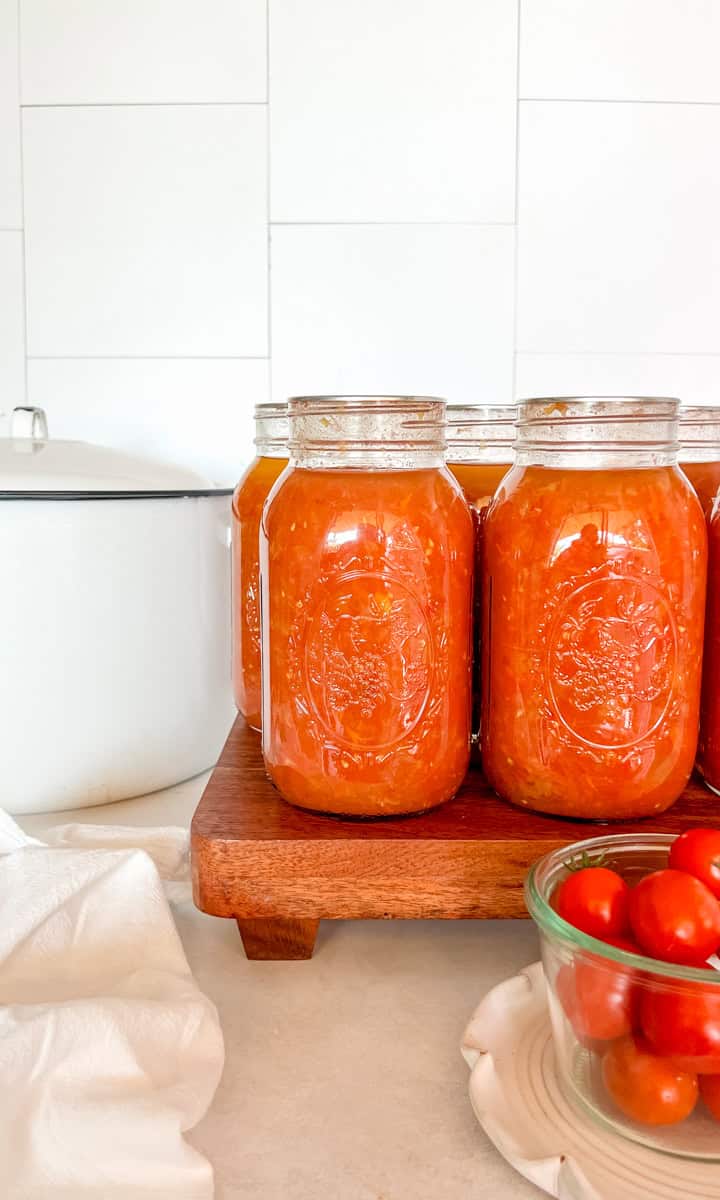
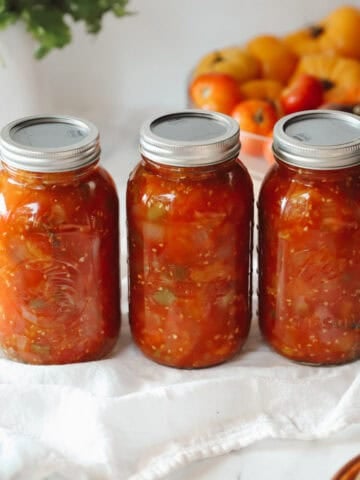
- Jars: I like to use small-mouth quart jars for tomatoes. Check rims for chips/cracks. Wash and keep warm until filling to avoid thermal shock (dishwasher heat-dry or keep in hot water).
- Pro tip: keep a small bowl or kettle of extra hot water handy. You'll need it to top off the canner if the water level drops during processing.
Fill the Jars
- Ladle hot tomatoes into jars, leaving ½ inch of headspace.
- Remove air bubbles by sliding a non-metal utensil around the inside of the jar.
- Adjust tomato level if needed.
- Wipe rims with a vinegar-dampened cloth.
- Place new lids and screw on bands until fingertip tight.
Water Bath Canning Process
Fill canner halfway with hot (≈180°F) water for hot-pack. Load jars upright with a jar lifter. Add boiling water to cover jars by more than one inch.
Processing Times for Crushed Tomatoes
Start the timer only after water reaches a rolling boil. For crushed or diced tomatoes, process pints for 35 min, Quarts for 45 min (at 0–1,000 ft). Process packed whole/halved tomatoes, pints for 40 min. If packing whole/halved tomatoes, pints are processed for 40 min. See the chart below to adjust for your elevation and jar size.
If at any point the jars are no longer submerged, add water and restart the timer once it comes to a simmer.

Let Jars Rest After Processing
When the processing time is complete:
- Turn off the heat and carefully remove the canner lid, tilting it away from you to avoid a face full of steam.
- Let the jars sit in the hot water for 5 minutes.
- This helps prevent thermal shock, which can cause jars to crack.
- It also gives the boiling action inside the jars a chance to settle.
Carefully Remove Jars
- Use your jar lifter to lift each jar straight up and out of the water.
- Keep jars upright—tilting them can interfere with proper sealing.
- Place jars on a towel-lined counter or cooling rack, leaving at least one inch of space between them for airflow. Be safe! Never set a hot jar on a cool surface- it can explode!
The Waiting Game: 12–24 Hours
- Leave jars undisturbed at room temperature for 12–24 hours.
- During this time, you’ll probably hear a few satisfying “pings” as the lids seal.
- Resist the urge to press on the lids or tighten the bands—you want the natural vacuum to form without interference.
Meg’s Tip: It’s tempting to rearrange them for a prettier Instagram photo, but hands off! Moving jars around too soon can cause seal failures.
Cleaning & Storing:
- Wipe jars clean with a damp cloth or vinegar if sticky.
- Label the jars with contents and date.
- Remove rings.
- Store in a cool, dark place (50–70°F).
- Avoid damp areas to prevent rust.
Shelf Life
- Jars last 18 months or longer when stored correctly.
- After that, they may still be safe, but quality may decline with undesirable flavor changes or color fading.

Troubleshooting
- Tomatoes & Water Separate
- Common with paste varieties like roma tomatoes.
- Safe to eat—just shake the jar before using.
- Cloudy Liquid:
- Usually caused by hard water or tomato starches.
- Add a splash of vinegar to canner water to prevent this next time.
- Unsealed Jars:
- Causes: dirty rims, overtightened bands, defective lids, or water level too low.
- Solution: Replace lid and reprocess, or refrigerate and use quickly.
FAQs
- Approximately 21 pounds for 7 quarts
- Approximately 13 pounds for 9 pints
Yes! Just acidify every jar. See above for my top tomato recommendations for canning.
No. Bands and jars are reusable, lids are not.
Yes, this is safe too! A weighted-gauge pressure canner or dial-gauge model can be used without added acid, but processing times are different.
Meg’s Tip: If you’re serious about canning, a dedicated water-bath canner is worth the investment. It’s deeper, heats more evenly, and often comes with a rack that makes loading and unloading much easier.
By following these steps, you’ll have beautiful jars of home-canned tomatoes ready for soups, sauces, and pasta dishes all year long—just like Grandma used to make, but even safer.
That's a Wrap!
Canning tomatoes might feel like a big, messy project (because, let’s be honest, it is), but there’s something deeply satisfying about seeing those jars lined up on your shelf. They’re more than just food—they’re little time capsules of summer, ready to save the day when dinner needs a flavor boost or you want to taste your garden in the middle of January.
By taking a few simple safety steps—like acidifying each jar, adjusting for altitude, and following proper processing times—you’re not just preserving tomatoes. You’re preserving peace of mind.
Grandma’s method gave us tradition. Today’s guidelines give us confidence. Together? That’s a pantry worth bragging about.
Drop a comment below and tell me your favorite way to use home-canned tomatoes—I love hearing your stories!
More Canning Recipes
Canning recipes that can be processed in a boiling water bath are high acid foods, such as homemade dill pickles, peaches, canned sweet corn, juices like cranberry or grape, peach preserves, jams and jellies.


Recipe

How to Can Tomatoes
Equipment
- water bath canner
- quart mason jars, lids and rings
- jar lifter and funnel
- food mill optional
- large stock pot
Ingredients
- 12 pounds tomatoes approximately
- 8 tablespoons lemon juice see chart for other acid options
- 4 teaspoons salt optional
Instructions
- Wash tomatoes. Rinse thoroughly under cool running water and let them dry on a clean towel. It is no longer recommended to use dish soap to wash tomatoes for canning.
- Peel and core tomatoes. See note below about blanching vs. using a food mill for this process.
- Use a big dutch oven or stock pot to cook the tomatoes. Simmer peeled and diced, halved or milled tomatoes for 30 minutes.
- Wash jars, lids and rings in hot soapy water and rinse well. Keep the jars hot before adding the tomatoes.
- Place clean jars on a towel-lined counter, then add 2 tablespoons of bottled lemon juice (or another acid from the chart above) to each jar before filling. Optional: add 1 teaspoon of salt per quart.
- Ladle hot tomatoes into jars, leaving ½ inch of headspace. Remove air bubbles by sliding a non-metal utensil around the inside of the jar. Adjust tomato level if needed. Wipe rims with a vinegar-dampened cloth. Place new lids and screw on bands until fingertip tight.
- Fill canner halfway with hot (≈180°F) water for hot-pack. Load jars upright with a jar lifter. Add boiling water to cover jars by more than one inch.
- Start the timer only after water reaches a rolling boil. For crushed or diced tomatoes, process quart jars for 45 min (at 0–1,000 ft). Process packed whole/halved tomatoes, pints for 40 min. If packing whole/halved tomatoes, pints are processed for 40 min. See the chart below to adjust for your elevation and jar size.If at any point the jars are no longer submerged, add water and restart the timer once it comes to a simmer.
- When the processing time is complete, turn off the heat and carefully remove the canner lid, tilting it away from you to avoid a face full of steam. Let the jars sit in the hot water for 5 minutes. This helps prevent thermal shock, which can cause jars to crack. It also gives the boiling action inside the jars a chance to settle.
- Use your jar lifter to lift each jar straight up and out of the water. Keep jars upright—tilting them can interfere with proper sealing. Place jars on a towel-lined counter or cooling rack, leaving at least one inch of space between them for airflow. Be safe! Never set a hot jar on a cool surface- it can explode!
- Leave jars undisturbed at room temperature for 12–24 hours. During this time, you’ll hear a few satisfying “pings” as the lids seal. Resist the urge to press on the lids or tighten the bands—you want the natural vacuum to form without interference.
- Wipe jars clean with a damp cloth or vinegar if sticky. Label the jars with contents and date. Remove rings.Store in a cool, dark place (50–70°F). Avoid damp areas to prevent rust.
- Jars last 18 months or longer when stored correctly. After that, they may still be safe, but quality may decline with undesirable flavor changes or color fading.
Notes
- Tomatoes & Water Separate
- Common with paste varieties like roma tomatoes.
- Safe to eat—just shake the jar before using.
- Cloudy Liquid:
- Usually caused by hard water or tomato starches.
- Add a splash of vinegar to canner water to prevent this next time.
- Unsealed Jars:
- Causes: dirty rims, overtightened bands, defective lids, or water level too low.
- Solution: Replace lid and reprocess, or refrigerate and use quickly.

Comments
No Comments