How to Score Sourdough Bread: Tips, Techniques & Pictures!
Learn how to score sourdough! We all love to admire those fancy patterns and slashes on the top of your sourdough bread. Mastering the skill of decorative scoring turns homemade bread into a work of art, and also impact it's texture and rise in the oven.
Jump to:
- What is Sourdough Scoring?
- What makes sourdough bread rise?
- The Tools You Need
- A beautifully scored loaf needs the right baking conditions
- How to bake sourdough without a dutch oven
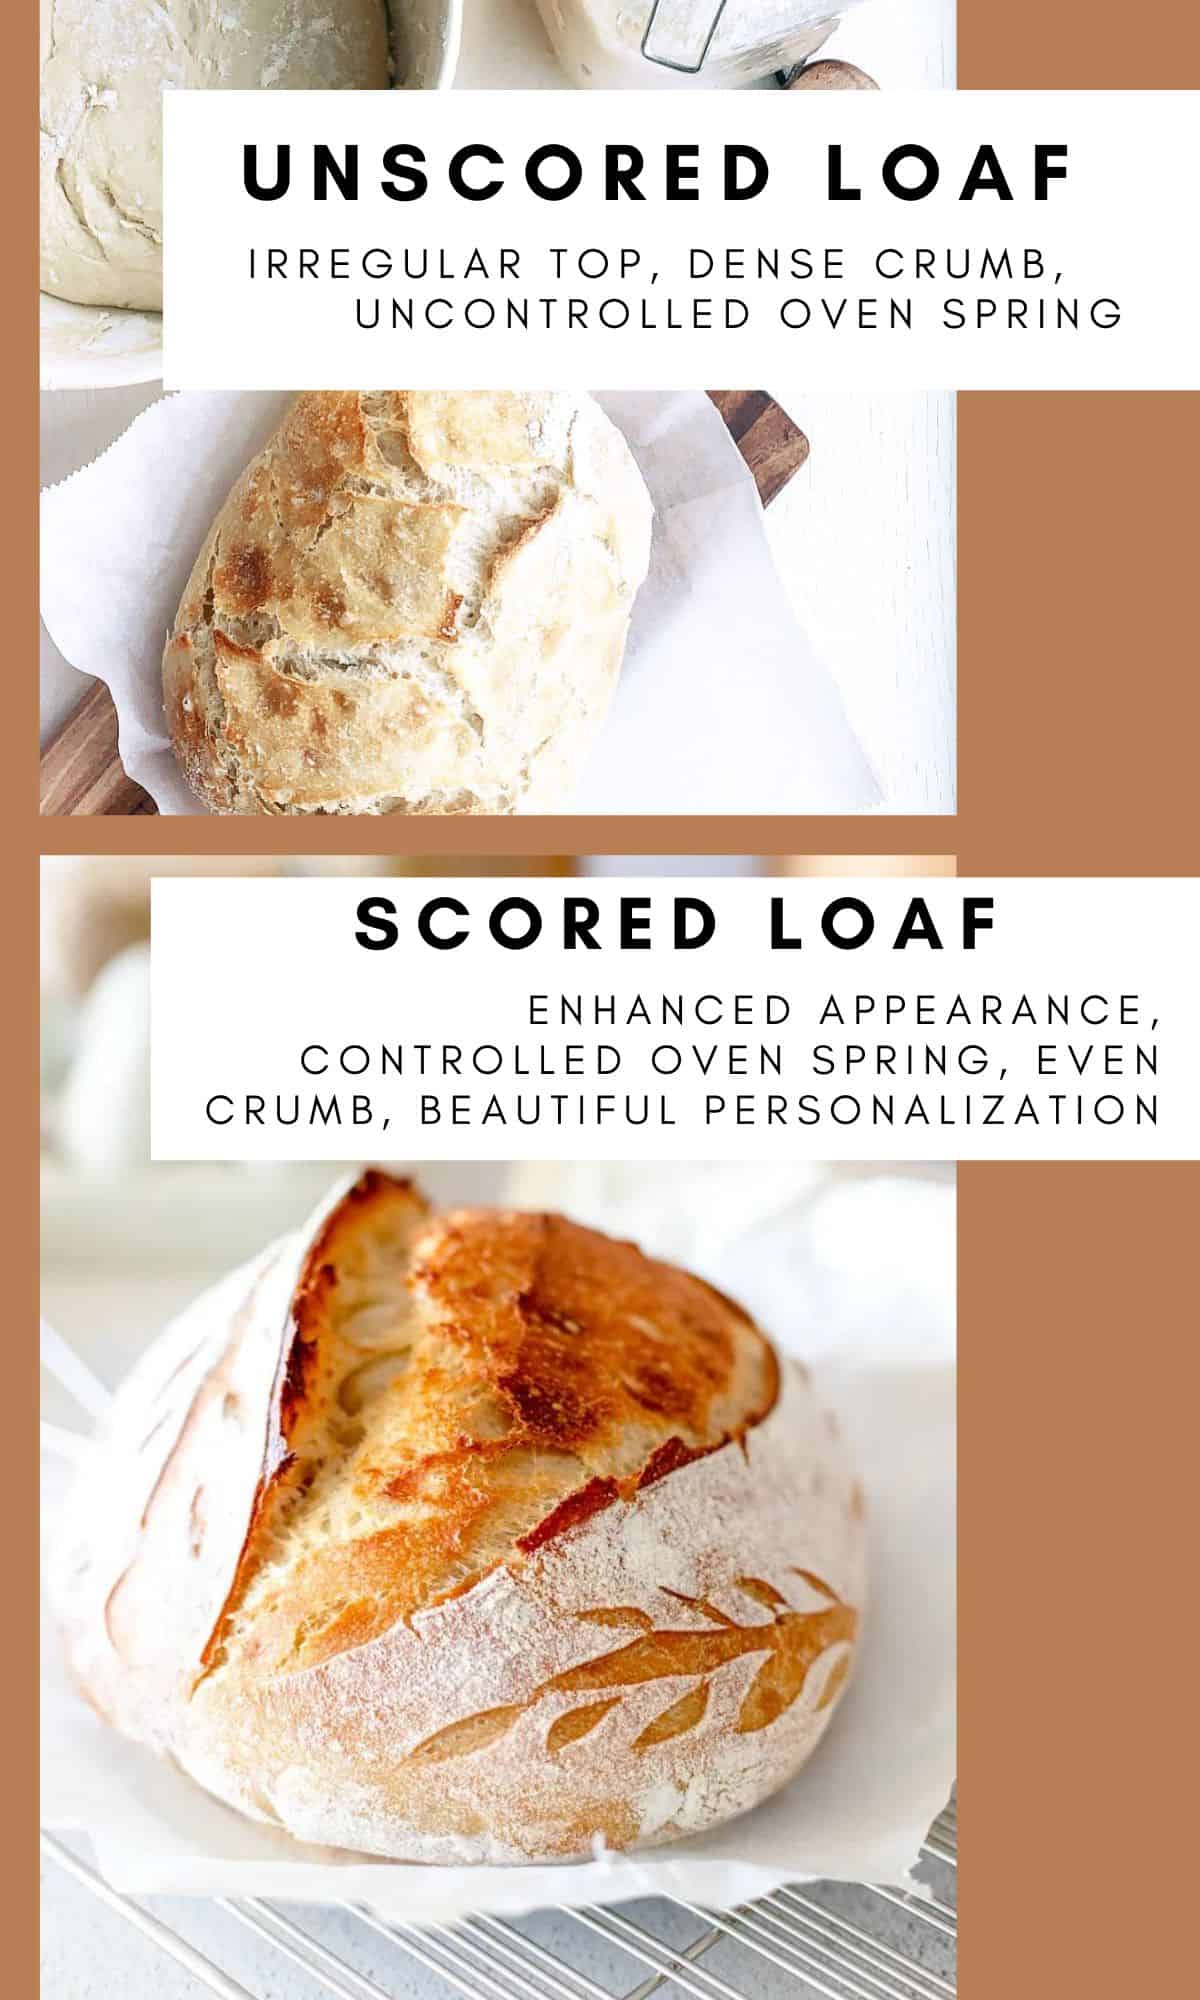
- What happens if I don't score my sourdough?
- The Basic Techniques for Scoring Bread
- What is the difference between deep and shallow scoring?
- What are unique ways to create a scoring pattern?
- Troubleshooting Common Scoring Issues
- The Final Bake
- More posts about sourdough baking, sourdough recipes and techniques!
- New on the Homestead
- Comments
What is Sourdough Scoring?
First things first, what's sourdough scoring all about? Well, it's essentially making those shallow cuts or slashes on your bread's surface right before it hits the oven. It's not just for looks; it helps your dough expand gracefully while it bakes, preventing it from bursting in weird places.
Basically as the sourdough loaf bakes, the expansion finds the weakest spots and creates a massive blow out.
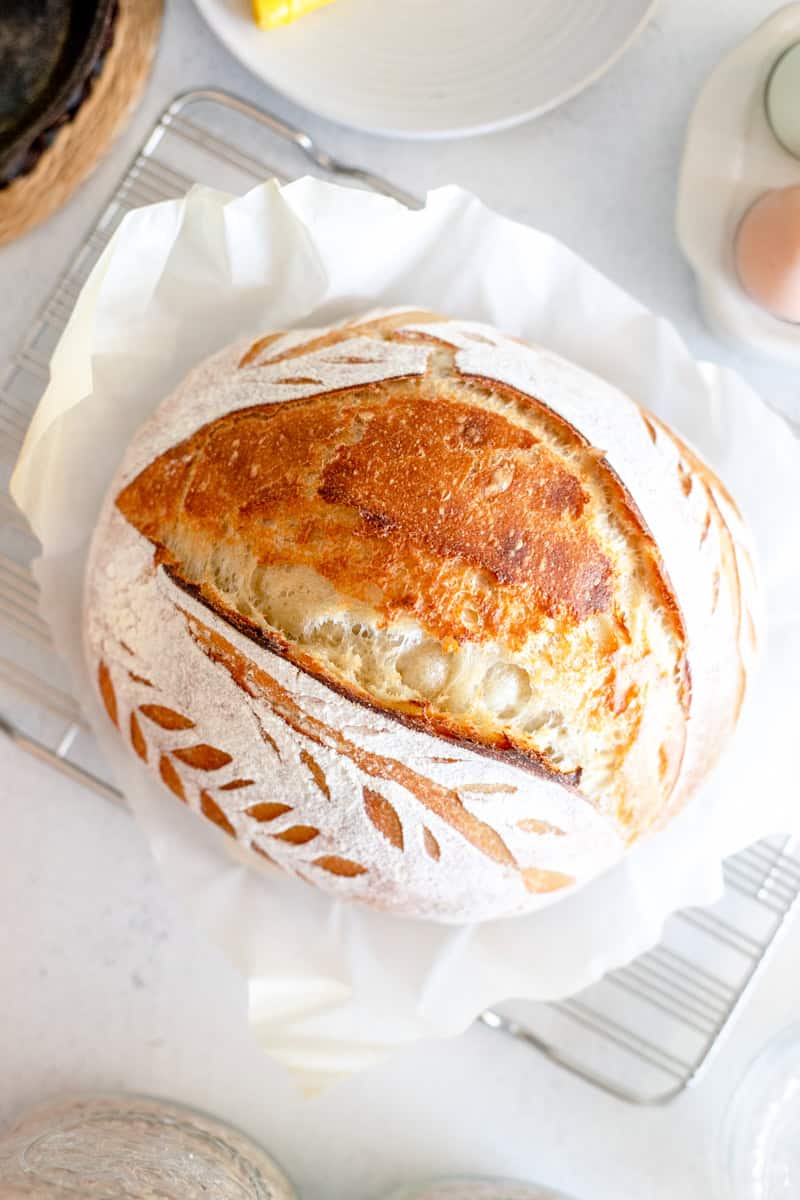
I can't tell you how many times I've put a loaf of sourdough in the oven to bake, thinking that it was going to be the most boring Plain Jane bread I've ever baked, but then the scoring and expansion creates a beautiful ear and the expansion scores look like they came from a magazine.
What makes sourdough bread rise?
During the proofing and fermentation process in bread baking, that magical rise you see is all thanks to the power of nature – specifically, yeast and bacteria.
Here's how it works:
Yeast, those tiny living organisms in your sourdough starter, consume the carbohydrates in the flour. As they feed, they produce two critical things: carbon dioxide gas and alcohol. It's this gas that causes your dough to rise.
As it accumulates, it gets trapped in the dough's gluten structure, creating those lovely air pockets you find in bread.
Now, the wild yeast and lactic acid bacteria in your starter aren't just about puffing up your dough; they also work their magic on flavor development. They break down complex sugars into simpler ones, contributing to that distinctive sourdough taste.
So, while your dough is rising, it's also gaining layers of flavor that set sourdough apart from other bread types.
As an amazon associate, this post contains affiliate links, which means I make a small commission at no extra cost to you. See my full disclosure here.
The Tools You Need
Now, let's talk tools. You don't need a fancy-schmancy setup. Just grab a trusty lame (a fancy word for a razor blade on a stick), a sharp knife, sharp razor blade, serrated knife, or even scissors.
Heck, some bakers use a simple box cutter – whatever floats your bread boat. And don't forget a little bowl of water to dip your blade in; it helps prevent sticking.
I also discovered about a year ago that dusting the dough surface with rice flour before scoring creates that lovely contrast of the shallower cuts on the dough's surface. So now I make my sourdough bread art pop whenever I make a loaf of bread!
A pastry brush can also be helpful for dusting off any excess flour before beginning your scoring pattern.
Do you need a whole set of sourdough tools? No. Just get the things you think you'll enjoy and don't worry about the rest! The beauty of baking sourdough loaves is that it is such a primitive process.
Just get a sharp, straight blade and you're all set. Pretty soon you'll master your scoring technique and the beautiful designs will be flowing.
A beautifully scored loaf needs the right baking conditions
Now this next item I'm going to shout out is not necessarily for scoring, per se, but professional bakers (and newbies, too!) swear by baking sourdough in a heavy duty cast iron dutch oven.
Here's why! A Dutch oven is the secret weapon for baking the best loaves of sourdough bread because it creates the perfect baking environment for a few key reasons, and they all lead to the perfect combination of a crunchy crust and a soft, chewy interior:
1. Trapped Steam: When you preheat a Dutch oven and then place your bread inside, it creates a sealed environment. This traps the steam evaporating from the dough during the first part of baking. The trapped steam keeps the dough's surface moist, allowing it to expand fully and develop a beautiful, crispy crust.
2. Even Heat: A Dutch oven's thick walls distribute heat evenly, which ensures uniform baking and prevents hot spots that can lead to uneven rising or browning in the hot oven.
3. Oven Spring: The trapped steam and even heat encourage a phenomenon called "oven spring." This is when the bread rapidly expands in the first few minutes of baking, resulting in a higher rise and an airy crumb structure.
4. Crispy Crust: The enclosed environment of the Dutch oven also promotes a crisp and well-browned crust. The steam prevents the crust from forming too early, allowing the bread to expand before it sets.
How to bake sourdough without a dutch oven
Pizza Stone (with Steam Tray):
- Advantages: A pizza stone provides excellent heat retention and distribution, resulting in even baking. When paired with a steam tray (a pan filled with water placed in the oven), it can create a steamy environment similar to a Dutch oven, promoting oven spring and a crisp crust.
- Outcome: You can achieve good oven spring and a slightly thinner, crisper crust compared to a Dutch oven. The crumb may be more open due to the stone's ability to conduct heat evenly.
3. Open Pan (Baking Sheet or Baking Stone):
- Advantages: Baking sourdough on an open pan, like a baking sheet or stone without a lid, allows the bread to expand freely. It's suitable for larger or irregularly shaped loaves. The lack of steam confinement results in a thinner, crispier crust.
- Outcome: You'll get a loaf with a thin, crunchy crust and an open crumb. However, achieving significant oven spring can be more challenging compared to a Dutch oven or stone with a steam tray.
4. Cloche or Bread Dome:
- Advantages: A cloche or bread dome is a specialized baker that provides a similar effect to a Dutch oven but in a different form. It traps steam and helps create an ideal baking environment.
- Outcome: You can expect excellent oven spring, a crispy crust, and a well-developed crumb. It's an excellent choice for those who prefer an alternative to a Dutch oven.
5. Cast Iron Skillet (with a Lid or Foil Tent):
- Advantages: A cast iron skillet can be used with a lid or tented with foil to mimic the steamy environment of a Dutch oven. It provides good heat retention and can produce satisfactory results.
- Outcome: While not as effective as a Dutch oven, you can achieve decent oven spring and a crust that's crispier than open-pan methods.
What happens if I don't score my sourdough?
I have baked sourdough without scoring before, and below is an example of what the baked loaf typically looks like. Uneven and jagged cracks burst open as the steam tries to escape during baking.
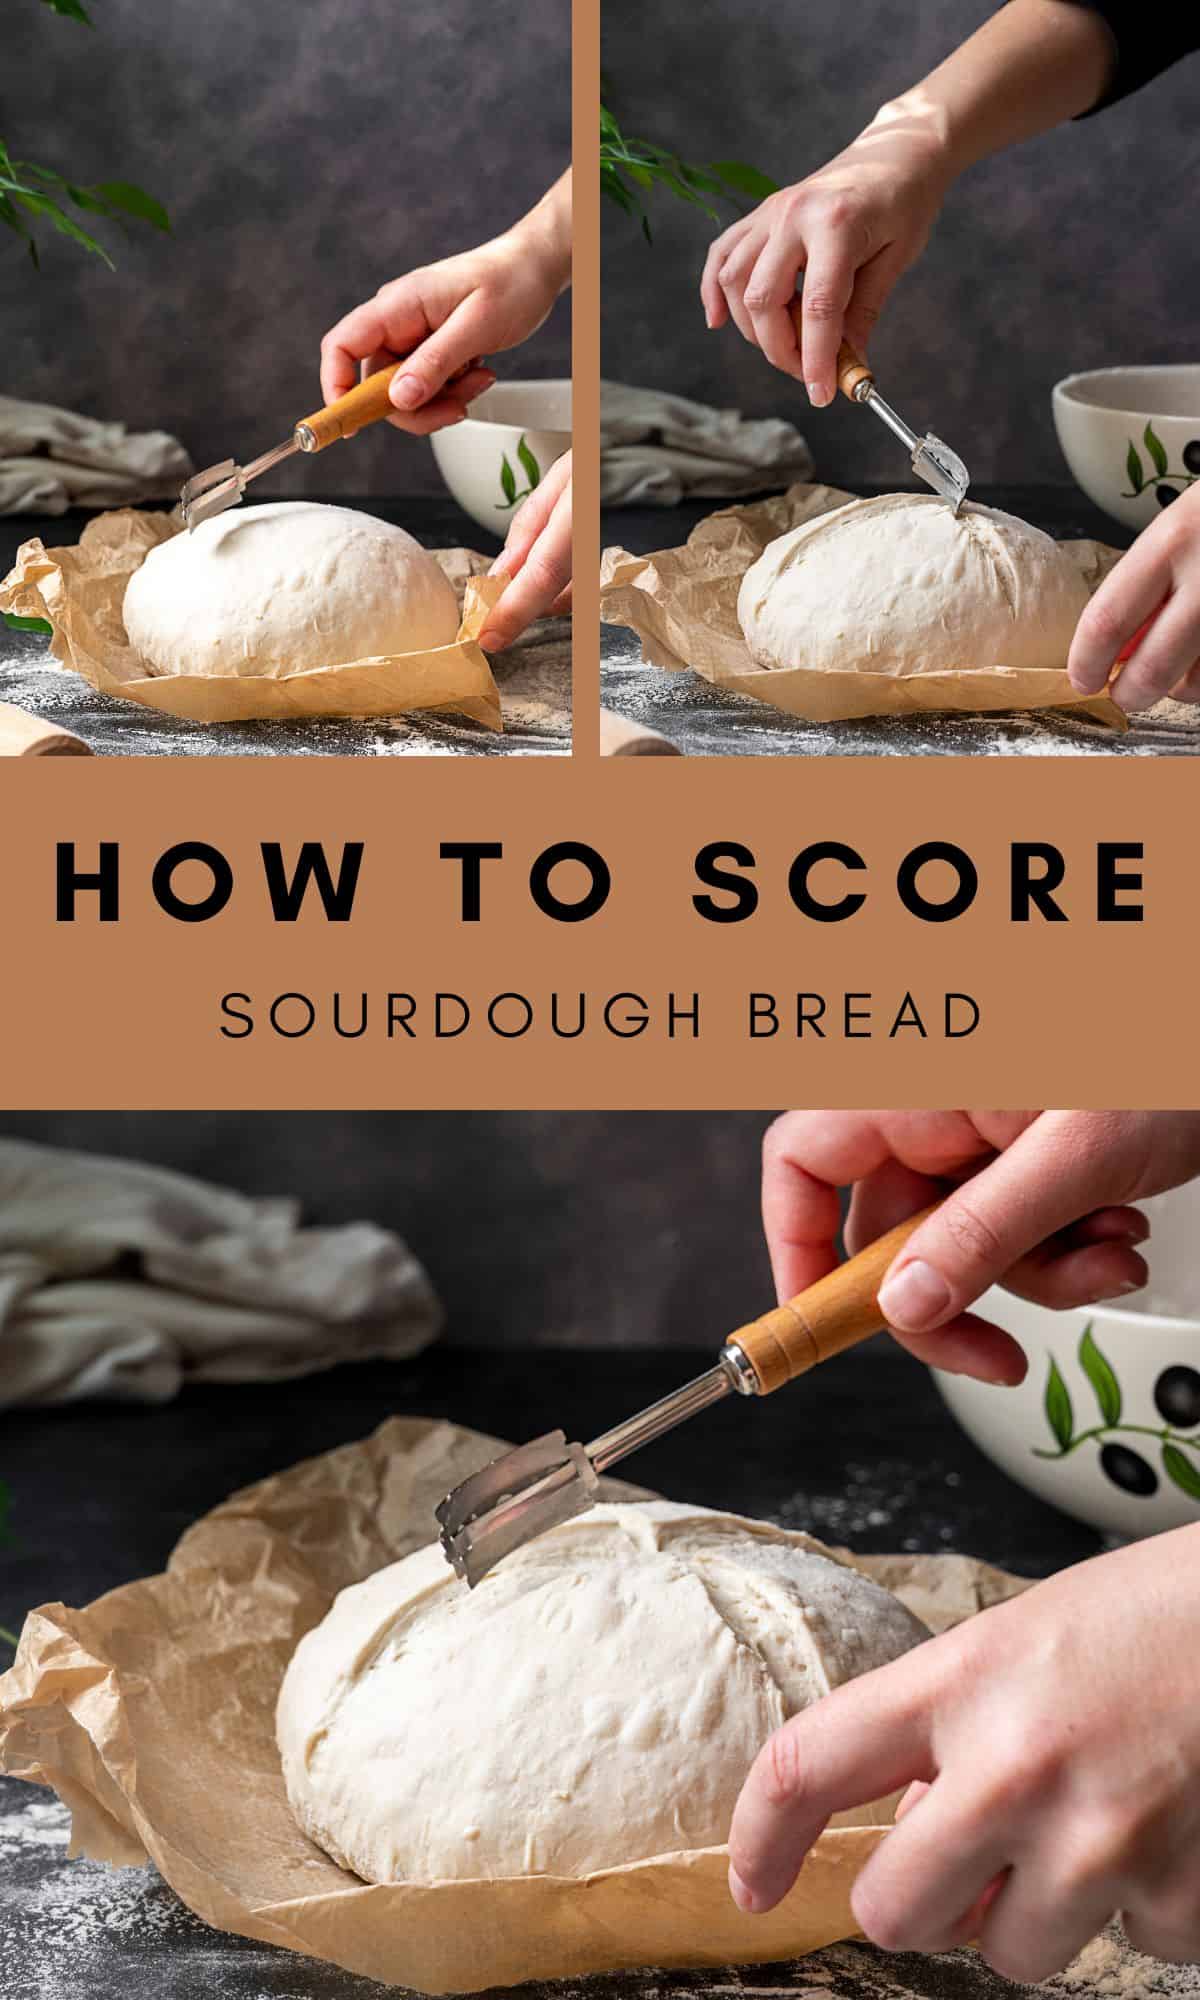
The Basic Techniques for Scoring Bread
Here's where the rubber meets the road. Or maybe I should say the bread dough meets the scoring blade. There are a few core techniques you'll want to know:
- Straight Slash: The classic. Just a simple, confident slash across the dough. Easy peasy.
- Cross Slash: Two cuts intersecting in the middle – it's like a sourdough tic-tac-toe!
- Decorative Scoring: This is where you get to flex your creative muscles. You can make intricate designs, waves, or whatever inspires you. It's your canvas; paint it with your blade.
What is the difference between deep and shallow scoring?
Deep Cuts:
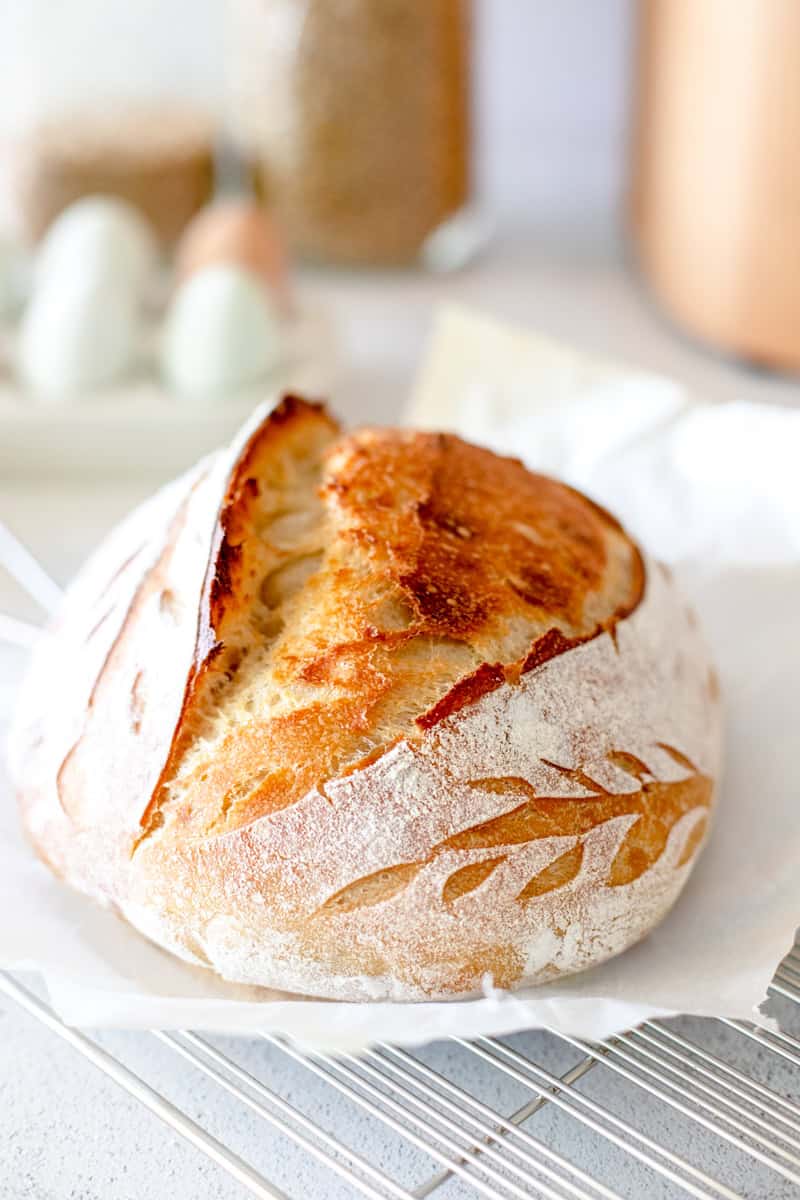
- Purpose: Deep cuts, often made with a straight or cross slash, serve as more than just visual flair; they have a functional role. These cuts allow the expanding dough to release steam during baking, preventing the loaf from cracking unpredictably. It directs the oven spring, helping the bread rise evenly and create a controlled "oven spring."
- Result: The deep cuts result in a classic rustic appearance with a well-defined separation between the scored sections. They help control the bread's rise and achieve the desired texture inside during the baking process.
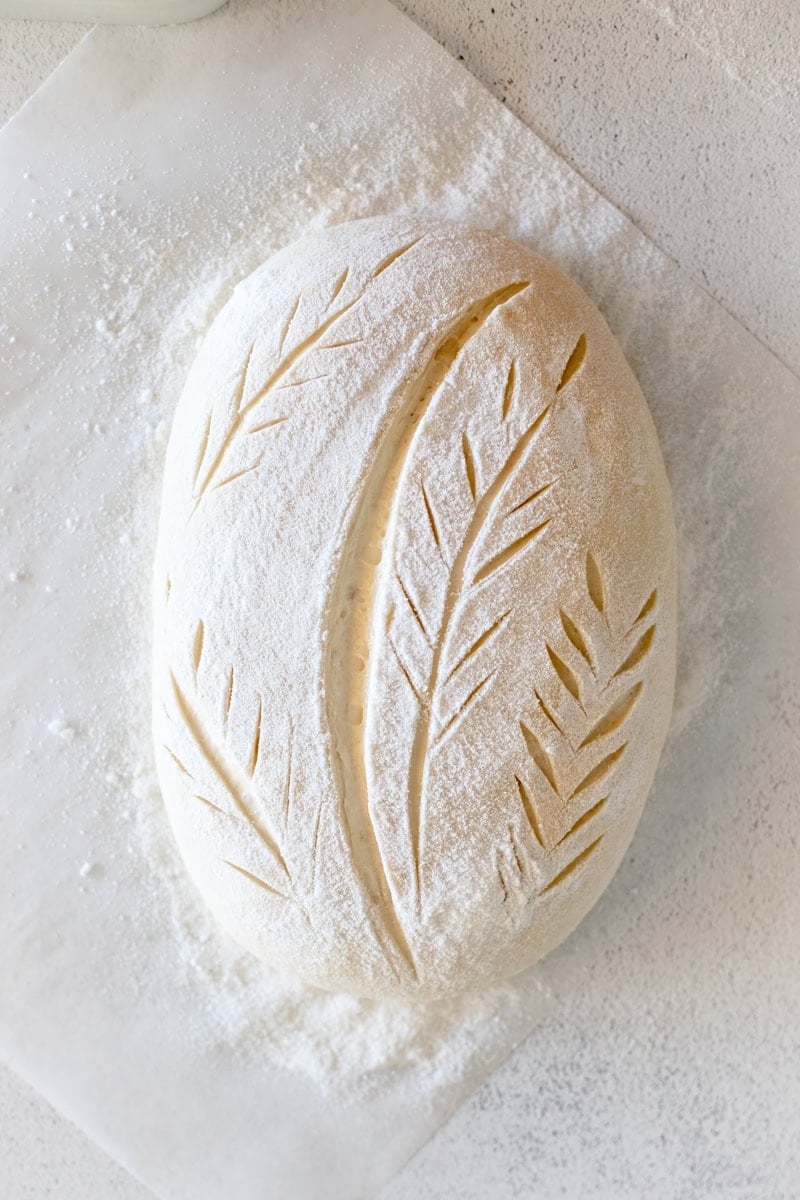
Shallow Decorative Cuts:
- Purpose: Shallow decorative cuts, on the other hand, are primarily about aesthetics and personal expression. They don't serve a functional role in steam release or oven spring control. These cuts are an opportunity to get creative and add a unique touch to your bread, making it visually appealing.
- Result: Decorative cuts can result in intricate patterns, waves, or other artistic designs on the bread's surface. They showcase your creativity and can make your sourdough loaves stand out as a work of art.
A general rule for scoring sourdough is to include at least one deep cut that runs the length of the unbaked loaf. Once you've created a primary score, you can then add any decorative shallow cuts if you want!
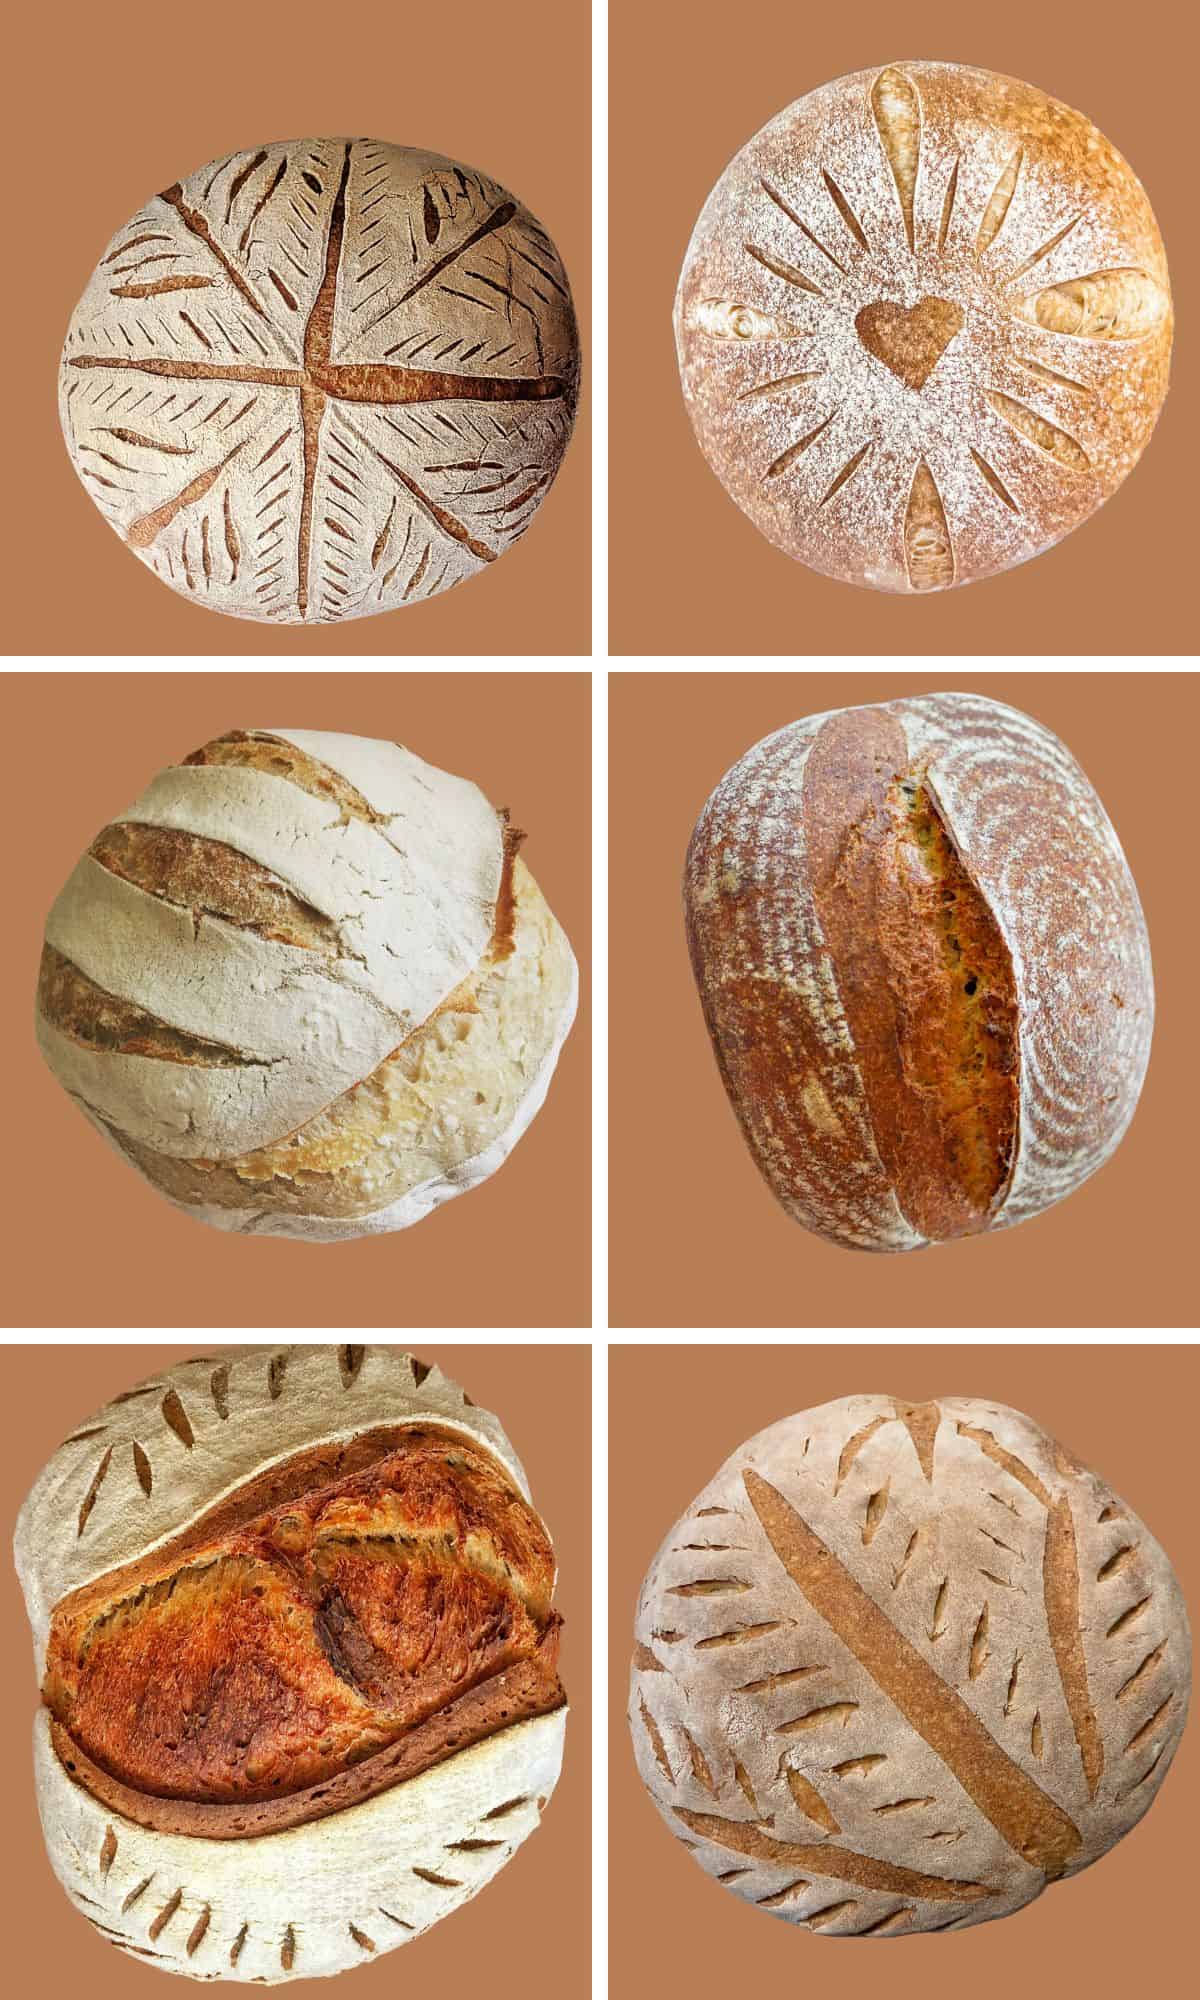
What are unique ways to create a scoring pattern?
I'm always looking for unique decorative scoring patterns and funky methods to try! Some of my favorite so far have been using baking twine to make a sourdough "pumpkin." Here are some techniques I've tried that I think you'll like, including the use of scissors and different blades:
- Scissor Snips: Scissors are a handy tool for creating unique designs. Just snip the surface of the dough at various angles to make irregular cuts that form interesting patterns. Try crisscrossing lines or curving shapes for an artistic touch. This works especially well for creating a raised zig-zag pattern.
- Leafy Designs: To give your bread a natural, rustic look, consider using fresh or dried leaves from edible plants like rosemary or sage. Place the leaves on top of the dough and gently press them in. Then, make your cuts around and over the leaves. When you remove the leaves after baking, you'll have beautiful leafy imprints on your bread. Flowers like pansies and lavender are fair game, too!
- Stencil Scoring: Craft stencils can be used to create precise designs. Lay the stencil on top of your dough and carefully score along its edges. You can find or make stencils with various patterns, from geometric shapes to intricate motifs.
- Wavy Blades: Invest in specialty scoring blades with wavy or serrated edges. These blades can produce unique textures and patterns on the bread's surface. Experiment with different angles and depths for varying effects.
- Creative Freehand: Don't be afraid to go freehand with your scoring. Draw inspiration from nature, art, or your surroundings. You can create waves, swirls, stars, or any pattern that inspires you. The key is to have fun and let your imagination run wild. You can use a straight cut or deep single slash to create a decorative pattern.
- Multiple Blades: Try using multiple blades or razors simultaneously. Place them side by side or at various angles to create complex and eye-catching designs. This can result in striking and intricate patterns on your bread.
- Cookie Cutters: If you have small cookie cutters, press them gently onto the dough's surface, creating shapes that stand out when the bread bakes. Remove the cutters before placing the dough in the oven.
- Wheat Design: For a rustic, homestead-inspired look, score a "wheat sheaf" design on your bread. It resembles a bundle of wheat tied together with a bow or individual wheat stalks. This is a more intricate pattern and will challenge your creativity (in a good way)!
Troubleshooting Common Scoring Issues
Now, don't worry if you mess up – we've all been there. Sometimes, you might encounter tearing or uneven cuts. It's all part of the learning process.
I've had loaves that looked like they went through a wild knife fight, but they still tasted amazing. Learn from your missteps and keep on scoring!
Like anything in life, practice makes perfect. Start with the basics and gradually work your way up to more complex designs.
With time and a little flour-covered determination, you'll become a scoring maestro.
The Final Bake
Okay, you've scored your dough masterpiece, and now it's time to bake it to perfection. Remember, scoring isn't just for looks; it affects your bread's rise and crust. So, pay attention to the details, and you'll be rewarded with a beautifully scored loaf.
To wrap it all up, sourdough scoring is both an art and a science. Don't be afraid to experiment, have fun, and embrace imperfections. Share your bread triumphs and blunders with the world – we're all in this doughy adventure together.
Got a scoring success story or a beautifully scored loaf? Share it with me on here on the blog or social media. And hey, while you're here, check out our other sourdough adventures and recipes!
Happy scoring, my sweet sourdough friend!
-Meg
More posts about sourdough baking, sourdough recipes and techniques!
Here's a round up of some of my most popular posts about sourdough, but there are so many more! Check out my sourdough category page for a more comprehensive list.
I also always tell friends that the first thing the need to learn is how to make a sourdough starter, followed by my most-loved artisan sourdough loaf recipe.
Once you start baking, be sure to try my sourdough discard coffee cake! It has so many reviews from bakers who love it!


I'm new to sourdough but have made 1/2 dozen loaves or so. I can't get my lame to break through the top of the dough. I end up with shallow, ineffective cuts, deflating of my dough, and then little rise in the oven. The bread tastes good but what am I doing wrong? Am I not proofing the dough enough or overproofing? I've tried knives and lames. I've tried refrigerating the dough and not refrigerating it prior to scoring.
When your dough comes out of the fridge and is nice and chilled, the lame won't break through? I use the corner of the blade and go over my strokes a few times to get the proper depth. The decorative cuts are usually very shallow and just break through the top layer, while the middle cut is about a quarter to half inch deep and I have to usually retrace my cut a few times to get it deep enough. It sounds like you are doing this correctly, I'm wondering if your lame isn't sharp enough for some reason?