
Chocolate Peanut Butter Oreo Icebox Cake
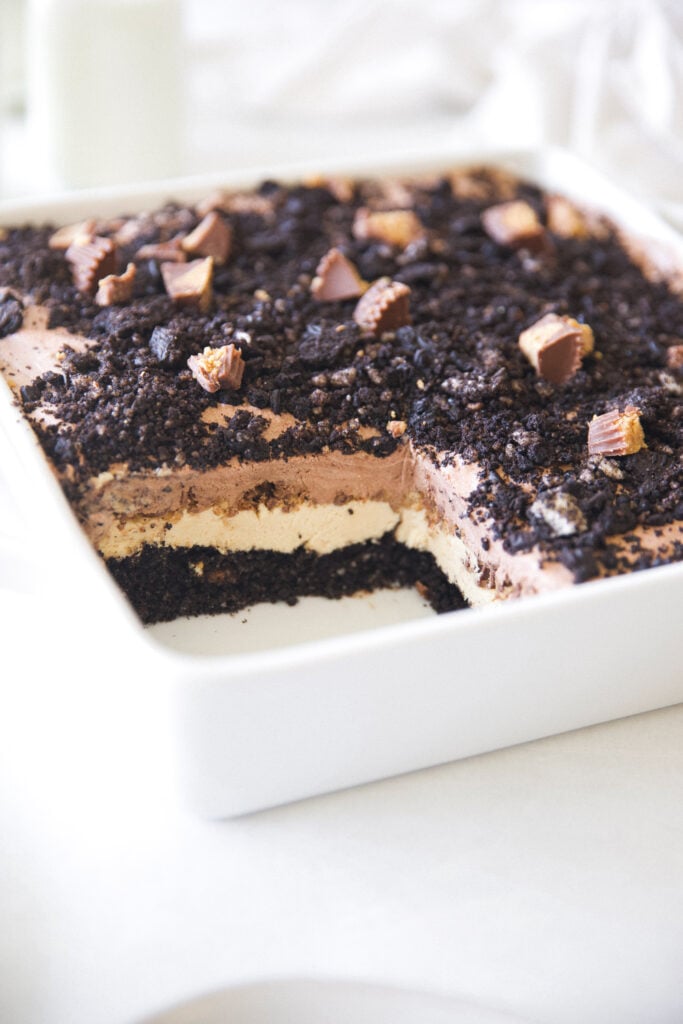
This Chocolate Peanut Butter Oreo Icebox Cake is an easy, no-bake dessert made with layers of crunchy Oreo cookie crust, creamy peanut butter cheesecake filling, rich chocolate pudding, and whipped topping. The recipe came from my grandma's recipe box, and it's one of those old-fashioned desserts that's perfect for potlucks, holidays, and family gatherings. Make it ahead of time and serve it chilled straight from the refrigerator!
What Makes This Oreo Icebox Cake So Irresistible?
Think peanut butter cheesecake meets chocolate pudding, layered over a buttery Oreo cookie crust. There's a lot going on in this dessert, but trust me, it all works sooo deliciously together!
The peanut butter cheesecake filling is made with cream cheese, peanut butter, powdered sugar, and whipped topping, with miniature Reese's peanut butter cups mixed in. It's smooth, creamy, and a little like a silky pudding pie, until you get a bite of those peanut butter cups. WOAH. So good!
And then there's the Oreo crust. Crushed Oreo cookies and melted butter make a rich, chocolatey base that holds all those creamy layers together.
Oreos, peanut butter, cream cheese... sounds like ready, set, go to me!
Ingredients for Oreo Icebox Cake
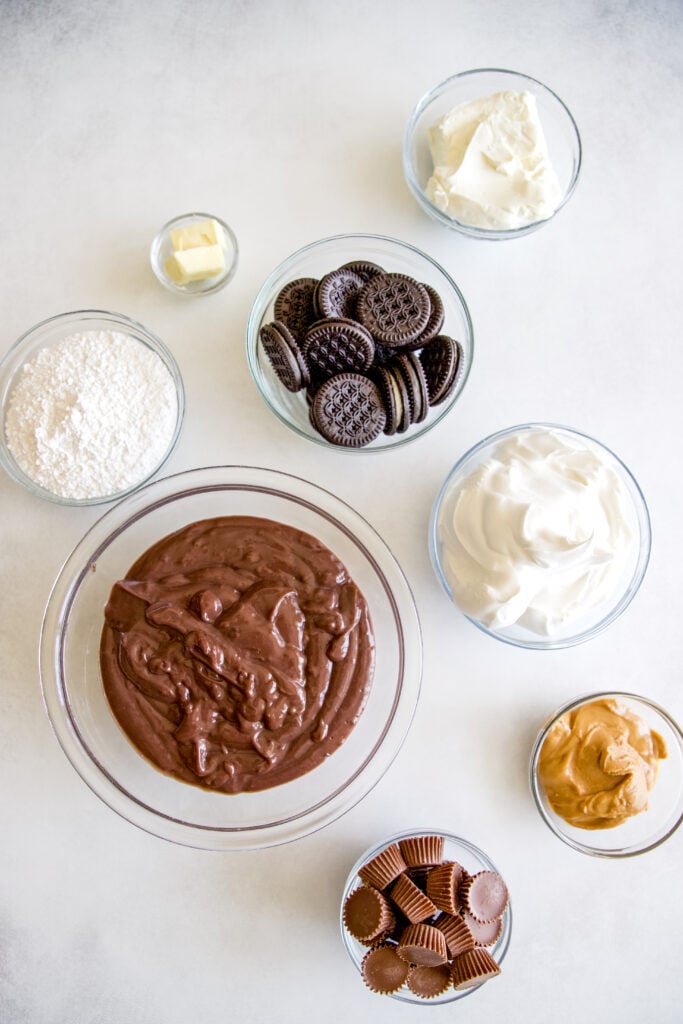
- Oreo cookies: All good no-bake desserts start with a crushed cookie crust, don't they? You won't need a full package of Oreos, so there should be plenty left for snacking!
- Butter: Melted butter holds the crushed Oreo cookies together to make a rich, crumbly chocolate crust.
- Cream cheese: This is what turns the peanut butter layer into a no-bake cheesecake filling. It's silky, smooth, and deliciously rich.
- Peanut butter: Creamy or crunchy peanut butter both work for this recipe! I prefer creamy for a smoother cheesecake filling.
- Powdered sugar: Sweetens the peanut butter cheesecake layer. You can even make your own by blending granulated sugar until it's finely powdered!
- Whipped cream: Whipped topping: Use homemade whipped cream or store-bought whipped topping, such as Cool Whip. Both work, although Cool Whip generally holds its shape better for make-ahead desserts.
- Miniature peanut butter cups: Remember those extra Oreos I mentioned? Well, that's not the case with the peanut butter cups! Save every last one for this dessert.
- Milk: Whole milk or 2% milk works best for preparing the chocolate pudding.
- Chocolate pudding: Instant chocolate pudding is quick and easy, but you can also use prepared, completely cooled cook-and-serve pudding. I love using my Homemade Chocolate Pudding when I'm making this for someone extra special!

How to Make Oreo Icebox Cake
- Make the Oreo crust. In a food processor, crush two-thirds of the Oreo cookies with the melted butter until fine crumbs form. Press the mixture evenly into the bottom of a 9-inch square baking dish. Set aside.
- Prepare the peanut butter cheesecake filling. In a stand mixer, beat the cream cheese, peanut butter, and 1 cup of powdered sugar until smooth and creamy. Gently fold in half of the whipped topping, then spread the mixture evenly over the Oreo crust.
- Add the peanut butter cups. Coarsely chop the miniature peanut butter cups with a chef's knife. Sprinkle three-fourths of the chopped candy over the peanut butter cheesecake layer.
- Make the chocolate pudding layer. In a large mixing bowl, whisk together the instant chocolate pudding mix, remaining powdered sugar, and milk for 2 minutes. Let stand for another 2 minutes to thicken, then gently fold in the remaining whipped topping. Spread evenly over the peanut butter cups.
- Top and refrigerate. Sprinkle the remaining crushed Oreo cookies and chopped peanut butter cups over the top. Cover and refrigerate overnight to allow the layers to set before serving.

Can Oreo Icebox Cake Be Made Ahead?
Absolutely! This Oreo icebox cake is a great make-ahead dessert for holidays, potlucks, and family gatherings. I recommend preparing it the night before serving so the chocolate pudding and peanut butter cheesecake layers have plenty of time to set.
You can make this dessert up to two days ahead of time. Simply cover the baking dish tightly with plastic wrap and keep it refrigerated until you're ready to serve. I prefer serving it straight from the refrigerator because the layers stay soft, creamy, and delicious!
Can You Freeze Oreo Icebox Cake?
Yes! If you prefer a firmer, ice cream-like dessert, this chocolate peanut butter Oreo icebox cake can also be frozen.
To freeze, prepare the recipe as directed and cover the baking dish tightly with plastic wrap, followed by two layers of aluminum foil. Freeze for up to two months.
When you're ready to serve, allow the dessert to soften in the refrigerator until it's easy to slice. The frozen version is especially delicious on hot summer days!
How Do You Store Leftover Oreo Icebox Cake?
Cover leftover Oreo icebox cake tightly with plastic wrap or transfer individual servings to an airtight container. Keep refrigerated and enjoy within 3–4 days. The Oreo crust will soften as it sits, but the creamy chocolate and peanut butter layers are still delicious!

Helpful Tips for Making Oreo Icebox Cake
- Make pressing the Oreo crust easier. The cookie crumbs can be a little sticky! Lightly spray your fingers with cooking spray before pressing the crust into the pan. My grandma always uses the wrapper from a stick of butter to press her crumb crusts. Give it a try and tell me what you think!
- Use cold milk. Cold milk helps instant pudding thicken quickly. For an extra-cold start, pop the milk in the freezer for about 30 minutes before making the pudding. Just don't let it freeze!
- Gently fold in the whipped topping. To keep the peanut butter cheesecake and chocolate pudding layers light and fluffy, gently fold in the whipped topping rather than vigorously stirring it. Avoid overmixing!
- Soften the cream cheese. Let the cream cheese come to room temperature before mixing it with the peanut butter and powdered sugar. This helps create a smooth, creamy filling without lumps.
Oreo Icebox Cake Variations
Love a good no-bake dessert? Here are a couple of fun ways to change up the flavors of this Oreo icebox cake!
- Peanut Butter Lover's Dessert: Can't get enough peanut butter? Try vanilla instant pudding instead of chocolate, swap the Oreo crust for crushed Nutter Butter cookies, and use Reese's Pieces in place of the miniature peanut butter cups. It's a peanut butter lover's dream!
More Old-Fashioned Dessert Recipes You'll Love
If you love easy, old-fashioned desserts that can be made ahead of time, here are two more family favorites!
- Banana Pudding with Nilla Wafers: Layers of creamy vanilla pudding, fresh bananas, and vanilla wafers make this classic dessert a family favorite.
- Chocolate Delight: Another delicious layered dessert with chocolate pudding and a creamy filling. Perfect for potlucks, holidays, and family gatherings!
- Vanilla Homemade Pudding: Skip the boxed mix and make rich, creamy vanilla pudding from scratch! It's delicious on its own or used in your favorite homemade desserts.
If you make this recipe, please leave a comment below! This provides helpful feedback to both me and other readers. For more delicious recipes from scratch and homesteading tips, follow me on instagram @NinnescahHomestead
Recipe
Chocolate Peanut Butter Oreo Icebox Cake
Equipment
- 9-inch square baking dish
- food processor
- stand mixer or electric mixer
- large mixing bowl
- whisk & rubber spatula
Ingredients
- 1 package oreo cookies divided
- 2 tablespoons butter room temperature
- 8 ounces cream cheese room temperature
- ½ cup peanut butter
- 1 ½ cups powdered sugar divided
- 16 ounces whipped topping thawed but cold
- 20 peanut butter cups
- 1 cup milk
- 1 instant pudding package
Instructions
- Make the Oreo crust. In a food processor, crush two-thirds of the Oreo cookies with the melted butter until fine crumbs form. Press the mixture evenly into the bottom of a 9-inch square baking dish. Set aside.
- Prepare the peanut butter cheesecake filling. In a stand mixer, beat the cream cheese, peanut butter, and 1 cup of powdered sugar until smooth and creamy. Gently fold in half of the whipped topping, then spread the mixture evenly over the Oreo crust.
- Add the peanut butter cups. Coarsely chop the miniature peanut butter cups with a chef's knife. Sprinkle three-fourths of the chopped candy over the peanut butter cheesecake layer.
- Make the chocolate pudding layer. In a large mixing bowl, whisk together the instant chocolate pudding mix, remaining powdered sugar, and milk for 2 minutes. Let stand for another 2 minutes to thicken, then gently fold in the remaining whipped topping. Spread evenly over the peanut butter cups.
- Top and refrigerate. Sprinkle the remaining crushed Oreo cookies and chopped peanut butter cups over the top. Cover and refrigerate overnight to allow the layers to set before serving.
Notes
Recipe Notes
- Chilling time: For the best texture, refrigerate overnight before serving. The chocolate pudding and peanut butter cheesecake layers need time to set.
- Room-temperature cream cheese: Soften the cream cheese before mixing to prevent lumps in the cheesecake filling.
- Whipped topping: Homemade whipped cream or store-bought whipped topping both work. Store-bought whipped topping generally holds its shape better for make-ahead desserts.
- Chocolate pudding: Instant pudding works best for quick preparation. Cook-and-serve pudding can also be used, but it must be prepared separately and cooled completely before assembling.
- Make ahead: Prepare up to 2 days in advance and keep covered in the refrigerator until serving.
- Freezer option: For a firmer, ice cream-like dessert, cover tightly and freeze for up to 2 months. Thaw in the refrigerator until soft enough to slice.
Nutrition
More Recipe's You'll Love
My Italian Cream Cake is three layers of decadent perfection! Coconut, pecans, cream cheese frosting... you will absolutely love it!
For a fruity dessert, try baking a pan of Fresh Peach Cobbler. It is a perfect dessert for a Sunday luncheon or cozy cold night.
For a more grownup dessert, try a Bourbon Bundt Cake. Does the thought of a boozy desert make your heart flutter? Oh my goodness, same here! Adding bourbon glaze gives this traditional buttermilk bundt cake recipe a sophisticated upgrade.
What's New on the Homestead




Perfect for the sweet tooth!
Came out great!