How to Make & Maintain a Clabber Culture
Learn how to make and maintain a traditional clabber culture using fresh raw milk. This old-fashioned fermented milk culture works similarly to a sourdough starter and can be used for homemade cheese, cultured butter, baking, and other farmhouse kitchen recipes.
Yield: 1 culture
Cost: $8
Materials
- 1 glass jar jelly jar, pint, or half-pint
- 1 rubber band or canning ring
- breathable cover such as a coffee filter
- spoon
- 1 pint milk raw
Instructions
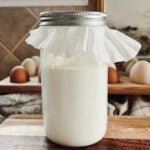
- Pour fresh raw milk into a clean glass jar, leaving a little room at the top for stirring and fermentation.
- If maintaining an existing culture, stir a spoonful of mature clabber into the fresh milk. If starting a fresh culture, you won't add anything.
- Cover the jar with something breathable like a coffee filter secured with a rubber band or a fabric jar cover. Avoid airtight lids, plastic wrap, or beeswax wraps while the milk is actively fermenting.
- Place the jar on the kitchen counter away from direct sunlight and allow it to sit undisturbed at room temperature. Once the cream separates to the top, skim it off. Do not stir the milk.
- Check the culture morning and night as it ferments. Depending on the temperature of your kitchen and the freshness of the milk, the timing can vary quite a bit. A fresh culture can take up to 3-4 days to ferment, while an active culture could be ready in 12-24 hours.
- Watch for the milk to thicken into a softly set, delicate texture that bulges slightly when the jar is tilted but no longer sloshes like liquid milk.
- Smell the culture as it develops. Healthy clabber should smell mild, creamy, lightly sweet, and pleasantly cultured — similar to plain yogurt.
- If the clabber becomes sharply sour, watery, heavily separated, moldy smelling, or unpleasant, discard it and begin again with fresh milk.
- Once the clabber reaches the stage you prefer, either use it immediately for cheesemaking, baking, cultured dairy recipes, or transfer it to the refrigerator to slow the fermentation process.
- To maintain the culture long-term, continue feeding fresh milk to a spoonful of mature clabber as needed.
Notes
- Healthy clabber should smell mild, creamy, and pleasantly cultured, not rotten, moldy, or sharply sour.
- Fermentation timing will vary depending on kitchen temperature, milk freshness, and season. Summer cultures often ferment much faster than winter ones.
- Raw milk that has never been chilled typically cultures more quickly when starting a brand-new clabber culture.
- Leave the jar undisturbed while fermenting. Shaking or stirring the milk repeatedly can disrupt the delicate texture as it thickens.
- If the culture becomes watery, heavily separated, overly bubbly, or aggressively tangy, it has likely over-fermented.
- Refrigerating the culture will slow the fermentation process if you need to pause feeding for a busy day or overnight.
- Mature clabber can be used in cheesemaking, pancakes, muffins, biscuits, cultured butter, smoothies, and other traditional farmhouse recipes.
- Small batches are often easier for beginners to manage and establish more reliably than large jars of milk.