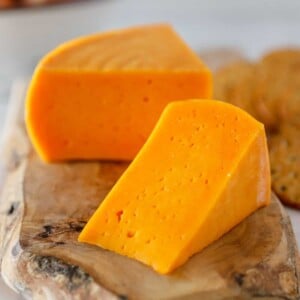
Colby Cheese
Making Colby cheese at home is a rewarding and simple process that yields a mild, creamy cheese perfect for slicing, melting, and snacking. Colby’s signature moist texture and gentle flavor make it a family favorite, and the best part is that you can make it with raw milk right in your kitchen!
Equipment
- cheese press
- large cheese mold
- large stock pot
- measuring spoons
- long handled knife and spoon
- strainer
- cheese cloth
Ingredients
Colby Cheese
- 2 gallons Milk raw, unpastuerized
- ½ teaspoon Mesophilic starter culture I'm using Flora Danica
- ½ teaspoon Rennet liquid, animal-based
- ¼ teaspoon Annatto
Instructions
- Start by slowly heating 2 gallons of raw milk to 86°F (30°C). Stir gently as it warms to avoid scorching.
- Sprinkle the Flora Danica starter culture over the surface of the milk. Let it sit for 2-3 minutes to rehydrate, then stir it in gently for about 30 seconds. Let the milk ripen for 1 hour, keeping the temperature steady at 86°F. A good trick is to place the pot in a sink filled with 86°F water.
- Dilute ½ teaspoon of liquid rennet in ½ cup of room-temperature, non-chlorinated water. If using annatto, dilute ¼ teaspoon in another ½ cup of water. Gently stir the diluted rennet and annatto into the milk using an up-and-down motion to mix it evenly.
- Let the milk sit undisturbed for 45-75 minutes until the curd sets. Check for a "clean break" by inserting a knife into the curd—if it comes out clean and the curd separates easily, you’re good to go. If not, let it sit a little longer. See the middle picture below for an example of what a clean break looks like and then cutting the curds.
- Once the curd is set, cut it into ½-inch cubes with a long knife. Let the curds rest for 5 minutes to firm up.
- Slowly heat the curds to 102°F (39°C) over 30 minutes, stirring gently with your hands or a long spoon to prevent clumping. The curds will shrink and firm as they cook. Hold them at 102°F for 10 minutes.
- Drain about one-third of the whey until it’s level with the curds. You can save this first round of whey for recipes like ricotta cheese or whey caramel! Add 70°F water to replace the whey, gently stirring to cool the curds to 90°F.
- Let the curds rest for 5 minutes. Repeat this process 1-2 more times (do not save whey - it will be too diluted), gradually cooling the curds to 75°F. This washing step reduces acidity, giving Colby its mild flavor. Once the curds reach 75°F, let them rest for 15 minutes.
- Pour off the whey and transfer the curds to a colander lined with cheesecloth. The whey will be very diluted by this point and isn't worth keeping for whey recipes.
- Pack the curds into a cheese mold lined with cheesecloth. Lightly press at 10 lbs of pressure for 1 hour. Remove the cheese, flip it over, rewrap it in cheesecloth, and press at 20 lbs for 1 hour. Rewrap again and press at 40 lbs for 1 hour. Finally, rewrap and press at 50 lbs for 8 hours or overnight.
- The total pressing time will be about 12 hours. Pressing a little longer will create a dryer textured cheese, shortening the pressing time will produce a softer Colby.
- After pressing, soak the cheese in a brine solution for 6 hours, flipping it halfway through (3 hours per side). Sprinkle a tablespoon of cheese salt on the exposed side, covering lightly and evenly. The brine enhances flavor and helps retain moisture. See picture below.
- Remove the cheese from the brine and let it air-dry (uncovered) on a rack for 1-3 days, flipping every 12 hours. The surface will feel like a 'clammy handshake' when it's ready for packaging.
Video
Notes
How to Make a Brine
- 1 gallon water
- 2 ¼ pounds cheese salt
- 1 tablespoon calcium chloride
- 1 teaspoon white vinegar
- Measure all ingredients into a large non-reactive pot, like stainless steel, and bring to a boil, stirring occasionally.
- Cool to room temperature before using. Store extra brine in mason jars in a cool, dark place.
Nutrition
Serving: 4ouncesCalories: 4542kcalCarbohydrates: 354gProtein: 248gFat: 242gSaturated Fat: 141gPolyunsaturated Fat: 8gMonounsaturated Fat: 52gCholesterol: 909mgSodium: 2877mgPotassium: 11356mgSugar: 364gVitamin A: 12265IUCalcium: 9312mg
Tried this recipe?Share it with us @NinnescahHomestead